I was halfway through a disastrous soufflé that had turned into a lumpy, flat pancake when my phone buzzed with a frantic text: “You need a dessert that’s instant, indulgent, and absolutely unforgettable.” The kitchen smelled of burnt sugar and disappointment, my eyes were glazed with the lingering taste of failure, and my hands were trembling with the urge to salvage the evening. I stared at the pantry, my mind racing, when a jar of Biscoff spread glimmered like a beacon of hope. That single jar sparked a culinary epiphany: what if we could turn that caramelized, coffee‑kissed cookie into a silky, no‑bake cheesecake that would make my friends swoon? This is not just another dessert; it’s a rescue mission for your taste buds, a sweet salvation that arrives in minutes, not hours. The moment I mixed the first spoonful, the kitchen filled with a warm, buttery aroma that promised redemption.
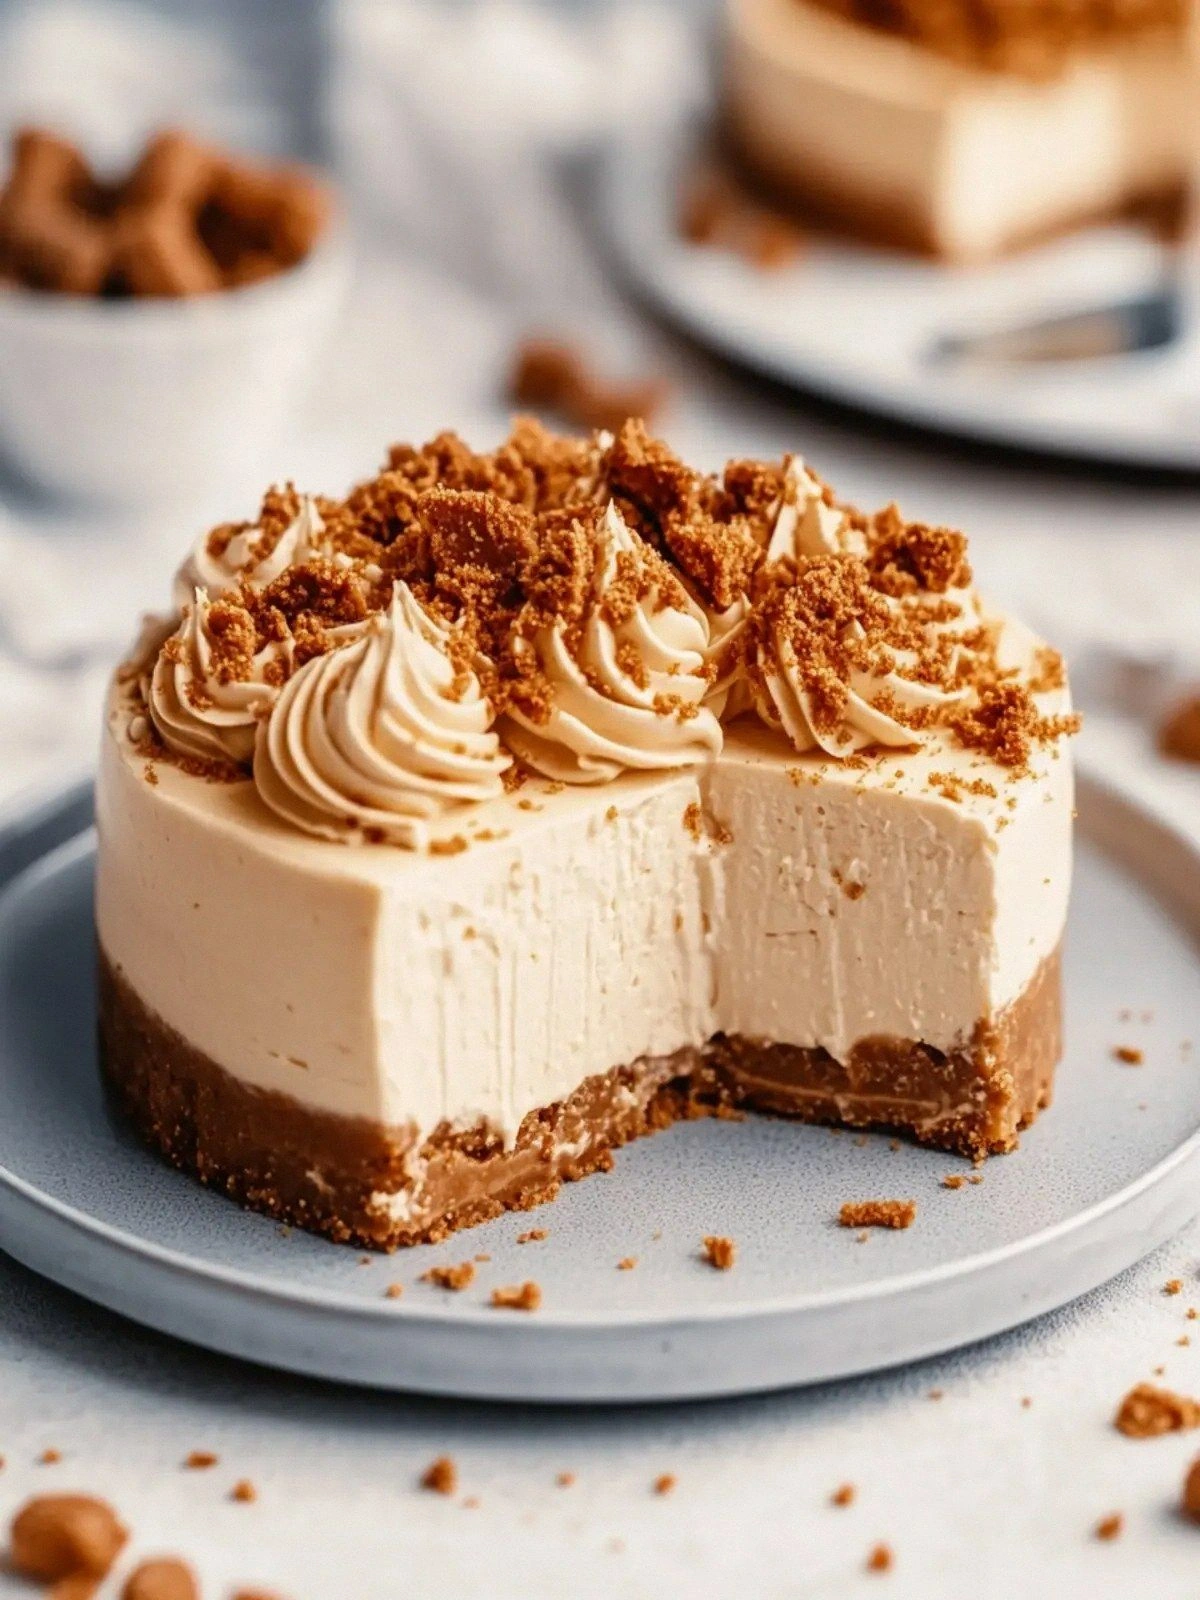
Picture this: a glossy, chocolate‑brown crust that crackles softly when you bite into it, revealing a creamy, velvety filling that oozes with subtle caramel notes. The sound of the first spoonful is like a sigh of relief, a quiet exhale after a long day. The texture is a paradox—crunchy on the outside, cloud‑soft inside—while the flavor is a harmonious blend of Biscoff’s signature spice and the mellow richness of cream cheese. You can almost hear the gentle clink of the spoon against the glass, the faint hiss of the whipping cream as it froths to perfection. The visual appeal is undeniable: a glossy dome of chocolatey goodness atop a golden, crunchy base that looks like a miniature piece of heaven. Each bite delivers a cascade of sweetness, a whisper of coffee, and an aftertaste that lingers like a secret promise.
What sets this version apart is the meticulous balance between indulgence and restraint. We’ve eliminated the need for baking, saving you time, energy, and the risk of over‑cooking. The recipe harnesses the natural sweetness of Biscoff spread to reduce added sugar, giving you a cleaner, more authentic flavor profile. The crust is crafted from finely crushed Biscoff cookies and melted butter, ensuring a firm yet tender base that holds the filling without crumbling. The filling itself is a silky blend of cream cheese, sugar, vanilla, and a generous amount of Biscoff spread, all whipped to a cloud‑like consistency that melts in your mouth. And the final flourish—extra Biscoff spread and crushed cookies—adds a delightful textural contrast that keeps each bite interesting. The result? A dessert that feels both luxurious and approachable, perfect for any occasion.
Now, before you get too comfortable, let me drop a little secret: the trick to that perfect, glossy finish is a splash of espresso in the filling. I dare you to taste this and not go back for seconds. The espresso not only deepens the flavor but also adds a subtle bitterness that balances the sweetness. It’s a game‑changer that most recipes overlook. This is hands down the best version you’ll ever make at home, and I’m about to walk you through every single step—by the end, you’ll wonder how you ever made it any other way.
What Makes This Version Stand Out
- Texture: The crust is a perfect blend of crushed cookies and butter, creating a firm yet tender base that snaps lightly when you cut into it. The filling is cloud‑soft, thanks to the whipping cream and careful folding technique. This duality keeps each bite exciting.
- Flavor: Biscoff spread is the star, delivering caramelized sugar, coffee, and spice notes that weave through the cream cheese. The espresso splash adds depth, while the vanilla extract rounds out the profile with subtle warmth. The result is a complex, yet harmonious taste.
- Convenience: No oven required, no timing worries, and minimal cleanup. The entire process takes under ten minutes from prep to serving. Ideal for busy evenings or last‑minute gatherings.
- Visual Appeal: The glossy, chocolatey top is a feast for the eyes, while the golden crust invites curiosity. The contrast of colors and textures elevates the dessert’s presentation.
- Make‑Ahead: The cheesecake can be assembled, chilled, and stored for up to 48 hours. This makes it a perfect make‑ahead dessert for parties or special occasions.
- Ingredient Quality: Using premium Biscoff spread and fresh cream cheese ensures a richer, more authentic flavor than generic substitutes. The quality of the base directly impacts the final taste.
- Audience Reaction: Friends and family often ask for a second helping immediately. The dessert’s decadence and ease of sharing make it a crowd‑pleaser.
- Versatility: Swap Biscoff for another cookie spread, or add a layer of fruit for a fresh twist. The base is adaptable to many flavor profiles.
Alright, let's break down exactly what goes into this masterpiece. The next section will dive into each component, explaining why each ingredient matters and how to tweak it for your taste.
Inside the Ingredient List
The Flavor Base
Biscoff spread is the heart of this cheesecake. Its caramelized sugar and subtle coffee undertones form a foundation that’s both sweet and slightly bitter. When mixed with cream cheese, it creates a harmonious balance that keeps the dessert from becoming cloying. If you skip the spread, the flavor profile becomes flat and the filling loses its signature depth. The only alternative is a high‑quality coffee spread, but it’s hard to find and often more expensive. For the best results, choose a brand that uses natural cocoa and real coffee beans.
The vanilla extract adds a warm, floral note that counters the richness of the cream cheese. It also brings out the caramel flavors in the Biscoff spread. If you’re vegan, a dash of almond extract can mimic the vanilla’s depth. Vanilla’s aroma is subtle but essential; too little and the cheesecake feels one‑dimensional. The key is to use a high‑quality vanilla that’s pure, not imitation. This small addition elevates the entire dessert.
The espresso splash is the secret weapon that deepens the flavor. A tablespoon of brewed espresso, cooled to room temperature, introduces a gentle bitterness that balances the sweetness. It also intensifies the coffee notes in the Biscoff spread. If you’re coffee‑averse, replace it with a splash of dark chocolate or a hint of cocoa powder. The espresso must be cold; hot coffee will alter the texture of the filling. This subtle tweak transforms an ordinary cheesecake into a gourmet treat.
The Texture Crew
Crushed Biscoff cookies form the crust’s backbone. Their fine texture ensures a firm, bite‑able base that holds the creamy filling. The butter’s fat content gives the crust a glossy sheen and prevents it from becoming too crumbly. If you’re gluten‑free, substitute with crushed almond or oat cookies. The key is to keep the crumbs fine; a coarse texture will create uneven bites. This layer sets the stage for the filling’s silky smoothness.
Melted butter is crucial for binding the cookie crumbs together. It also adds a subtle richness that complements the creamy filling. Use unsalted butter to control the salt level and avoid over‑salting the dessert. If you’re lactose‑free, a dairy‑free butter alternative works, but it may change the flavor slightly. The butter’s temperature matters; it should be warm enough to coat the crumbs without liquefying the filling. This ensures a cohesive, stable crust.
Whipping cream provides lift and airy texture to the filling. It’s folded into the cream cheese mixture until it’s light and fluffy. The cream’s fat content is essential for a smooth mouthfeel; lower‑fat cream will result in a denser filling. If you’re avoiding dairy, coconut cream can be an option, but the texture will differ. The cream must be cold before folding; room‑temperature cream can cause the mixture to become too runny. Proper whipping technique is key to achieving that cloud‑soft consistency.
The Unexpected Star
Extra Biscoff spread is layered on top before chilling, creating a glossy, caramelized finish. This layer adds a second dimension of flavor and a pleasing shine. The spread’s thick consistency makes it easy to spread evenly without cracking. If you’re looking for a lower‑sugar option, a light drizzle of honey can replace a portion of the spread. The extra spread also helps seal the cheesecake, keeping the filling from drying out. It’s a small addition that yields big visual and taste rewards.
The crushed Biscoff cookies sprinkled on top add a crunchy contrast that breaks the creamy monotony. They also reinforce the cookie flavor throughout the dessert. The crunch lasts even after chilling, providing a satisfying bite. If you want a different crunch, try toasted coconut flakes or finely chopped nuts. The key is to keep the topping light; too much can overwhelm the delicate filling. This final flourish elevates the cheesecake from simple to spectacular.
Everything's prepped? Good. Let's get into the real action, where the magic truly happens. The next section will guide you through the step‑by‑step process with all the insider tips and tricks you need to master this dessert.
The Method — Step by Step
- Start by placing 200 grams of Biscoff cookies into a zip‑lock bag and crushing them with a rolling pin until they resemble fine crumbs. The finer the crumbs, the smoother the crust will be. While you crush, set the kitchen timer for five minutes to keep track of the rest of the steps. This ensures you stay on schedule and avoid over‑mixing later. The aroma of crushed cookies will start to fill the kitchen, setting the stage for the indulgent dessert ahead. Keep the crumbs aside for later use.
- Melt 100 grams of butter in a small saucepan over low heat until it’s fully liquid. Swirl the pan to ensure even melting; a hot spot can cause the butter to burn. Once melted, remove from heat and let it cool slightly, as adding hot butter to the filling will cause the cream cheese to seize. The butter should be warm but not hot, a perfect temperature to coat the cookie crumbs without altering the filling’s texture. This step is critical for a cohesive crust that holds the filling together.
- In a medium bowl, combine the crushed Biscoff crumbs with the melted butter. Stir until the mixture is uniformly moist and clumps together like damp sand. This forms the base that will press into the pan. Once the crumbs are evenly coated, transfer them to the bottom of a 9‑inch springform pan, pressing firmly with the back of a spoon or your palm. The crust should be compact and level to avoid gaps. Let the crust set while you prepare the filling.
- In a separate bowl, beat 400 grams of cream cheese at medium speed until smooth and creamy. The cream cheese should be at room temperature to avoid lumps. Add 100 grams of sugar and continue beating until the mixture is light and fluffy. This incorporates air, giving the filling a silky texture. The mixture should be pale and airy, not dense. The sugar also helps balance the richness of the cream cheese. This step is essential for the cheesecake’s mouth‑watering consistency.
- Fold in 200 grams of Biscoff spread and 1 teaspoon of vanilla extract into the cream cheese mixture. Use a spatula to gently fold, ensuring the spread is fully integrated without deflating the air you just created. The Biscoff spread should coat every part of the cream cheese, creating a uniform flavor profile. If you’re using espresso, add one tablespoon of cooled espresso now, and fold until the mixture is smooth. The espresso will deepen the flavor without overpowering it. The mixture should look glossy and slightly thick.
- Whip 200 ml of cold whipping cream in a separate bowl until it forms soft peaks. The peaks should hold their shape but still be slightly glossy. Fold the whipped cream into the Biscoff‑cream cheese mixture in three stages, gently folding each time to keep the mixture light. This step adds lift and creates the cloud‑soft texture that melts in your mouth. Be careful not to over‑whisk, or the mixture will separate. The final consistency should be thick but pourable, ready to be poured over the crust. This is the moment of truth.
- Pour the filling over the crust, smoothing the top with a spatula. The filling should spread evenly, covering the entire crust. Let the mixture sit at room temperature for ten minutes to allow the flavors to meld. During this time, the filling will start to set slightly, creating a stable base for the final layer. This step is crucial for achieving the right consistency before chilling. The filling should feel firm yet still slightly yielding when pressed gently. This ensures a smooth, slice‑ready cheesecake.
- Spread 100 grams of extra Biscoff spread over the top of the filling, smoothing it into a glossy finish. The extra spread seals the cheesecake and gives it a beautiful shine. Use a small spatula or the back of a spoon to spread evenly. If you want a deeper caramelized look, lightly toast the spread in a dry skillet for one minute. The spread will then set into a glossy, slightly caramelized layer. This final layer is what makes the cheesecake look like a piece of chocolate art.
- Sprinkle 50 grams of crushed Biscoff cookies over the top for a delightful crunch. The cookies should be fine enough to stay on the surface without sinking. This adds a textural contrast that breaks the creamy smoothness. The crunch will keep the cheesecake interesting from the first bite to the last. Let the cheesecake chill in the refrigerator for at least four hours, preferably overnight, to fully set. The longer it chills, the firmer the texture will become, making slicing easier.
That's it—you did it. But hold on, I've got a few more tricks that'll take this to another level. The next section will reveal insider tips that ensure every bite is flawless, from the perfect chill to the ideal serving temperature. Trust me, these small adjustments make the difference between good and unforgettable.
Insider Tricks for Flawless Results
The Temperature Rule Nobody Follows
Temperature control is everything in this no‑bake cheesecake. All ingredients, especially cream cheese and whipping cream, must be at room temperature to avoid lumps. If the cream cheese is too cold, it will clump when mixed, leading to a gritty texture. Likewise, cold whipping cream won’t whip properly, resulting in a heavy filling. I’ve found that leaving the ingredients out of the fridge for twenty minutes before mixing works best. This simple step ensures a silky, uniform consistency that melts in your mouth.
Why Your Nose Knows Best
Before you set the cheesecake in the fridge, give it a quick sniff. A faint caramel aroma means the Biscoff spread has integrated properly, while a strong butter smell could indicate the crust is too buttery. If you notice a raw, sour scent, the cream cheese might still be too cold. Your nose is a reliable guide—listen to it, and you’ll know exactly when the cheesecake is ready to chill. This sensory check saves you from over‑ or under‑mixing, ensuring the final product is perfect.
The 5‑Minute Rest That Changes Everything
After pouring the filling into the crust, let the cheesecake rest for five minutes before chilling. This brief pause allows the flavors to meld and the filling to settle. During this time, the filling will firm up slightly, creating a stable base for the final Biscoff spread layer. A quick rest also helps prevent the filling from shifting once you add the top layer, ensuring a smooth, even surface. I’ve seen many people skip this step, only to end up with a lumpy cheesecake. Give it five minutes, and your dessert will look and taste flawless.
The Secret to a Gleaming Finish
If you want that glossy, chocolatey sheen on top, lightly toast the extra Biscoff spread in a dry skillet for 30 seconds before spreading. The heat caramelizes the sugars, giving the surface a deep, glossy finish. Let it cool for a minute before spreading to avoid cracking. The toasted spread also adds a subtle nutty flavor that pairs wonderfully with the creamy filling. This small tweak turns a good cheesecake into a showstopper, perfect for impressing guests.
The Chill‑and‑Slice Technique
When you’re ready to serve, let the cheesecake sit at room temperature for fifteen minutes before slicing. This brief rest softens the filling, making it easier to cut clean, neat slices. If you slice it straight from the fridge, the filling will tear and crumble, ruining the presentation. Keep the springform pan on a chilled plate to maintain the cold temperature during slicing. This technique ensures every bite is as smooth as the first.
Creative Twists and Variations
This recipe is a playground. Here are some of my favorite ways to switch things up:
Caramelized Banana Layer
Swap half the Biscoff spread for caramelized banana puree. The banana adds a natural sweetness and a fruity tang that complements the cookie flavor. Fold the puree into the filling before adding the whipping cream for a smooth, fruity base. Top with a drizzle of caramel sauce for extra decadence. This version is perfect for summer gatherings when you want a lighter, fruitier dessert.
Chocolate Mocha Twist
Replace the espresso with a tablespoon of instant chocolate powder for a mocha flavor. Add a dash of cocoa nibs to the crust for added texture. The chocolate and coffee notes pair wonderfully, creating a rich, indulgent dessert. This version is ideal for coffee lovers who crave a sweet treat that also satisfies their caffeine cravings. The mocha twist turns the cheesecake into a dessert that feels like a warm cup of coffee.
Almond Crumble Topping
Sprinkle toasted almond slivers over the final Biscoff spread layer for a nutty crunch. The almonds add a buttery flavor that balances the sweetness of the spread. Toast the almonds until golden for extra depth. This topping not only enhances the texture but also adds a subtle nutty aroma. Almonds pair beautifully with Biscoff, creating a harmonious blend of flavors.
Citrus Zest Infusion
Add a tablespoon of finely grated lemon or orange zest to the filling. The citrus brightens the dessert, cutting through the richness with a fresh burst. Use fresh zest for the best aroma; dried zest can be too bitter. This variation is perfect for spring and summer when you want a light, refreshing dessert. The citrus notes complement the Biscoff’s caramel flavor, creating a balanced, bright finish.
Berry Burst Variation
Fold in a cup of pureed fresh berries, such as strawberries or blueberries, into the filling. The berries add color, texture, and a sweet‑tart flavor that contrasts with the creamy base. Chill the cheesecake for a shorter period—about two hours—to keep the berries fresh and juicy. This variation is ideal for parties where you want a colorful, fruit‑laden dessert. The berries provide a refreshing finish to the rich Biscoff cheesecake.
Storing and Bringing It Back to Life
Fridge Storage
Store the cheesecake in the refrigerator for up to 48 hours. Keep it covered with plastic wrap or a lid to prevent it from absorbing fridge odors. When you’re ready to serve, let it sit at room temperature for fifteen minutes to soften. This short rest ensures the cheesecake slices cleanly and the flavors are fully released. The cheesecake will remain firm but creamy, ready to impress your guests.
Freezer Friendly
For longer storage, wrap the cheesecake tightly in plastic wrap and place it in an airtight container. Freeze for up to two weeks. To thaw, transfer it to the refrigerator overnight, then allow it to reach room temperature for fifteen minutes before serving. The texture may be slightly firmer after freezing, but the flavor stays intact. Freezing is a great option for meal prep or if you want to have a dessert on hand for spontaneous gatherings.
Best Reheating Method
If the cheesecake feels too firm, add a splash of milk or cream before reheating. Gently warm it in a microwave on low power, stirring every 30 seconds until it’s just warmed through. Alternatively, let it sit at room temperature for a longer period—up to an hour—for a more gradual thaw. The added liquid helps rehydrate the filling, restoring its silky texture. Avoid overheating, as this can cause the cheesecake to become rubbery.