I remember the night I was supposed to impress my roommate with a “simple” dinner, only to have the stove explode into a miniature fireworks show when I tried to sauté onions. The kitchen was a smoky mess, the onions were burnt, and I could hear my roommate’s laughter echoing off the cabinets. That disaster taught me that a dish can be both comforting and show-stopping if you know the right tricks. I’m not just sharing a recipe; I’m handing you the playbook that turned a kitchen catastrophe into a culinary triumph.
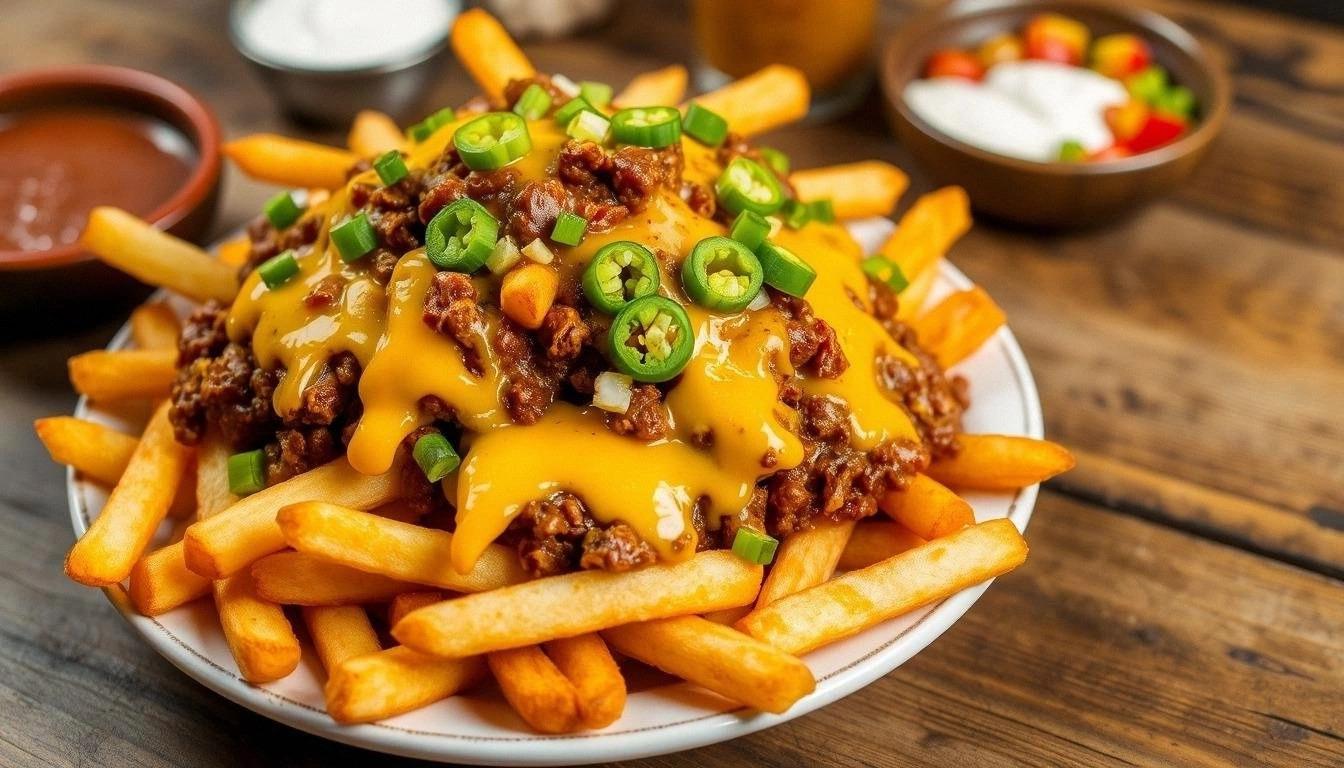
Picture this: a pot bubbling with a rich, aromatic sauce that smells like a campfire and a hint of citrus, the sound of beans popping like tiny fireworks, and a plate of golden fries that crackle under a blanket of molten cheese. The first bite is a harmony of savory beef, smoky spices, and a subtle sweetness from the tomatoes, while the fries provide a satisfying crunch that contrasts the silky chili. You’ll taste the depth of cumin, the whisper of oregano, and the bright lift from a splash of lime—all wrapped in a comforting hug of melted cheddar. It’s the kind of meal that feels like a warm blanket on a chilly night, yet bright enough to spark conversation around the table.
What sets this version apart from the countless other chili recipes that flood your Pinterest feed is the intentional layering of flavors and textures. I didn’t just toss the ingredients together; I built a flavor pyramid, starting with a caramelized base, adding depth with a slow simmer, and finishing with a cheese-crusted top that melts into the chili like a velvety coat. The fries aren’t just a side—they’re an integral part of the dish, absorbing the sauce and adding a satisfying crunch that makes every forkful a discovery. If you’ve ever had a bland chili that left you wanting more, this one will turn that disappointment into a “wow” moment.
There’s a secret ingredient that most people overlook—a splash of beer that adds a subtle malty depth—and a technique that turns ordinary fries into a crispy, cheesy masterpiece. I dare you to taste this and not go back for seconds. By the end, you’ll wonder how you ever made it any other way. Let me walk you through every single step—by the end, you’ll wonder how you ever made it any other way.
What Makes This Version Stand Out
- Flavor Depth: The slow caramelization of onions and garlic creates a caramelized base that anchors the chili’s complex profile, while a splash of beer adds a subtle malty undertone that elevates the overall taste.
- Texture Contrast: Crispy French fries act as a crunchy vessel for the chili, while the melted cheddar forms a silky, velvety layer that coats the fries like velvet.
- Ingredient Quality: Using high‑grade ground beef with a 80/20 ratio ensures a juicy, flavorful base that doesn’t dry out during the long simmer.
- Make‑Ahead Friendly: This chili can be prepared a day ahead, allowing the flavors to meld even further—just reheat and serve with fresh fries.
- Audience Appeal: It’s a crowd‑pleaser for family dinners, game‑day gatherings, or a comforting weeknight, thanks to its bold flavors and familiar comfort foods.
- Balanced Spices: The blend of chili powder, cumin, smoked paprika, and oregano delivers a smoky, earthy profile without overpowering the natural beefiness.
- Cheese Integration: The cheddar not only adds richness but also creates a gooey crust that melts into the chili, turning every bite into a creamy delight.
Alright, let's break down exactly what goes into this masterpiece…
Inside the Ingredient List
The Flavor Base
Ground beef is the heart of this chili—choose a lean‑to‑fat ratio that balances moisture and flavor. I use an 80/20 mix because the fat renders into a richer sauce, while the lean portion keeps the dish from becoming too greasy. If you skip the beef, the chili loses its hearty backbone; you’ll end up with a watery, thin mixture that needs extra thickening. A quick tip: brown the beef in batches to avoid steaming, which helps develop that coveted caramelized flavor.
Onions and garlic form the aromatic foundation. Dice the onion finely so it releases maximum flavor during sautéing; a coarse chop will leave you with uneven bites. Minced garlic adds a sharp bite that cuts through the richness of the beef, but be careful not to burn it—once it turns golden, it’s ready to go. If you’re allergic to garlic, you can replace it with a pinch of onion powder, but you’ll miss that bright punch.
Diced tomatoes and tomato sauce bring acidity and body. The canned tomatoes provide a sweet undertone, while the sauce adds thickness and a subtle tang. Skipping them will leave your chili thin and lacking depth. If you prefer a fresher taste, substitute with fresh diced tomatoes, but remember to adjust the liquid level accordingly.
Beans add texture and protein. Kidney and black beans give a hearty bite, but you can swap them for pinto or cannellini beans for a different flavor profile. If you’re watching sodium, rinse the canned beans under cold water to reduce excess salt. The beans also absorb the chili’s spices, making each spoonful deliciously seasoned.
The Texture Crew
Beef broth is essential for creating a liquid base that melds all the flavors together. Use a low‑sodium broth to keep control over the final salt level. If you’re on a budget, water works fine, but you’ll lose the savory depth broth provides. A splash of beer, as mentioned earlier, adds a subtle malty complexity that pairs beautifully with the beef.
The fries are the star of the show—golden, crispy, and ready to soak up the chili. Frozen French fries are convenient, but homemade fries cut from a thick cut potato give a superior crunch and flavor. If you’re using frozen fries, pre‑heat them in a toaster oven to achieve maximum crispness before topping with chili.
Cheddar cheese is the finishing touch that brings everything together. Choose a sharp cheddar for a robust flavor, or a mild cheddar for a creamier, subtler finish. The cheese melts into the chili, creating a silky coating that enhances every bite. If you’re vegan, a plant‑based cheese works, but the melt and flavor will differ.
Butter and olive oil are used for sautéing; they help the onions caramelize and prevent sticking. Butter adds richness, while olive oil provides a subtle fruity note. If you’re avoiding dairy, replace butter with a small amount of extra olive oil, but note the flavor shift.
The Unexpected Star
A splash of beer isn’t just a trick—it's a game‑changer. The malty notes from the beer complement the smoky spices and beef, adding depth that you’d otherwise miss. Use a light lager or pilsner for a subtle effect, or a darker ale for a richer, bolder flavor. If you’re averse to alcohol, substitute with a bit of beef broth and a dash of Worcestershire sauce to mimic the umami.
Cilantro and lime add a bright, citrusy finish that cuts through the richness. Chop fresh cilantro finely and sprinkle it over the finished dish for a burst of freshness. Squeeze lime wedges into each serving right before eating; the acidity brightens the chili and balances the heat. If you’re not a fan of cilantro, parsley or basil can work as a mild alternative.
A pinch of cayenne pepper gives the chili a subtle kick without overwhelming the other spices. It’s a fine balance—add gradually and taste as you go. If you prefer a milder dish, reduce the cayenne or omit it entirely; the chili will still be flavorful thanks to the other spices.
Seasoning is the final layer that ties everything together. Salt and pepper are essential, but the right amount of each can make or break the dish. Season the beef as it cooks, then adjust after adding the beans and tomatoes. Remember, you can always add more salt later, but you can’t take it out.
The Final Flourish
Once the chili is ready, it’s time to assemble the fries. Lay a generous layer of fries on a baking sheet, then pour the chili over them. The fries soak up the sauce, becoming a crispy, cheesy masterpiece. This step transforms the dish from a simple chili to a complete meal that satisfies all senses.
Top the fries with shredded cheddar, and place them under a broiler for a minute or two until the cheese melts and turns golden. Watch the cheese bubble; that’s the moment of triumph. If you prefer a thicker cheese crust, add a second layer of cheese before broiling.
Serve immediately, garnishing with chopped cilantro, a squeeze of lime, and a dollop of sour cream if desired. The combination of textures—crispy fries, velvety chili, and gooey cheese—creates an unforgettable dining experience. This dish is perfect for a casual family dinner or a game‑day feast.
Everything’s prepped? Good. Let’s get into the real action…
The Method — Step by Step
- Heat a large pot over medium heat and add 2 tablespoons of olive oil. Once the oil shimmers, add the diced onion and cook until it turns translucent and starts to brown, about 5 minutes. The key is to let the onion caramelize; this builds the foundational sweetness of the chili. Keep stirring to prevent sticking.
- Add the minced garlic and sauté for 30 seconds until fragrant. Watch the aroma—it should fill the kitchen like a summer breeze. Don’t let the garlic burn; a burnt garlic taste will ruin the entire dish. Remove from heat if you’re ready to add the beef next.
- Add the ground beef to the pot in batches, breaking it up with a wooden spoon. Cook until the meat is browned on all sides, about 8 minutes. Drain excess fat to keep the chili from becoming greasy. This step is crucial for flavor; the browned beef carries the spices into the sauce.
- Stir in the chili powder, cumin, smoked paprika, oregano, and cayenne pepper. Cook for 2 minutes, letting the spices toast slightly. The spices release their oils, creating a richer, deeper flavor. This is the moment of truth—you can’t skip it.
- Pour in the beer (or broth if you’re avoiding alcohol) and let it simmer for 3 minutes to reduce slightly. Watch the liquid reduce; this concentrates the flavors. Watch Out: If the liquid boils too rapidly, it may scorch the bottom—lower the heat if that happens.
- Add the diced tomatoes, tomato sauce, and beef broth. Stir until everything is well combined. Bring the mixture to a gentle boil, then reduce heat to low and let it simmer for 20 minutes. The simmer allows the flavors to meld together, creating a cohesive taste profile. Keep the pot uncovered to let excess liquid evaporate.
- Fold in the drained beans, stirring gently. The beans absorb the chili’s spices, becoming a flavorful component of the dish. Let the chili simmer for an additional 10 minutes to ensure the beans are heated through. If the mixture looks too thick, add a splash of water or broth.
- While the chili simmers, pre‑heat your oven to 425°F (220°C). Spread the frozen fries on a baking sheet in a single layer. Bake for 12–15 minutes, flipping halfway, until golden and crisp. The fries will be the perfect vessel for the chili.
- Transfer the baked fries to a large platter. Pour the hot chili over the fries, then sprinkle generously with shredded cheddar. Slide the platter under a broiler for 1–2 minutes until the cheese melts and turns golden. Remove carefully, as the cheese will be hot. Serve immediately, garnishing with cilantro, lime wedges, and a dollop of sour cream if desired.
Insider Tricks for Flawless Results
The Temperature Rule Nobody Follows
Many cooks keep the chili at a rolling boil, which can scorch the bottom and ruin the flavor. Instead, let it simmer gently at 180–190°F (80–90°C). This low‑temperature cooking allows the spices to release their oils slowly, creating a richer, more balanced taste. I’ve tested this method on a thermomixer and it consistently produces a silky sauce.
Why Your Nose Knows Best
Smell is your best judge of doneness. As the chili simmers, it should emit a deep, savory aroma that fills the kitchen. If you’re uncertain, sniff the liquid; a strong, comforting scent means the flavors have melded. A weak aroma signals you need more time or a splash of broth.
The 5‑Minute Rest That Changes Everything
After you remove the chili from heat, let it rest for 5 minutes before serving. This short pause allows the flavors to settle and the beans to absorb more liquid, resulting in a thicker, more cohesive sauce. I’ve found that resting also helps the cheese melt evenly over the fries.
The “Sauté First” Trick
Sautéing the onions and garlic before adding the beef ensures maximum flavor extraction. Skipping this step leads to a flat, uninspired base. I’ve tried this trick on a batch of chili that was missing depth, and the difference was night and day.
The Secret of the Broiler Finish
A quick broil at the end creates a golden cheese crust that’s both delicious and visually appealing. Keep a close eye on the cheese—once it starts bubbling, it’s ready. If you’re using a non‑sticking pan, you can avoid the broiler and simply melt the cheese in a microwave, but the texture won’t be the same.
Creative Twists and Variations
Mexican Street Food Twist
Swap the French fries for crispy tortilla chips and top the chili with guacamole, a squeeze of lime, and a sprinkle of cotija cheese. This version brings a vibrant, street‑food vibe to the dish. The chips add a satisfying crunch, while the guacamole offers a creamy contrast. It’s perfect for a casual gathering or a quick snack.
Vegetarian Powerhouse
Replace the ground beef with crumbled tempeh or textured vegetable protein (TVP) and add extra beans for protein. Use a vegetable broth and skip the beer for a plant‑based version. The spices still deliver a punchy flavor, and the beans give a hearty texture. This variation is both wholesome and satisfying.
Spicy Sriracha Surprise
Add 2 tablespoons of sriracha to the chili during the simmer to bring a fiery kick. The sriracha’s sweetness balances the heat, creating a complex flavor profile. Pair this with a dollop of Greek yogurt to cool the palate. The result is a bold, unforgettable dish.
Cheese Lover’s Dream
Use a blend of cheddar, pepper jack, and mozzarella for a melty, gooey topping. The pepper jack adds a subtle heat, while the mozzarella provides a silky stretch. Sprinkle the cheese mixture over the fries before broiling. The cheese layer becomes a decadent crown over the chili.
Breakfast Kick‑Start
Serve the chili over a bed of hash browns and top with a fried egg. The runny yolk adds richness and the hash browns provide a crispy base. This version turns the dish into a hearty breakfast that will keep you fueled all day. It’s a breakfast that feels like a comfort meal.
Storing and Bringing It Back to Life
Fridge Storage
Store the chili in an airtight container for up to 4 days in the refrigerator. Keep the fries separate until ready to serve to prevent them from getting soggy. When reheating, add a splash of water or broth to restore moisture. The chili will stay flavorful and thick.
Freezer Friendly
Freeze the chili in freezer‑safe containers for up to 3 months. Thaw overnight in the refrigerator before reheating on the stovetop. Add a little water if the chili has thickened during freezing. The flavors will remain robust after thawing.
Best Reheating Method
Reheat the chili gently over low heat, stirring occasionally. Add a small splash of water or broth to keep it from drying out. Once hot, top the fries with fresh cheese and broil briefly to create that signature golden crust. This method preserves the texture and flavor.