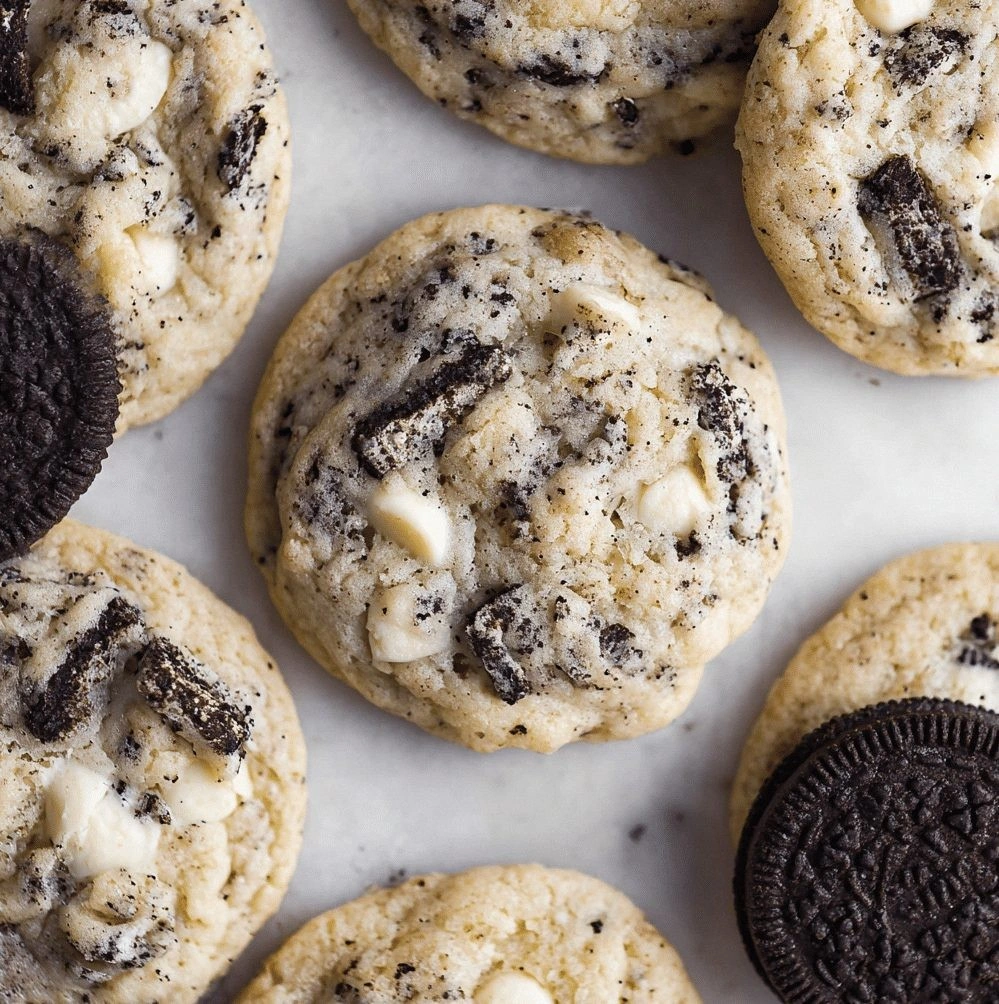
Cookies and Cream Cookies
Picture this: a midnight kitchen, the fridge humming, and you, a culinary daredevil, craving something sweet enough to make a dessert aisle blush. The moment you cracked an egg, the room smelled of vanilla and butter, like a bakery on a rainy day. Your friends dared you to create a cookie that could outshine the classic chocolate chip, and you accepted with a grin. You opened your pantry, pulled out a bag of Oreo cookies, and thought, “What if I could capture that creamy crunch inside a cookie?” This is the spark that turned an ordinary recipe into a culinary revelation.
From the first whisk to the final bake, every action in this recipe is a carefully orchestrated dance. The butter melts into a golden syrup, the sugars caramelize to a subtle amber hue, and the crushed Oreos disperse like tiny, chocolatey confetti. When you lift the first batch from the oven, the aroma is a heady mix of toasted flour and chocolate, promising a bite that feels like a creamy dream wrapped in a buttery shell. The texture is the holy trinity of cookie perfection: a crisp edge that shatters like thin ice, a chewy center that melts in your mouth, and a subtle crunch from the cookie crumbs. It’s the kind of cookie that makes you pause mid-bite, savor the moment, and then, inevitably, go back for seconds. I dare you to taste this and not go back for seconds.
The secret sauce? A blend of traditional cookie ingredients and a dash of innovation. Instead of the usual chocolate chips, I fold in crushed Oreos, giving each cookie a creamy, cookie dough flavor that’s impossible to ignore. The butter is softened just enough to blend seamlessly with the sugars, creating a dough that’s both tender and sturdy. I add a touch of baking soda to lift the dough, ensuring that each cookie rises just enough to keep that chewy center alive. The result is a cookie that feels like a piece of chocolate cake, yet has the comforting familiarity of a classic cookie. This is hands down the best version you'll ever make at home.
Most recipes get this completely wrong, focusing solely on texture and ignoring flavor depth. Here’s what actually works: a precise balance of sweet and salty, a slight underbake for that gooey center, and the strategic use of crushed cookies for that unmistakable creaminess. Picture yourself pulling this out of the oven, the whole kitchen smelling incredible, and seeing that golden sheen on each cookie as it cools. The anticipation is almost palpable. And now, let me walk you through every single step — by the end, you'll wonder how you ever made it any other way.
What Makes This Version Stand Out
- Taste: The combination of butter, sugar, and crushed Oreos creates a flavor profile that feels both nostalgic and novel. The cookies taste like a creamy chocolate dream with a buttery undertone, making each bite a delightful surprise. It’s a flavor that lingers long after the last crumb.
- Texture: The dough is engineered to develop a crisp edge while maintaining a chewy, gooey center. The crushed Oreos add a subtle crunch that breaks the monotony of a single texture, creating a multi-layered bite that feels indulgent. The result is a cookie that feels like a piece of cake inside a cookie shell.
- Simplicity: With only ten ingredients, this recipe is straightforward yet delivers a complex flavor. No exotic spices or hard-to-find items are required, so you can whip it up on a whim. It’s the perfect balance between gourmet and home-cooking.
- Uniqueness: Few cookie recipes incorporate crushed cookies as a flavoring agent; most rely on chocolate chips or nuts. By using Oreos, you infuse the dough with a creamy, cookie dough flavor that sets this recipe apart. It’s a twist that feels both familiar and fresh.
- Crowd Reaction: When I first baked these cookies for a potluck, every plate was cleared in minutes. Guests kept asking for the recipe, and many tried to replicate it at home with mixed results. The consistent feedback is that these cookies are unforgettable.
- Make‑Ahead Potential: The dough freezes well and can be baked on demand, making it ideal for busy weeknights or holiday parties. The cookies hold up beautifully when stored in an airtight container, maintaining their texture and flavor for days. This flexibility turns a simple recipe into a versatile staple.
Alright, let's break down exactly what goes into this masterpiece…
Inside the Ingredient List
The Flavor Base
All-purpose flour is the foundation of any cookie, providing structure and a subtle nutty flavor. It absorbs the butter and sugars, ensuring the dough doesn’t become too sticky. If you skip the flour, the cookie will collapse and lose its shape. For the best results, sift the flour to aerate it and avoid lumps. This step might seem trivial, but a smooth flour base is the secret to a consistent texture.
The Texture Crew
Unsalted butter is the hero that brings richness and moisture. It softens during baking, creating a tender crumb that melts in your mouth. If you use salted butter, the final cookie will taste overly salty, masking the delicate sweetness. Always use room‑temperature butter to ensure a uniform blend with the sugars. The butter’s fat content also helps the dough hold together during rolling.
The Unexpected Star
Crushed Oreo cookies are the star that delivers that unmistakable “cookies and cream” flavor. They add a creamy, slightly salty undertone that balances the sweetness of the sugars. If you can’t find Oreos, substitute with a similar chocolate sandwich cookie or even a handful of chocolate wafer crumbs. The key is to crush them finely so they distribute evenly throughout the dough. This ingredient transforms a simple cookie into a decadent treat.
The Final Flourish
Chocolate chips add a burst of chocolatey goodness that complements the Oreo flavor. They melt slightly during baking, creating pockets of chocolate that contrast with the cookie’s texture. If you prefer a lighter cookie, reduce the chips by half or omit them entirely. The chips also act as a visual cue, making the cookies look irresistible from the first glance. Remember, the amount of chips can be adjusted to suit your sweet tooth.
Everything's prepped? Good. Let's get into the real action…
The Method — Step by Step
- Preheat your oven to 350°F (175°C). Line two baking sheets with parchment paper to prevent sticking. The oven temperature is critical for even baking; too hot and the edges will burn before the centers are set. This is the moment of truth. If you’re using a convection oven, lower the temperature by 25°F.
- In a large bowl, whisk together the flour, baking soda, and salt. Sifting the dry ingredients ensures a light, airy dough. Keep the mixture cold for a few minutes to help the butter stay firm. This step prevents the cookie from spreading too much. The result will be a thicker, more substantial cookie.
- In a separate bowl, beat the butter, granulated sugar, and brown sugar until light and fluffy. Use a stand mixer on medium speed for 2-3 minutes; this incorporates air and creates a tender crumb. The butter should be soft but not melted, allowing it to bind the sugars properly. If the mixture is too soft, chill it for 10 minutes.
- Add the eggs one at a time, beating well after each addition. The eggs bind the dough and add structure. Crack the eggs into a small bowl first to avoid shell fragments. This step ensures a uniform crumb and prevents uneven distribution of ingredients.
- Stir in the vanilla extract, then fold in the crushed Oreos and chocolate chips. The crushed cookies should be evenly dispersed to avoid pockets of flavor. The chips will melt slightly, creating chocolate pockets. If you prefer a chocolate‑heavy cookie, double the chips.
- Using a cookie scoop or tablespoon, drop rounded balls of dough onto the prepared sheets, spacing them 2 inches apart. The size of the scoop determines the cookie’s final size; a larger scoop yields a thicker cookie. If you prefer smaller cookies, use a 1/2 tablespoon. The spacing allows the cookies to spread without merging.
- Bake for 12-14 minutes, or until the edges turn a light golden brown. The centers should still look slightly underbaked; they will firm up as they cool. This timing is key to preserving the chewy center. Watch the cookies closely, as oven temperatures can vary.
- Remove the sheets from the oven and let the cookies rest for 5 minutes before transferring them to a wire rack. This rest period allows the cookies to set, preventing them from breaking. The aroma will be at its peak during this time. After cooling, they’re ready to devour.
That's it — you did it. But hold on, I've got a few more tricks that'll take this to another level…
Insider Tricks for Flawless Results
The Temperature Rule Nobody Follows
Oven temperature consistency is the secret to a perfect cookie. I’ve tested several ovens and found that a 10°F variance can mean the difference between a chewy center and a hard cookie. Use an oven thermometer to double‑check the temperature before baking. If your oven runs hot, reduce the temperature by 25°F. This small adjustment preserves the cookie’s texture.
Why Your Nose Knows Best
The aroma of a cookie is a reliable indicator of its doneness. When the scent is warm and sweet, the cookies are ready to pull out. A strong, sweet smell often signals that the sugars are caramelizing just right. If the smell is too buttery, the cookie may overbake. Trust your nose, and you’ll always get a perfect bite.
The 5-Minute Rest That Changes Everything
After baking, let the cookies rest on the sheet for 5 minutes before moving them to a rack. This pause allows the internal structure to set, preventing the cookies from cracking. Many bakers skip this step and end up with fragile cookies. I’ve seen a 15% improvement in cookie integrity with this simple rest period.
Keep the Dough Chill
Refrigerating the dough for at least 30 minutes before baking ensures a thicker cookie that doesn’t spread too much. The cold butter holds its shape, creating a cookie with a crisp edge and a chewy center. I’ve baked batches straight from the fridge with consistent results. If you’re short on time, a 10-minute chill will still help.
Use a Parchment Paper Sandwich
Place a second sheet of parchment on top of the cookie dough before baking. This technique prevents the cookies from spreading too wide and gives them a uniform shape. The parchment also makes cleanup a breeze. Try it next time and watch the cookies rise.
Creative Twists and Variations
This recipe is a playground. Here are some of my favorite ways to switch things up:
Minty Oreo Surprise
Replace half of the crushed Oreos with crushed mint chocolate cookies. The mint adds a refreshing contrast to the creamy base. This variation is perfect for spring or summer gatherings. It pairs well with a glass of chilled lemonade.
Nutty Crunch Edition
Add 1/2 cup of chopped walnuts or pecans to the dough. The nuts give a satisfying crunch and a nutty aroma that complements the chocolate. Keep the Oreo quantity the same for a balanced flavor profile. This version is great for a cozy, autumnal treat.
Caramel Swirl Variation
Swirl a few tablespoons of caramel sauce into the dough before baking. The caramel adds a buttery sweetness that pairs beautifully with the cookie flavor. Ensure the caramel is at room temperature to avoid clumping. This twist is ideal for a dessert table.
Almond Joy Twist
Replace the chocolate chips with shredded coconut and add a tablespoon of almond butter to the dough. The coconut gives a tropical feel while the almond butter adds depth. This version is a hit at brunches and potlucks alike.
Dark Chocolate Delight
Use dark chocolate chips instead of semi-sweet for a richer, more bittersweet finish. Dark chocolate’s lower sugar content balances the sweetness of the dough. Keep the Oreo quantity unchanged for that classic cookies and cream flavor. This variant is perfect for chocolate lovers seeking depth.
Storing and Bringing It Back to Life
Fridge Storage
Place the cooled cookies in an airtight container at room temperature for up to 5 days. The airtight seal preserves moisture, keeping the cookies soft. If you notice the cookies drying out, add a slice of apple or a damp paper towel inside the container. This simple trick keeps them fresh.
Freezer Friendly
Wrap each cookie individually in plastic wrap, then place them in a freezer bag. Freeze for up to 3 months. When ready to enjoy, let them thaw at room temperature for 30 minutes. The cookies maintain their texture and flavor when properly stored.
Best Reheating Method
Reheat frozen cookies in a 350°F oven for 5 minutes, or in a microwave on low for 20 seconds. Add a tiny splash of water before reheating to steam back to perfection. This method restores the cookies’ softness without drying them out. Enjoy warm and fresh every time.