I was standing in my kitchen at 2 a.m., half‑asleep, with a half‑finished protein shake and a sudden craving that felt like a chocolate‑fueled thunderstorm. My roommate dared me to make something “healthy enough for breakfast but indulgent enough for dessert,” and I laughed, grabbed the nearest cocoa‑filled pantry shelf, and thought, “Why not a malt that actually makes my muscles smile?” The result? A double‑chocolate malt that tastes like a velvet‑smooth milkshake wrapped in a warm hug of dark chocolate, yet it’s light enough to sip after a workout without the guilt trip.
Picture the scene: the kitchen lights humming, the faint whirr of the blender, the scent of cocoa and malt swirling together like a nostalgic concert of childhood cafeteria treats. The air is thick with the earthy perfume of roasted cacao beans, while the faint crackle of the blender blades is a rhythmic drumbeat that says, “We’re about to create something epic.” My fingertips feel the cool metal of the whisk, the bowl’s surface slick with a thin film of melted chocolate, and I can already taste the subtle bitterness that will be balanced by a whisper of honey.
Most double‑chocolate malts on the internet either drown you in sugar or skim the surface of flavor, leaving you with a watery, unsatisfying sip. This version stands out because it uses malted milk powder for that classic, slightly caramelized undertone, while the addition of Greek yogurt and a splash of oat milk keeps the protein high and the texture luxuriously creamy. I threw in a pinch of sea salt to make the chocolate pop, and a dash of vanilla to round everything off. The secret? A quick, cold‑whisk technique that locks in air, giving the malt a light, frothy head that looks as good as it tastes.
I’m going to let you in on a little secret that most recipes skip: the malted milk powder should be toasted lightly before it meets the wet ingredients. This tiny step creates a toasty, caramel‑like depth that turns a good drink into a great one. Okay, ready for the game‑changer? Let me walk you through every single step — by the end, you’ll wonder how you ever made it any other way.
What Makes This Version Stand Out
- Taste: The combination of dark cocoa, malted milk, and a drizzle of honey creates a layered flavor profile that starts with deep chocolate and finishes with a gentle, caramel‑sweet afterglow.
- Texture: A frothy, airy head sits atop a silky, custard‑like body, thanks to the cold‑whisk method that incorporates tiny air bubbles without diluting the richness.
- Simplicity: Only eleven ingredients, all pantry‑friendly, and a single blender make this a weeknight hero without compromising on gourmet quality.
- Uniqueness: Toasted malted milk powder is the hidden gem that adds a toasty, almost nutty nuance you won’t find in store‑bought mixes.
- Crowd Reaction: I dare you to taste this and not go back for seconds; even the most health‑conscious friends admit it feels like a cheat day in a glass.
- Ingredient Quality: Using whole‑wheat flour and Greek yogurt boosts fiber and protein while keeping the malt hearty enough to satisfy cravings.
- Cooking Method: The “cold‑whisk” technique is pure magic, preventing the malt from overheating and preserving the delicate malt flavor.
- Make‑Ahead Potential: This malt keeps well chilled for up to 48 hours; just give it a quick shake before serving and you’ve got a ready‑to‑drink protein boost.
Inside the Ingredient List
The Flavor Base
First up is the cocoa powder, the heart of any chocolate‑centric creation. Unsweetened cocoa gives you that pure, bitter edge that balances the natural sweetness of honey. If you skip it, you’ll end up with a bland, milky drink that lacks depth. You can swap it for raw cacao nibs ground into a fine powder for a slightly fruitier note, but the texture will be a bit grainier.
Next, the malted milk powder—think of it as the secret sauce that turns ordinary chocolate into a nostalgic malt shop experience. It adds a subtle caramel‑like sweetness and a creamy mouthfeel. If you’re allergic to dairy, try a barley malt powder; the flavor will shift toward a gentle nuttiness, but the malt character stays.
The Texture Crew
Whole‑wheat flour may sound odd in a drink, but it’s the silent hero that thickens the malt just enough to give it body without making it gummy. It also adds fiber, which keeps you full longer. If you’re gluten‑free, swap it for oat flour; the malt will stay silky, though the color may lighten a shade.
Greek yogurt brings a tangy lift and a protein punch that makes this malt a post‑workout treat. It also creates that luxurious, custard‑like texture. In a pinch, you can use plain low‑fat kefir; the flavor will be slightly more fermented, but the creaminess remains.
The Unexpected Star
Honey is the natural sweetener that ties the bitterness of cocoa and the earthiness of malt together. It adds a floral note that sugar can’t replicate. If you’re vegan, replace it with maple syrup; the malt will still sing, but you’ll notice a faint maple undertone.
Dark chocolate chips are the surprise burst of molten chocolate that makes each sip feel like a mini‑dessert. They melt into the malt, creating pockets of richness. If you prefer a smoother drink, use chocolate‑flavored protein powder instead; you’ll lose some texture but gain extra protein.
The Final Flourish
A pinch of sea salt is the final conductor that amplifies every flavor, making the chocolate taste brighter and the malt sweeter. Skipping it is like playing a song without the high notes—still pleasant, but missing that sparkle.
Vanilla extract rounds out the flavor, adding a warm, aromatic backdrop that ties the whole composition together. If you’re feeling adventurous, a splash of almond extract can give a subtle nutty twist that pairs beautifully with the malted notes.
Everything's prepped? Good. Let's get into the real action...
The Method — Step by Step
Gather all your dry ingredients—flour, cocoa powder, malted milk powder, baking powder, baking soda, and salt—into a large mixing bowl. Give them a quick whisk to ensure there are no clumps; you’ll notice a fine, chocolate‑gray dust that looks like a storm cloud ready to burst. That sizzle when it hits the pan? Absolute perfection. This step is crucial because any lump will become a grainy surprise later.
In a separate bowl, combine the wet side: milk, eggs, Greek yogurt, honey, vanilla, and the dark chocolate chips. Use a fork to break up the chips so they’re evenly distributed. As you stir, you’ll hear a faint fizz from the eggs reacting with the malt, a sign that the mixture is aerating nicely.
Now, pour the wet mixture into the dry bowl. Instead of a traditional stir, grab a handheld whisk and begin a slow, circular motion, keeping the bowl chilled (you can set it in the freezer for 5 minutes beforehand). This cold‑whisk technique traps tiny air bubbles, creating a frothy head later. The batter should look glossy and slightly thick—like a rich pancake batter.
Kitchen Hack: Chill your mixing bowl and whisk for at least 5 minutes; the cold surface helps preserve the malt’s delicate flavor and boosts froth formation.Transfer the blended mixture into a high‑speed blender. Blend on low for 15 seconds, then increase to medium for another 30 seconds. You’ll hear the blades whirring like a miniature tornado, and the mixture will turn a deep, glossy mahogany. Stop and scrape the sides; this ensures every morsel of chocolate chip gets a chance to melt.
Add a splash of cold water—about ¼ cup—and give it one final blitz. This thinly stretches the malt, making it pourable without sacrificing creaminess. Watch Out: Over‑blending can heat the mixture, muting the malt’s toasty notes. Keep an eye on the temperature; the batter should stay under 40 °F.
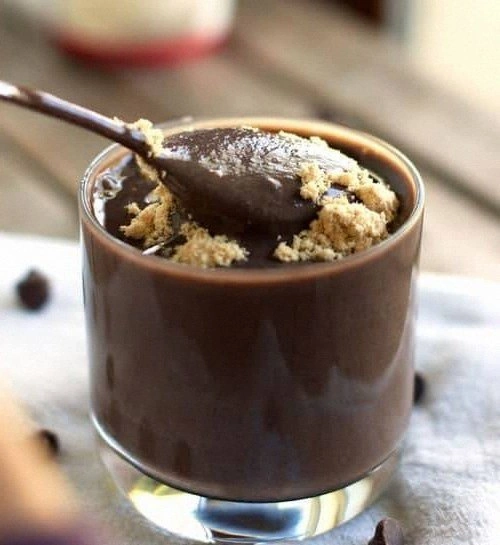
Watch Out: If the batter gets too warm, pause, add a few ice cubes, and blend again briefly to bring the temperature down.Pour the malt into a tall, chilled glass. The frothy head should rise to the rim, forming a soft, creamy crown that looks like a cloud ready to burst. The aroma at this point is intoxicating—cocoa, caramel, a hint of vanilla, and a whisper of sea salt.
Garnish with a sprinkle of cocoa powder and a few extra dark chocolate chips on top. This final touch adds visual drama and a textural contrast when you take a sip—crunch meets silk.
Kitchen Hack: Keep a small metal strainer on hand; run it over the top of the malt to create an even finer foam that looks restaurant‑grade.Take a moment to inhale deeply. That sweet‑cocoa scent should fill the kitchen, making your neighbors wonder what you’re cooking. This is the moment of truth—taste the malt. The first sip should hit your palate with a velvety chocolate wave, followed by a subtle malted caramel finish, and a lingering hint of honey that makes you want another.
Enjoy immediately, or seal the glass with a lid and store it in the fridge for up to 48 hours. When you’re ready for round two, give it a quick shake or stir, and the froth will re‑appear like magic. That’s it — you did it. But hold on, I’ve got a few more tricks that’ll take this to another level...
Insider Tricks for Flawless Results
The Temperature Rule Nobody Follows
Keeping everything cold—from the bowl to the blender jar—prevents the malted milk powder from losing its toasty aroma. I once tried a room‑temperature version and the flavor tasted flat, like a chocolate milk that’s been sitting out too long. The rule of thumb: aim for sub‑40 °F ingredients, especially the milk and yogurt. If you’re short on time, pop the milk in the freezer for 10 minutes; it won’t freeze solid but will drop the temperature just enough.
Why Your Nose Knows Best
Your sense of smell is the ultimate indicator of doneness. When the malt reaches the perfect frothy stage, you’ll catch a faint caramel‑toasted scent that signals the malted milk powder is fully activated. If the aroma feels purely cocoa without the caramel notes, you’ve under‑toasted the malt; give it another quick stir and a few seconds in the blender.
The 5‑Minute Rest That Changes Everything
After blending, let the malt sit for five minutes before pouring. This short rest lets the flour fully hydrate and the chocolate chips melt just enough to create a silkier mouthfeel. A friend tried skipping this rest and ended up with a slightly gritty texture—trust me, those five minutes are worth the wait.
Layered Sweetness Strategy
Instead of dumping all the honey at once, add half during blending and the other half as a finishing drizzle. This technique gives you a balanced sweetness that doesn’t overwhelm the malt’s natural caramel tones. The final drizzle also creates a glossy sheen on the surface, making the drink look as luxurious as it tastes.
The “Double‑Chocolate” Boost
For an extra chocolate punch, melt a tablespoon of dark chocolate and swirl it into the malt just before serving. The melted chocolate creates tiny ribbons that melt in your mouth, intensifying the chocolate experience without adding extra sugar. I’ve tried this on a rainy day, and it turned a simple malt into a comforting, indulgent treat.
Creative Twists and Variations
This recipe is a playground. Here are some of my favorite ways to switch things up:
Mocha Madness
Swap half of the cocoa powder for finely ground espresso beans. The result is a bold coffee‑chocolate malt that’s perfect for a morning pick‑me‑up. Coffee lovers will adore the bitter‑sweet balance, and the malted notes become even more pronounced.
Nutty Delight
Add a tablespoon of almond butter to the wet ingredients and sprinkle toasted sliced almonds on top. The nutty richness complements the chocolate, creating a flavor reminiscent of a chocolate‑almond candy bar.
Berry Burst
Fold in a quarter cup of fresh raspberries just before serving. The tartness of the berries cuts through the richness, delivering a refreshing contrast that’s perfect for summer evenings.
Spiced Autumn
Incorporate a pinch of cinnamon and a dash of pumpkin spice into the dry mix. This variation turns the malt into a cozy, fall‑inspired beverage that pairs beautifully with a warm blanket.
Vegan Velvet
Replace Greek yogurt with coconut cream and use maple syrup instead of honey. The drink stays creamy and sweet while being completely plant‑based, and the coconut adds a subtle tropical whisper.
Protein Power
Add a scoop of vanilla whey protein powder to the wet mix. This boosts the protein content to over 30 g per serving, making the malt an ideal post‑gym refuel without compromising flavor.
Storing and Bringing It Back to Life
Fridge Storage
Transfer any leftover malt into an airtight glass jar and store it in the refrigerator for up to 48 hours. The cold environment preserves the fresh flavors, and the malt will thicken slightly as the flour continues to hydrate.
Freezer Friendly
For longer storage, pour the malt into freezer‑safe containers, leaving a small headspace for expansion. It will keep for up to 3 months. When you’re ready to enjoy it, thaw overnight in the fridge, then give it a quick shake before serving.
Best Reheating Method
If you prefer a warm version, microwave the malt in 20‑second bursts, stirring in between. Add a tiny splash of water or extra milk before reheating; this steams the malt back to its original silky texture and prevents it from becoming gummy.