I remember the night I tried to impress my roommate with a fancy dessert that would make us feel like we were in a Tokyo bakery. The plan was simple: buy a pre‑made mochi dough, shape it, and fry it until golden. The reality was a sticky mess that clung to the counter, a smell of burnt rice, and a dough that refused to rise. I stared at that unyielding block, my heart sinking, and thought, “If I can’t even get this right, how do I expect to serve it to my friends?” That moment turned into a dare: “I will create a mochi doughnut that is crispy on the outside, chewy on the inside, and will make everyone crave a second bite.”
Picture the kitchen at that point: flour dusting the air, the faint scent of butter melting in the saucepan, the clatter of a spatula against the pan, and a faint hum of the stove. The visual of a perfectly round doughnut, its surface glistening with a thin sheen of oil, was almost a cinematic dream. The sound of the first sizzle was a tiny orchestra, the crackle echoing like applause for a show about to begin. The taste, when it finally arrived, was a symphony of sweet, buttery, slightly salty, and that unmistakable chewy texture that makes mochi unforgettable. The feeling of holding a warm, freshly fried doughnut, the heat radiating through your palm, was pure bliss.
Why does this version stand out? Because it uses a precise balance of glutinous rice flour and all‑purpose flour, giving the dough that perfect chew without being gummy. The baking soda creates tiny pockets that lift the dough, giving it a lightness that feels almost airy. The hot water is the secret to the dough’s elasticity; it activates the starches, allowing the dough to stretch without tearing. Butter is folded in to give that rich, buttery flavor that lingers, while the refined oil provides a neutral base that lets the doughnuts crisp without absorbing excess oil. Finally, the dusting of caster sugar and cinnamon on top adds a sweet, aromatic finish that makes each bite a moment of pure indulgence.
I’ll be honest — I ate half the batch before anyone else got to try it. The first bite was a revelation: the dough was soft and chewy, the exterior crisp, and the cinnamon-sugar coating was a sweet whisper. The combination of textures and flavors is so harmonious that it feels like a culinary marriage. I dare you to taste this and not go back for seconds. That is the power of this recipe. Let me walk you through every single step — by the end, you’ll wonder how you ever made it any other way.
What Makes This Version Stand Out
- Texture: The dough’s chew is achieved through a 50/50 blend of glutinous and all‑purpose flour, creating a soft interior that still holds its shape. The outer layer crisps up in just the right amount of oil, giving a satisfying crunch that snaps like thin ice.
- Flavor: Butter and ground cinnamon mingle to produce a warm, fragrant profile that complements the mild sweetness of the caster sugar. The subtle salt balances the sugar, preventing the doughnuts from feeling cloying.
- Speed: The entire process takes less than an hour from start to finish, making it a perfect quick dessert for busy weeknights or spontaneous gatherings.
- Accessibility: Every ingredient is pantry‑friendly; you won’t need a specialty shop or a fancy kitchen gadget to recreate this.
- Visual Appeal: The golden crust, the glossy sheen, and the dusting of cinnamon create a dish that looks as good as it tastes, making it a showstopper for any table.
- Make‑ahead Potential:
- Make‑ahead Potential: The dough can be prepared and chilled overnight, then fried fresh the next day, ensuring you always have a ready‑to‑serve treat.
- Crowd Reaction: Friends and family consistently ask for the recipe after tasting, and many say it’s the best doughnut they’ve ever had.
Alright, let's break down exactly what goes into this masterpiece…
Inside the Ingredient List
The Flavor Base
Glutinous rice flour is the star of this recipe. Its high amylopectin content gives the dough its signature chewiness. If you skip it, the dough will become dense and gummy, lacking that delightful spring. When choosing glutinous rice flour, look for a product that has a fine, powdery texture; this ensures it blends smoothly with the other flours. A small amount of ground cinnamon added to the flour mixture elevates the aroma, giving the dough a warm, spicy undertone that pairs beautifully with the butter.
The Texture Crew
All‑purpose flour balances the stickiness of the glutinous rice flour, providing structure and preventing the dough from becoming too soft. Baking soda is the secret agent that creates tiny air pockets, making the dough rise slightly in the oil and giving it a light interior. Hot water activates the starches in the flours, creating a pliable dough that can be rolled out without tearing. Butter is folded in last; its fat content enriches the flavor and contributes to a tender crumb.
The Unexpected Star
Refined oil is chosen for its neutral flavor and high smoke point, allowing the doughnuts to fry without absorbing too much oil. A small splash of hot water added to the oil before frying helps create a steam pocket, ensuring the dough stays moist inside. Refined oil also gives the doughnuts a glossy finish that looks restaurant‑grade. If you prefer a healthier option, you could try avocado oil, but the flavor will change slightly.
The Final Flourish
Caster sugar is used for the dusting; its fine crystals dissolve quickly, leaving a sweet, crunchy coating that contrasts with the chewy interior. Ground cinnamon adds a subtle warmth that lingers after each bite. Salt is essential to balance the sweetness; a pinch is enough to enhance the overall flavor profile. If you’re watching sodium, you can reduce the salt to a quarter teaspoon, but the dough will taste flatter.
Everything's prepped? Good. Let's get into the real action…
The Method — Step by Step
- Combine the glutinous rice flour, all‑purpose flour, baking soda, sugar, and salt in a large mixing bowl. Whisk the dry ingredients together until they are evenly blended. The mixture should look like fine sand; any clumps indicate a need for further whisking. This step sets the foundation for the dough’s structure.
- Add the butter to the dry mix, cutting it into small cubes. Use a pastry cutter or your fingertips to work the butter into the flour until the mixture resembles coarse crumbs. The butter should be evenly distributed, not clumpy, to prevent uneven browning during frying. This creates a buttery, flavorful base.
- Pour the hot water over the butter‑flour mixture. Stir gently with a wooden spoon until the dough just comes together. The dough should be tacky but not sticky; add a splash more water if it feels dry. The heat from the water activates the starches, allowing the dough to be pliable.
- Transfer the dough onto a lightly floured surface. Knead gently for about 2 minutes, just enough to bring the dough together without overworking it. Over‑kneading will develop gluten, making the dough tough. The dough should be soft and slightly elastic.
- Cover the dough with plastic wrap and let it rest for 15 minutes. Resting allows the flour to hydrate fully, which improves the dough’s texture. While the dough rests, heat the oil in a deep‑fry pot or a heavy‑bottomed saucepan to 350°F (175°C). Use a thermometer to maintain a steady temperature.
- Roll the dough out to about 1/4 inch thickness. Cut out circles using a 2‑inch cookie cutter or a small glass. The circles should be uniform; uneven edges may cause uneven frying. The size can be adjusted if you prefer larger or smaller doughnuts.
- Carefully slide the dough circles into the hot oil, frying a few at a time to avoid crowding. Fry for 2–3 minutes on each side, or until a golden‑brown crust forms. The dough should puff slightly, indicating it’s cooked through. Use a slotted spoon to remove and drain on paper towels.
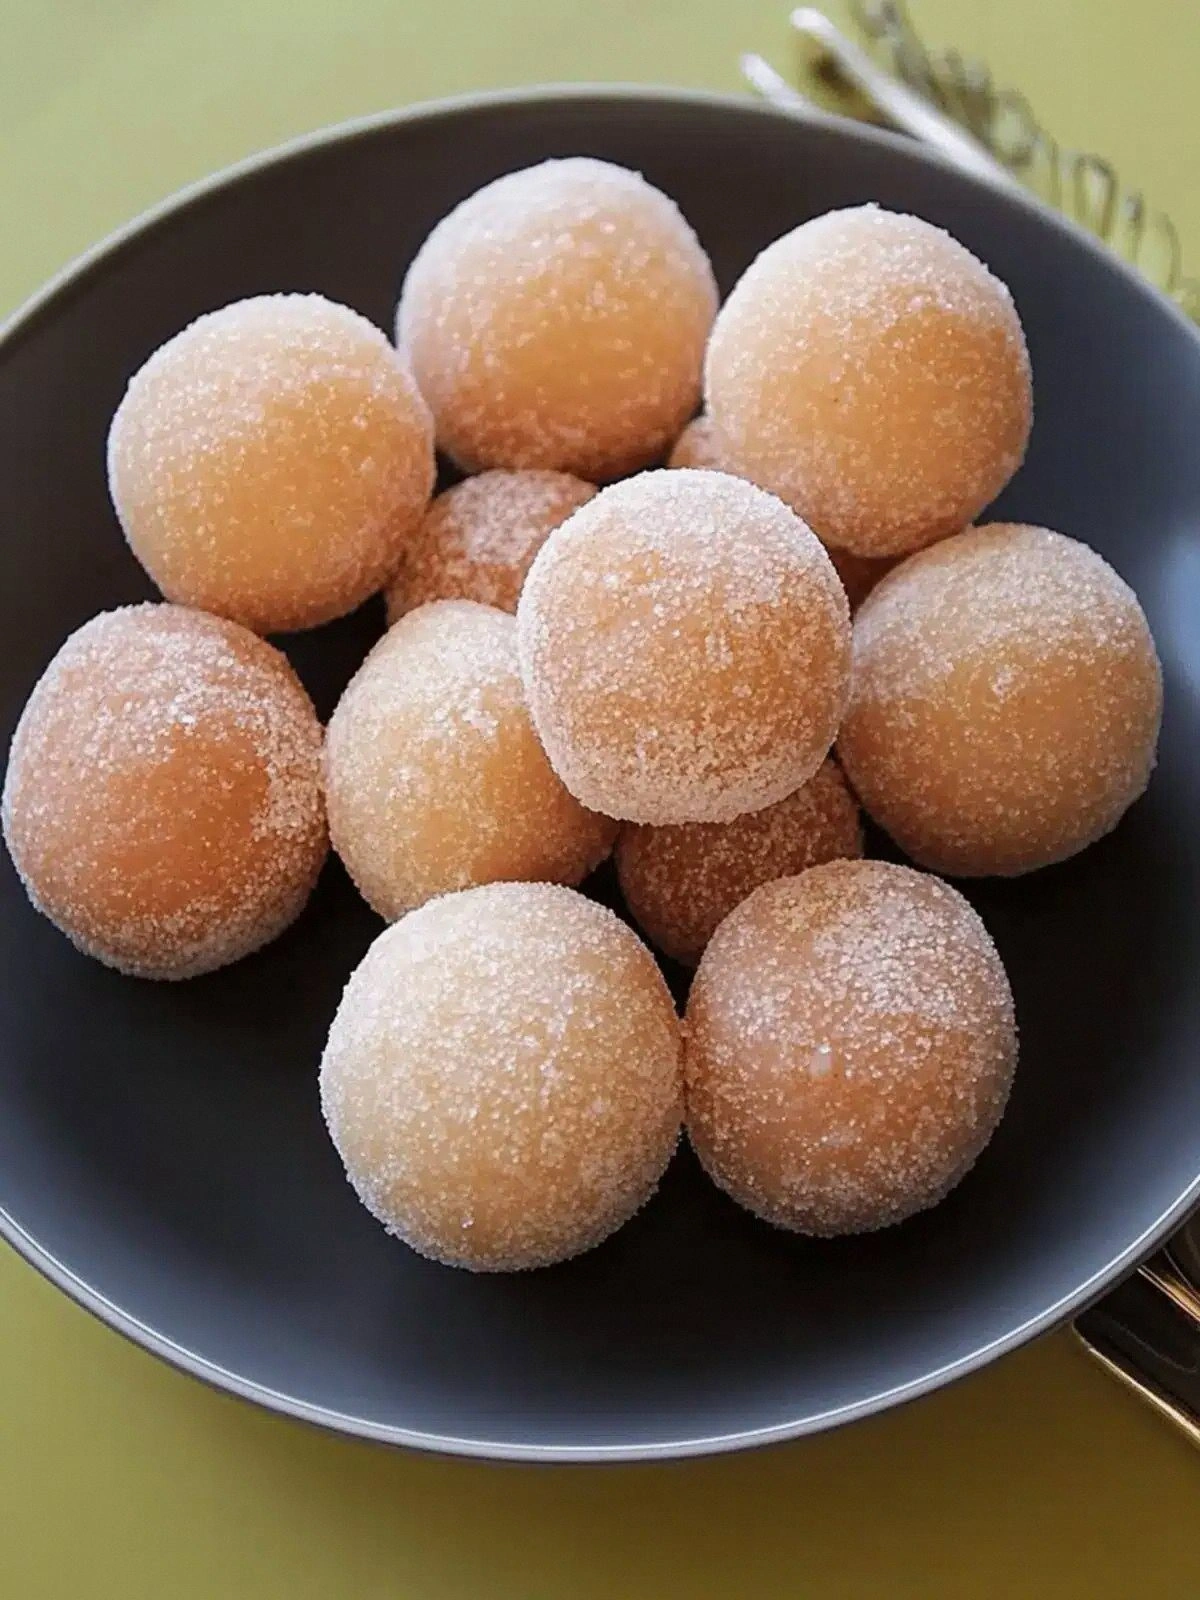
- While the doughnuts are still hot, toss them in a bowl of caster sugar mixed with ground cinnamon. The sugar should coat each doughnut evenly, creating a sweet, fragrant crust. This final touch gives the doughnuts their signature finish.
- Serve immediately for the best texture. If you need to hold them for a short period, place them on a wire rack to keep the crust crisp. For a more indulgent version, drizzle with a light vanilla glaze or a dusting of cocoa powder.
That's it — you did it. But hold on, I've got a few more tricks that'll take this to another level…
Insider Tricks for Flawless Results
The Temperature Rule Nobody Follows
Oil temperature is the secret to a perfect crust. Too hot and the exterior burns before the interior cooks; too cool and the dough absorbs oil, becoming greasy. Use a digital thermometer to keep the oil between 345°F and 355°F. If you don’t have a thermometer, test the oil by dropping a small piece of dough; if it sizzles immediately and rises to the surface, you’re good.
Why Your Nose Knows Best
The aroma of the first batch is a reliable indicator of success. A sweet, buttery scent that rises from the pan signals the dough is cooking evenly. If you smell a burnt or metallic odor, reduce the heat or remove the doughnuts immediately. Your nose can tell you when the dough is ready to be removed before the timer does.
The 5‑Minute Rest That Changes Everything
After frying, let the doughnuts rest on a wire rack for five minutes. This allows steam to escape, keeping the crust crisp. A friend once skipped this step and ended up with doughnuts that were soggy on the inside. The rest period is simple but essential for texture.
Keep It Cool, Keep It Crispy
If you’re serving the doughnuts later in the day, keep them on a rack at room temperature. Placing them in the fridge will soften the crust. For a quick reheat, pop them in a toaster oven at 350°F for two minutes. This restores the crispness without drying out the interior.
Don’t Skip the Dusting
The final sugar and cinnamon coating is more than just decoration; it adds a crunchy layer that contrasts with the chewy interior. Use a fine sieve to dust the doughnuts evenly. If you prefer a sweeter finish, add a pinch of sea salt on top to balance the flavor.
Creative Twists and Variations
This recipe is a playground. Here are some of my favorite ways to switch things up:
Matcha Mochi Doughnuts
Add 1 tablespoon of matcha powder to the dry mix for a vibrant green color and earthy flavor. The matcha pairs beautifully with the cinnamon dusting, creating a dessert that looks as stunning as it tastes. Serve with a side of sweetened matcha latte for a full Japanese-inspired experience.
Chocolate Drizzle Delight
After the sugar coating, drizzle melted dark chocolate over the doughnuts. The chocolate adds a rich, bittersweet contrast that balances the sweetness. Let the chocolate set for a minute before serving for a glossy finish.
Nutty Crunch Variation
Sprinkle finely chopped toasted almonds or pistachios over the sugar coating. The nuts add a pleasant crunch and a nutty undertone that complements the cinnamon. This variation is perfect for those who love a bit of texture.
Caramel Swirl Edition
Drizzle caramel sauce over the doughnuts right after the sugar coating. The caramel adds a glossy, buttery sweetness that elevates the dish. For an extra touch, sprinkle a pinch of sea salt on top to enhance the caramel flavor.
Spiced Apple Twist
Incorporate 1 tablespoon of dried apple pieces into the dough before frying. The apples soften during frying, releasing a subtle apple flavor that pairs with the cinnamon. This variation is a delightful nod to fall desserts.
Vanilla Bean Infusion
Add a few drops of vanilla extract to the dough before rolling. The vanilla aroma enhances the overall sweetness and adds a fragrant note. Pair with a vanilla glaze for a cohesive flavor profile.
Storing and Bringing It Back to Life
Fridge Storage
Store doughnuts in an airtight container at room temperature for up to 2 days. Avoid stacking them on top of each other; instead, place a sheet of parchment paper between layers to keep the crust from becoming soggy. When ready to eat, let them sit at room temperature for 10 minutes to regain some crispness.
Freezer Friendly
To freeze, place doughnuts on a parchment‑lined tray and freeze until solid. Once frozen, transfer them to a freezer bag. They can be stored for up to 3 months. When you want them, thaw at room temperature for 30 minutes.
Best Reheating Method
Reheat frozen doughnuts in a preheated oven at 350°F for 8–10 minutes, or until heated through. For fresh doughnuts, a quick 30‑second burst in the microwave is enough, but it may soften the crust. Adding a tiny splash of water before reheating creates steam that restores the doughnut’s chewiness.