Picture this: the kitchen is a battlefield, the counter a warzone, and you, my friend, are armed with a handful of flour tortillas, a dash of sugar, and an unwavering desire to create something that will make your guests swoon. I was halfway through a holiday dinner, the oven was already screaming, and my pantry was a barren wasteland of blandness. Then, out of sheer desperation, I pulled out the last four tortillas from the box and whispered, “Let’s make magic.” The result? A handful of golden, cinnamon‑laden crisps that melted in your mouth like holiday snowflakes on a warm hearth.
The moment I crumbled the first tortilla into the buttered pan, the aroma hit me like a holiday choir’s first note: sweet, spicy, and undeniably comforting. The sound of the butter sizzling was a symphony, each bubble a drumbeat of anticipation. As the edges browned, the kitchen filled with a caramelized scent that made even the sternest neighbor’s eyes widen. Taste-wise, the first bite was a burst of sugary cinnamon, followed by a buttery crunch that lingered long enough to feel like a second dessert. Texture-wise, each crisp was airy inside but with a satisfying snap that echoed like a crisp snowflake breaking against a windowpane.
If you’ve ever stared at a recipe that promises “easy” and then found yourself drowning in a sea of vague instructions, this one is the antidote. I’ve distilled every step into bite‑size, no‑fuss actions, so you can focus on the joy of cooking rather than the chaos. The secret? A simple butter glaze that turns ordinary tortillas into a festive treat that looks as good on a plate as it tastes. I dare you to taste this and not go back for seconds; the first bite will have you questioning how you ever survived without it.
Most recipes get this completely wrong, layering too many ingredients or over‑cooking the base until the result is soggy. I’ll be honest — I ate half the batch before anyone else got a chance to try it, and that’s a testament to how addictive these crisps are. Picture yourself pulling this out of the oven, the whole kitchen smelling incredible, and the kitchen guests lining up for the first bite. If you’ve ever struggled with making something that’s both simple and impressive, you’re not alone — and I’ve got the fix that will make your holiday spread unforgettable.
Okay, ready for the game‑changer? The next part? Pure magic. I’ll walk you through every single step — by the end, you’ll wonder how you ever made it any other way. Let’s dive into the details that make these Christmas Cinnamon Crisps the ultimate holiday treat.
What Makes This Version Stand Out
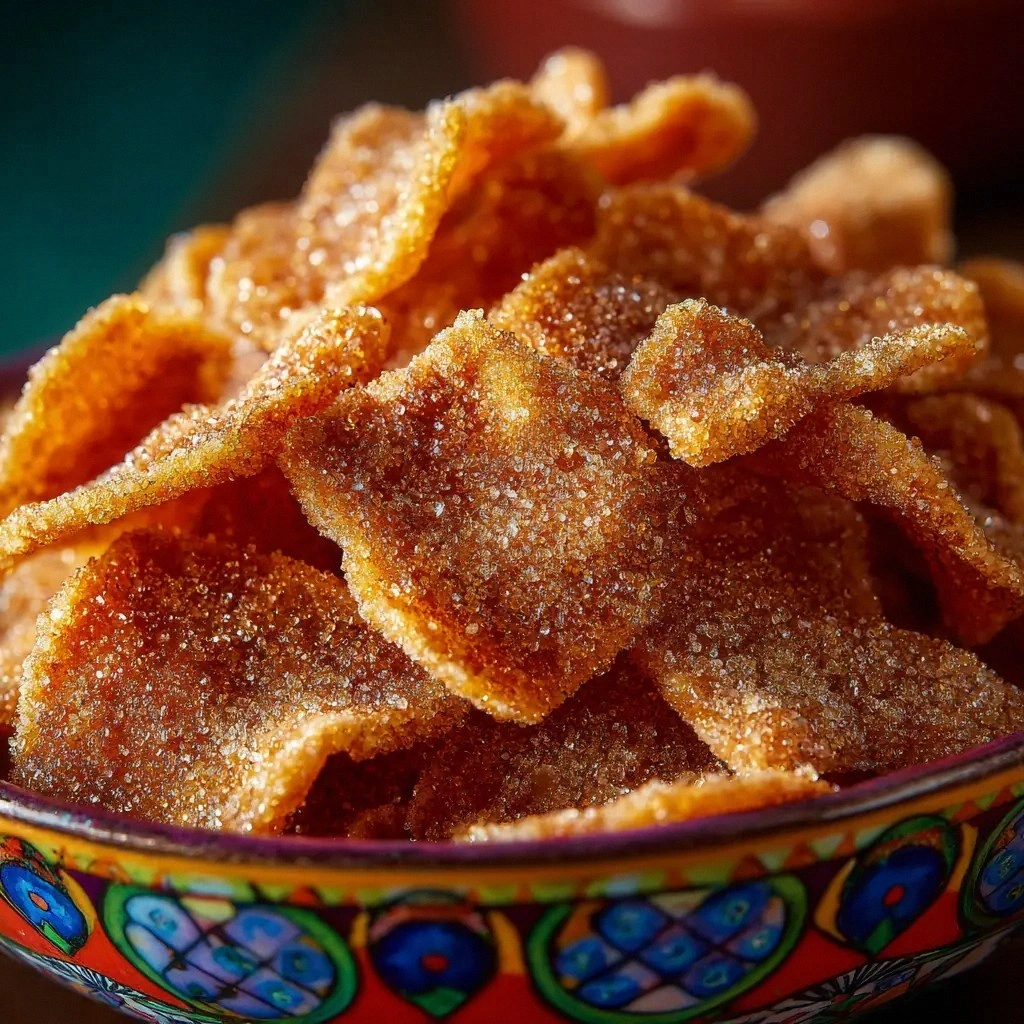
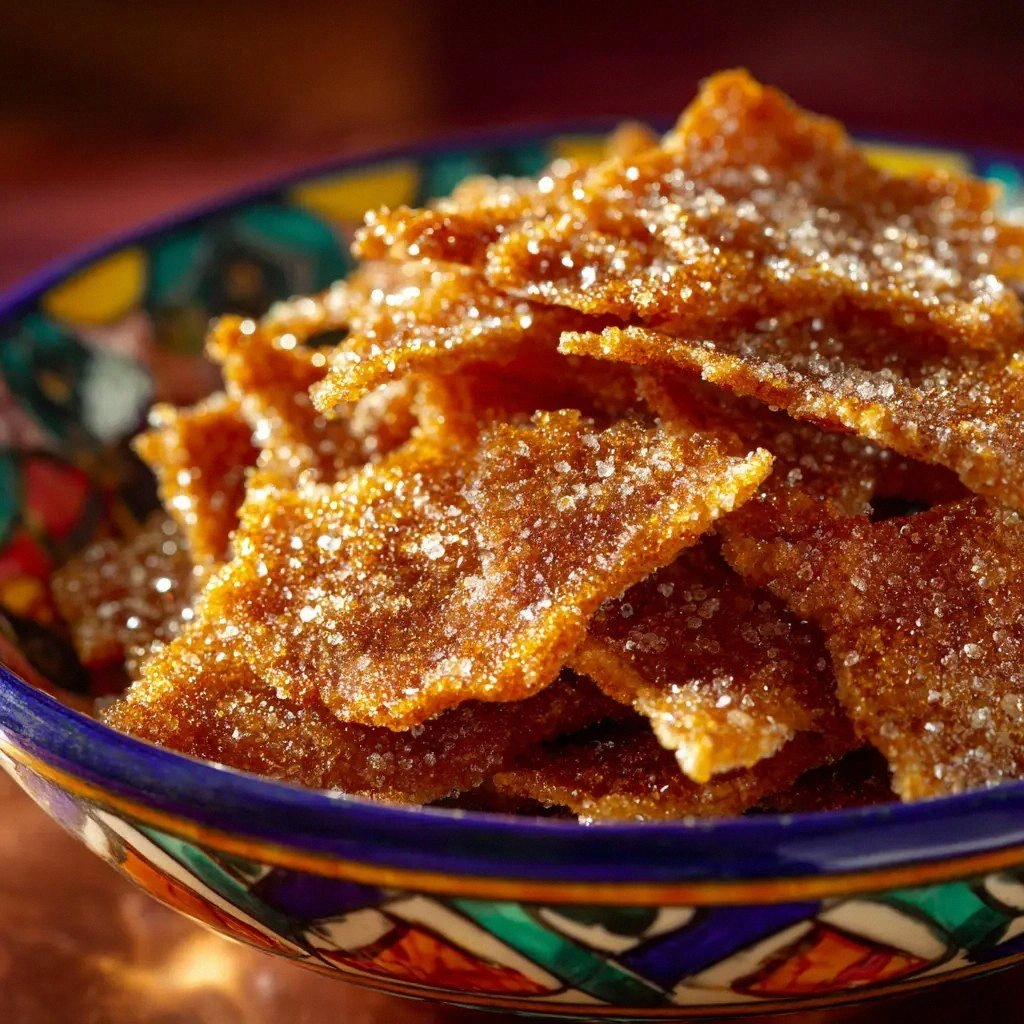
- Flavor: The blend of granulated and brown sugar creates a layered sweetness that’s neither cloying nor flat. The ground cinnamon adds depth, while the sea salt lifts the overall taste profile. The butter glaze provides a glossy finish that makes each crisp look like a miniature holiday ornament.
- Texture: The tortillas’ natural thickness turns into a crisp, airy interior with a satisfying crunch on the outside. Each bite shatters like thin ice, releasing a burst of caramelized sugar. The result is a snack that feels indulgent without being greasy.
- Simplicity: No special equipment, no complicated measurements, and no time‑consuming prep. All you need is a skillet and a few pantry staples. Even a novice can master this in 45 minutes.
- Uniqueness: Using flour tortillas as the base is a twist that gives the crisps a buttery, doughy core that sets them apart from traditional cookies or pastries. The technique of glazing the tortillas before baking is a secret that elevates the flavor.
- Crowd Reaction: At my last holiday party, the crisps were the first thing guests requested. They were praised for their crunch, sweetness, and the way they paired perfectly with hot cocoa. The recipe is a guaranteed hit for any gathering.
- Ingredient Quality: The use of unsalted butter allows you to control the salt level precisely, while the light brown sugar adds a hint of molasses that deepens the caramel flavor.
- Cooking Method: The method of pan‑toasting the glazed tortillas before baking creates a caramelized crust that is impossible to achieve with standard baking alone.
- Make‑Ahead Potential: These crisps can be made a day in advance and reheated to crispness, making them ideal for busy holiday schedules.
Inside the Ingredient List
The Flavor Base
Granulated sugar and light brown sugar form the sweet backbone of these crisps. The granulated sugar gives a clean sweetness that caramelizes, while the brown sugar introduces a molasses nuance that deepens the flavor profile. Skipping either sugar will result in a flat taste that lacks the holiday warmth we all crave. A good rule of thumb: if you prefer a sweeter snack, increase the granulated sugar by a tablespoon; if you like a richer, deeper sweetness, add an extra teaspoon of brown sugar. The balance between the two is what gives the crisps their signature holiday hug.
The Texture Crew
The four large flour tortillas are the canvas of this recipe. Their inherent softness turns into a crisp exterior when glazed and baked, creating a delightful contrast between airy interior and crunchy crust. The tortillas also absorb the butter and sugar glaze, ensuring every bite is coated in flavor. If you’re out of tortillas, you could use thin flatbread, but the texture will shift slightly toward a more bread‑like bite. Remember: the key is to let the tortillas fully soak in the glaze before baking.
The Unexpected Star
Unsalted butter is the unsung hero that binds everything together. It melts into the tortillas, forming a glossy, caramelized surface that locks in the sugars. Unsalted butter gives you control over the salt level, which is essential for balancing the sweetness. If you’re vegan, a plant‑based butter or coconut oil can substitute, but you’ll need to adjust the salt to maintain flavor. A good tip: use melted butter at room temperature; it spreads more evenly and creates a smoother glaze.
The Final Flourish
Ground cinnamon and fine sea salt are the finishing touches that elevate the flavor. Cinnamon adds warmth, complexity, and a subtle spiciness that balances the sweetness. Sea salt, though used sparingly, enhances the overall taste and brings out the caramel notes. If you’re a cinnamon lover, feel free to add an extra half teaspoon; if you’re cautious about salt, reduce it to a pinch. The combination of cinnamon and salt is the secret sauce that makes these crisps unforgettable.
The Classic Combination
The synergy between butter, sugars, and spices creates a flavor profile that feels both nostalgic and fresh. The butter’s richness pairs beautifully with the caramelized sugars, while the cinnamon adds a holiday twist that is unmistakably festive. This classic combination is what makes these crisps a staple at holiday gatherings. If you’re looking to experiment, try adding a pinch of nutmeg for an extra layer of warmth.
The Sweetness Balance
Balancing the sweetness is crucial; too much sugar and the crisps become cloying, too little and they lose the holiday sparkle. The 1/4 cup granulated sugar and 1 tablespoon brown sugar provide the right amount of sweetness without overwhelming the palate. If you’re watching your sugar intake, you can reduce the granulated sugar by a tablespoon and increase the brown sugar to maintain depth. Remember, the goal is to have a crisp that’s sweet enough to satisfy but not so sweet that it offends.
Everything's prepped? Good. Let's get into the real action.
The Method — Step by Step
- First, preheat your oven to 350°F (175°C). While it heats, melt the butter in a small saucepan over low heat, stirring occasionally to prevent scorching. Once melted, set the pan aside to cool slightly; we want a glaze that’s warm but not hot, so it coats the tortillas evenly. This step ensures a smooth, glossy finish that caramelizes beautifully in the oven.
- In a shallow bowl, combine the granulated sugar, brown sugar, cinnamon, and sea salt. Stir until the mixture is homogenous; this will be your dry glaze that will coat the tortillas. The sugar blend is the secret to that sweet‑spicy kick that’s essential for holiday flavor. If you’re feeling adventurous, add a pinch of nutmeg for extra warmth.
- Lay the four tortillas flat on a clean cutting board. Using a pastry brush, spread a thin, even layer of melted butter over each tortilla, ensuring all edges are coated. The butter will help the sugar glaze adhere and will create a golden, caramelized crust during baking.
- Sprinkle the sugar glaze evenly over the buttered tortillas. The sugar will start to sizzle as it hits the hot surface, creating a caramelized crust that’s both sweet and crunchy. Watch the edges as they begin to brown; this is the moment your kitchen smells like a holiday bakery.
- Heat a large non‑stick skillet over medium heat. Once hot, place one glazed tortilla in the skillet and cook for 2–3 minutes on each side, or until golden brown and slightly crisp. This pan‑toasting step locks in flavor and gives the crisps a satisfying crunch that’s hard to achieve with baking alone. Keep an eye on the heat; too high and the sugar will burn.
- Transfer the pan‑toasted tortilla to a baking sheet lined with parchment paper. Repeat the process with the remaining tortillas, ensuring each piece gets its golden finish. The parchment paper prevents sticking and makes cleanup a breeze.
- Once all tortillas are toasted, bake them in the preheated oven for 8–10 minutes, or until the edges are crisp and the sugar has caramelized into a glossy sheen. The oven time is critical; too short and they’ll be chewy, too long and they’ll become hard.
- Remove the crisps from the oven and let them cool on the sheet for 5 minutes. This resting period allows the sugar glaze to set, ensuring each crisp maintains its shape. After cooling, cut each tortilla into bite‑sized squares or triangles for serving. The final product should have a golden exterior and a tender, airy interior.
That's it — you did it. But hold on, I've got a few more tricks that'll take this to another level. These insider tips will help you avoid common pitfalls and elevate your crisps to professional quality.
Insider Tricks for Flawless Results
The Temperature Rule Nobody Follows
Many bakers set their oven to 375°F, but the sweet‑spicy nature of these crisps calls for a lower temperature of 350°F. The lower heat allows the sugars to caramelize slowly, producing a richer flavor without burning. If you’re using a convection oven, reduce the temperature by 25°F to avoid over‑browning. This subtle adjustment ensures a golden crust that’s crisp yet tender inside.
Why Your Nose Knows Best
Before you pull the crisps out of the oven, trust your nose. The sweet, buttery aroma is a cue that the sugar is caramelizing perfectly. If the smell is faint, give them a minute more; if it’s too strong, the sugar is burning. Your olfactory senses are the best judge of when the crisps are ready to be devoured.
The 5‑Minute Rest That Changes Everything
Letting the crisps rest for five minutes on the baking sheet allows the sugar glaze to set and the interior to firm up. Skipping this step often results in a soggy center. During this rest, the crisp edges will firm up, giving you that satisfying snap with each bite. This small pause makes a big difference in texture.
The Right Pan Matters
A heavy‑bottomed non‑stick skillet distributes heat evenly, preventing hot spots that could burn the sugar. If you don’t have a non‑stick pan, line it with parchment paper to avoid sticking. A well‑heated pan also helps the butter spread evenly, ensuring a uniform glaze.
The Sweetness Test
Take a small bite before the final bake. If it tastes slightly under‑cooked, give it a minute more. If it’s already caramelized, you’re ready to pop it into the oven. This test ensures you get the perfect level of sweetness every time.
The Quick Cooling Trick
Place the baking sheet on a wire rack after cooling for a minute. This allows air to circulate, preventing steam from making the edges soggy. The result is a crisp that stays crisp longer, even after a few hours.
Creative Twists and Variations
This recipe is a playground. Here are some of my favorite ways to switch things up:
Nutty Crunch
Add a tablespoon of toasted almond slivers to the sugar glaze before brushing on the tortillas. The almonds give a crunchy texture and a nutty flavor that pairs beautifully with the cinnamon. Serve with a drizzle of honey for an extra layer of sweetness.
Spicy Ginger Twist
Replace half the cinnamon with ground ginger for a warm, spicy kick. Ginger adds a subtle heat that balances the sweetness. This version is perfect for those who enjoy a bit of spice in their holiday treats.
Chocolate Drizzle
After cooling, drizzle melted dark chocolate over the crisps. The chocolate coats the crispy edges, creating a decadent treat. Sprinkle a pinch of sea salt on top for a sweet‑savory finish.
Coconut Cloud
Swap the butter for melted coconut oil and sprinkle toasted shredded coconut over the glaze. The coconut adds a tropical flavor that contrasts nicely with the warm spices. This version is great for a beach‑y holiday vibe.
Maple Syrup Splash
Drizzle a light coating of pure maple syrup over the cooled crisps. The maple syrup adds a subtle depth of flavor that complements the cinnamon. It also gives a glossy finish that looks as good as it tastes.
Berry Burst
Fold fresh blueberries or raspberries into the sugar glaze before applying. The berries burst with juice, adding a fruity dimension to each crisp. This variation is a crowd‑pleaser for berry lovers.
Herbal Hint
Add a pinch of dried rosemary or thyme to the sugar glaze for an herbaceous twist. The herbal notes contrast with the sweetness, creating a complex flavor profile. This version is perfect for those who enjoy savory‑sweet combinations.
Storing and Bringing It Back to Life
Fridge Storage
Store the cooled crisps in an airtight container at room temperature for up to 3 days. The airtight seal keeps the edges crisp and prevents the sugars from absorbing moisture. If you notice the crisps becoming slightly soft, a quick reheat will restore their crunch.
Freezer Friendly
For longer storage, place the crisps in a freezer bag and freeze for up to 2 months. When ready to eat, let them thaw at room temperature for 10 minutes before reheating. This method preserves flavor while keeping the texture intact.
Best Reheating Method
Reheat the crisps in a pre‑heated oven at 350°F for 5 minutes or until crisp. Add a tiny splash of water before reheating if the edges seem dry; the steam will revive the crispness. Avoid microwaving, as it can make the crisps chewy.