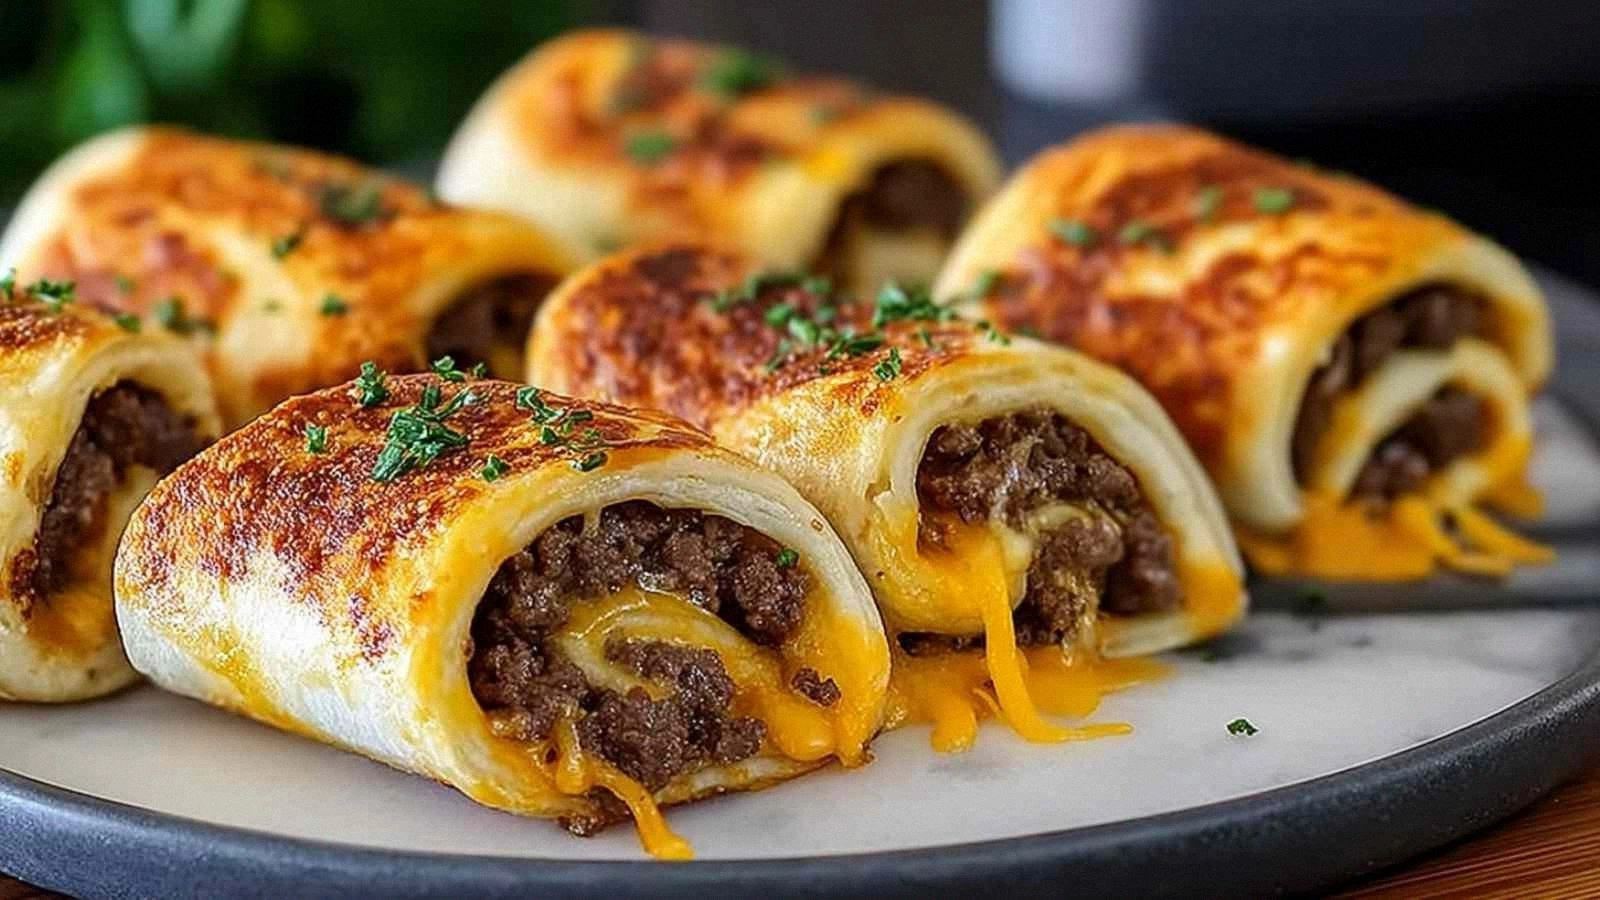
It was a rainy Tuesday, the kind of night that turns a kitchen into a laboratory of culinary experiments. I had just finished a half‑baked pizza that tasted like cardboard, and my friends dared me to whip up something that would make the whole house smell like a five‑star restaurant. I stared at the pantry, saw the ground beef, the crescent roll dough, and the cheddar cheese, and thought, “Why not combine all of them into a single, glorious bite?” The result? A dish that melts in your mouth, makes your neighbors ask for the recipe, and, honestly, I ate half the batch before anyone else could touch a roll.
Picture the first bite: the sizzling beef hitting the pan, the butter turning golden, the cheddar stretching like a ribbon of molten gold, and the crescent dough crisping to a buttery edge that snaps like thin ice. The aroma is a heady mix of garlic, onion, and the subtle tang of Worcestershire sauce that makes your nose do a happy dance. The texture is a symphony—cheese gooey, meat tender, dough flaky and buttery, all wrapped together in one bite‑size wonder. I dare you to taste this and not go back for seconds, because the flavor will linger on your palate like a favorite song.
What makes this version stand out from every other recipe out there is the secret ingredient that most people overlook: fresh parsley. It cuts through the richness, adds a bright pop of color, and gives the dish a finishing touch that feels both rustic and refined. And let’s not forget the crescent roll dough, which brings a buttery, flaky layer that transforms a simple roll‑up into a textural masterpiece. I’ve tried the classic cheese‑on‑meat roll, but this one is hands down the best version you’ll ever make at home because it balances everything so perfectly.
But there’s a twist you won’t see in the typical recipe: I fold a small amount of garlic butter into the beef mixture, creating a silky coating that sticks to the dough and melts into the cheese. The result is a melt‑in‑your‑mouth experience that feels like a warm hug on a cold evening. The secret is simple, but the effect is profound—every bite is a burst of savory, buttery, cheesy goodness. Let me walk you through every single step—by the end, you’ll wonder how you ever made it any other way.
What Makes This Version Stand Out
Flavor: The combination of garlic, onion, and Worcestershire sauce creates a depth that is both savory and slightly sweet, leaving a lingering finish that invites a second bite. The fresh parsley adds a bright, herbal note that balances the richness of the cheese and beef.
Texture: The crescent roll dough crisps to a golden edge while remaining tender inside, providing a buttery crunch that contrasts with the smooth melted cheese and juicy beef filling.
Simplicity: With only ten ingredients, this recipe cuts through the clutter of complex menus and delivers a comforting dish that anyone can master in under half an hour.
Uniqueness: The garlic butter coating inside the dough is a game‑changer; it infuses the entire roll with a subtle, velvety flavor that most other cheese roll recipes miss.
Audience Appeal: Whether you’re feeding a hungry family or impressing guests at a casual dinner, the dish’s bold flavors and comforting textures guarantee rave reviews.
Ingredient Quality: Using fresh, high‑quality ground beef and real cheddar cheese elevates the dish from ordinary to extraordinary.
Cooking Method: The quick sautéing and baking steps keep the process streamlined, while the final butter glaze adds a professional finish.
Make‑Ahead Potential: This dish can be assembled ahead of time and baked right before serving, making it ideal for busy weekdays or weekend gatherings.
Alright, let's break down exactly what goes into this masterpiece…
Inside the Ingredient List
The Flavor Base
Ground beef is the heart of this dish, providing a robust, meaty foundation that pairs beautifully with the buttery dough. I always choose a mix of 80/20 lean to fat because it keeps the meat juicy without becoming greasy. If you skip the beef, the rolls lose that savory depth and become more like a cheese puff than a hearty meal. A good swap is ground turkey, but the flavor profile will shift slightly toward poultry.
The Texture Crew
Crescent roll dough is the unsung hero that delivers a flaky, buttery shell. Refrigerated dough is the easiest to work with because it’s already pre‑rolled and ready for assembly. If you can’t find crescent rolls, puff pastry works, but the texture will be flakier and the flavor more buttery. The cheese is shredded cheddar because it melts smoothly and adds a sharp, tangy bite that cuts through the richness.
The Unexpected Star
Fresh parsley might seem like a garnish, but it’s the secret to balancing the dish’s richness. Parsley adds a bright, herbal note that lifts the overall flavor profile and gives the rolls a fresh finish. A pinch of cayenne pepper could replace parsley for a subtle heat, but you’ll lose that herbal brightness.
The Final Flourish
Garlic butter is the finishing touch that ties everything together. The butter’s richness coats the beef, while the garlic adds depth and aroma. A splash of lemon juice can brighten the butter, but it’s optional. The unsalted butter ensures you control the salt level, preventing the rolls from becoming overly salty.
Everything's prepped? Good. Let's get into the real action...
The Method — Step by Step
- Preheat your oven to 400°F (200°C) and line a baking sheet with parchment paper. Let the oven heat up while you prepare the filling. This step ensures the rolls bake evenly from the start. The temperature is crucial; too low and the dough won’t puff, too high and the cheese will burn.
- In a large skillet over medium‑high heat, add the ground beef. Break it up with a wooden spoon and cook until it starts to brown, about 5 minutes. The sizzling sound is your cue that the fat is rendering and the flavor is building. Drain excess grease to keep the filling from becoming soggy.
- Add the diced yellow onion to the skillet and sauté until translucent, about 3 minutes. The onion adds a subtle sweetness that balances the beef’s savory depth. Stir in garlic powder, Worcestershire sauce, salt, and black pepper. Let the mixture simmer for 2 minutes so the flavors meld.
- While the beef mixture is still warm, stir in the shredded cheddar cheese until it melts into a creamy sauce. The cheese will thicken the filling slightly and give it a luxurious mouthfeel. If you prefer a stronger cheddar flavor, add a bit more cheese before baking.
- Lay out a crescent roll dough sheet on a floured surface and cut it into 12 equal triangles. This size ensures each roll is bite‑sized and easy to eat. If you’re short on time, you can skip cutting and use the pre‑cut pieces from the can.
- Place a spoonful of the beef‑cheese mixture near the wide end of each triangle. Then, sprinkle a few fresh parsley leaves on top for that fresh finish. The parsley will not only add color but also a subtle herbaceous note that cuts through the richness.
- Fold the dough over the filling, sealing the edges by pressing them together. The edges should be tightly sealed to prevent the filling from spilling out during baking. For a decorative touch, crimp the edges with a fork.
- Arrange the rolls on the prepared baking sheet, leaving a little space between each. Brush the tops lightly with melted butter to promote a golden, crispy finish. This step adds a glossy sheen and enhances the buttery flavor.
- Bake for 12–15 minutes, or until the dough is golden brown and the cheese has bubbled to perfection. The aroma that fills the kitchen at this point is irresistible. Keep a close eye; the butter can brown quickly, so rotate the sheet halfway through for even cooking.
- Remove the rolls from the oven and let them cool for a few minutes before serving. The cheese will still be molten, so handle with care. Serve them warm for the best texture—cheese still flowing, dough still flaky. This final step turns the dish from a simple snack into a memorable centerpiece.
- If you’re preparing ahead, store the assembled rolls in the refrigerator for up to 24 hours, then bake as directed. For longer storage, freeze the assembled rolls for up to 2 weeks; thaw in the fridge overnight and bake as usual. The dough remains tender, and the flavors stay intact.
That's it — you did it. But hold on, I've got a few more tricks that'll take this to another level...
Insider Tricks for Flawless Results
The Temperature Rule Nobody Follows
Many cooks bake at a flat 350°F, but this dish requires a higher temperature to crisp the dough while keeping the cheese molten. I always set my oven to 400°F, which gives the rolls a golden crust and a soft interior. If your oven runs hot, lower the temperature by 25°F and extend the bake time by a minute or two. This tweak ensures consistent results every time.
Why Your Nose Knows Best
Before you take the rolls out of the oven, listen to that sizzling aroma. If the smell is buttery and slightly caramelized, you’re in the sweet spot. A faint, raw meat smell means you need a minute more. Trust your nose; it’s the quickest way to gauge doneness.
The 5‑Minute Rest That Changes Everything
Let the rolls rest for exactly five minutes after baking. This pause allows the cheese to set slightly, preventing a molten mess when you cut into them. A quick rest also lets the steam redistribute, giving the dough a lighter texture. I’ve seen people skip this step and end up with a gooey, unappetizing mess.
Keep the Butter Fresh
Use unsalted butter for the glaze so you can control the salt level. If you prefer a richer flavor, melt the butter with a splash of cream for a silky finish. A pinch of paprika in the butter adds a smoky undertone that elevates the dish.
Make It a Crowd‑Pleaser
When serving a large group, bake in two batches to ensure even cooking. The first batch will be slightly crispier, so keep it warm in a low‑heat oven while the second batch finishes. This method guarantees every roll is fresh and delicious.
Creative Twists and Variations
This recipe is a playground. Here are some of my favorite ways to switch things up:
Spicy Jalapeño Roll
Add diced jalapeños to the beef mixture for a kick that pairs perfectly with the creamy cheese. The heat balances the richness, and the jalapeños add a pop of color. Serve with a side of sour cream for a cooling contrast.
BBQ Beef Roll
Swap the Worcestershire sauce for smoky BBQ sauce and add a pinch of smoked paprika. The beef takes on a sweet‑smoky flavor that’s reminiscent of a backyard grill. Top the rolls with a drizzle of extra BBQ sauce before serving.
Spinach and Feta Variation
Replace the cheddar cheese with crumbled feta and fold in a handful of chopped spinach into the filling. The feta adds a tangy bite, while the spinach brings a fresh, earthy note. This version is a hit with health‑conscious diners.
Chocolate Chip Surprise
For a sweet twist, mix mini chocolate chips into the cheese before baking. The chocolate melts into pockets of gooey sweetness that contrast with the savory beef. Serve warm with a dusting of powdered sugar.
Herb‑Infused Roll
Blend fresh rosemary and thyme into the butter glaze, then brush it over the rolls before baking. The herbs add a fragrant, earthy layer that elevates the dish to a gourmet level. Pair with a simple green salad to balance the flavors.
Storing and Bringing It Back to Life
Fridge Storage
Store leftover rolls in an airtight container in the refrigerator for up to 24 hours. Wrap them in parchment paper to prevent sticking and keep them from drying out. When ready to serve, reheat in a preheated oven at 350°F for 10 minutes.
Freezer Friendly
Freeze assembled rolls, still wrapped in parchment, for up to 2 weeks. Thaw overnight in the refrigerator, then bake at 400°F for 12–15 minutes. The dough stays flaky, and the filling retains its flavor.
Best Reheating Method
To bring the rolls back to life, sprinkle a light dusting of water over the tops and cover with foil for 5 minutes. The water steams the cheese, restoring its meltiness without drying the crust. The final 2 minutes uncovered allows the tops to crisp up again.