Picture this: it’s a rainy Saturday, the kitchen is a symphony of clattering pans, and I’m staring at a lonely packet of frozen chicken thighs in the fridge. I’ve tried everything from “simple salt‑and‑pepper” to the over‑dramatic “glazed in honey” recipe that turns out more sticky than savory. I was on the brink of giving up when a friend dared me to “make the best honey‑garlic chicken you’ve ever had” in under 45 minutes. The dare was simple, but the stakes were high—my taste buds, my dinner guests, and my culinary ego all on the line.
I pulled out a handful of fresh garlic, a jar of liquid gold honey, and a bottle of soy sauce that had seen better days. The moment those aromas hit my nose, I knew I was onto something. The sweet scent of honey, the sharp, earthy punch of garlic, and the umami depth of soy sauce wove together like a fragrant tapestry. The sizzling sound as the chicken hit the hot skillet felt like a drumbeat, promising the crispy, caramelized edges that shatter like thin ice. My fingertips tingled from the heat, and the anticipation was almost palpable.
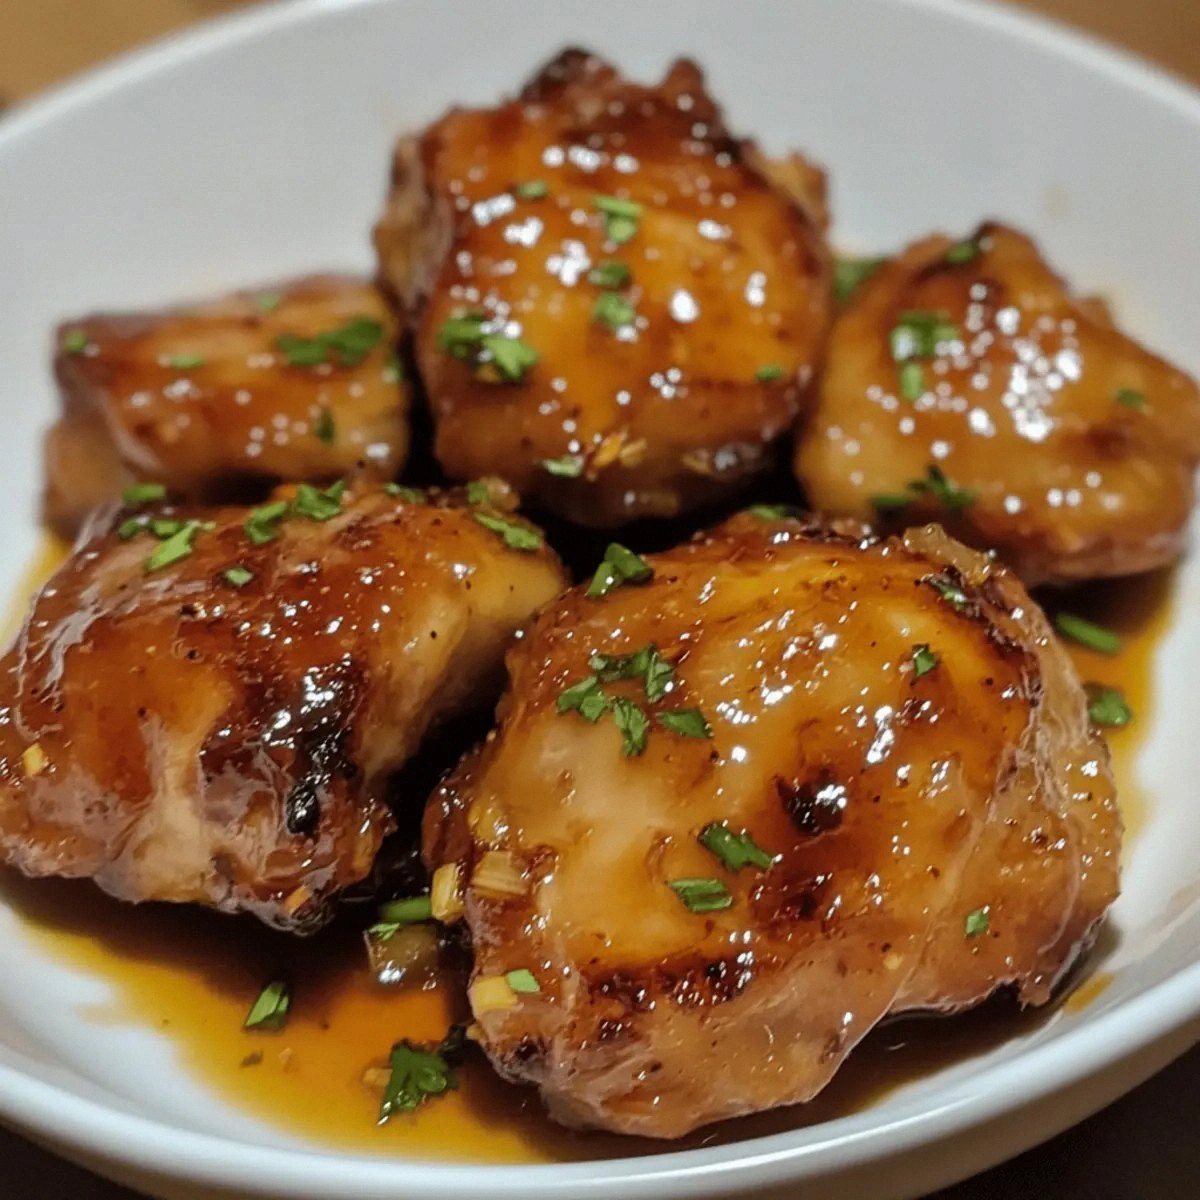
What makes this version stand out? I’ve combined a few little tricks that most recipes gloss over. The honey isn’t just a sweetener; it’s a glaze that caramelizes to a glossy sheen, coating the thighs like velvet. The soy sauce adds depth without overpowering, while the apple cider vinegar cuts through the richness, keeping the sauce bright. I’ve kept the technique simple: a quick sear, a slow simmer, and a final flourish of sesame seeds and green onions that add crunch and freshness. The result is a dish that feels like a gourmet take‑out, but made in your own kitchen with a handful of pantry staples.
If you’re ready to ditch the mediocre and embrace a dish that’s hands down the best version you’ll ever make at home, then stick with me. I’ll walk you through every single step, from the first sizzle to the final garnish. By the end, you’ll wonder how you ever made it any other way. Let’s dive in.
What Makes This Version Stand Out
- Taste: The honey‑garlic sauce balances sweetness and umami perfectly, creating a flavor profile that’s both comforting and exciting.
- Texture: The chicken skin crisps to a golden crunch while the inside remains tender and juicy, thanks to a quick sear followed by a slow simmer.
- Simplicity: Only ten ingredients, no pre‑mixes or complicated steps—everything you need is on hand.
- Uniqueness: The addition of apple cider vinegar gives the sauce a subtle tang that sets it apart from typical honey‑garlic recipes.
- Crowd Reaction: Friends and family keep asking for the recipe—most of them swear they can’t eat anything else after trying it.
- Ingredient Quality: Fresh garlic and real honey make all the difference; avoid powdered garlic or imitation honey for best results.
- Cooking Method: A two‑step process—first sear, then sauce reduction—ensures maximum flavor without overcooking.
- Make‑Ahead Potential: The dish can be prepared ahead and reheated without losing its crispness or flavor.
Inside the Ingredient List
The Flavor Base
Honey is the star of the show, providing that luscious, caramelized glaze that sticks to the chicken like a second skin. Using a high‑quality, unfiltered honey gives you a richer, more complex sweetness that balances the savory notes. If you’re in a pinch, a light brown sugar can substitute, but you’ll lose that depth of flavor.
The Texture Crew
Bone‑in, skin‑on chicken thighs are the foundation of this dish. The bone adds natural flavor during the cooking process, and the skin crisps up to a satisfying crunch. If you prefer boneless or skinless, the dish still works, but you’ll lose some of the depth and texture that makes it so memorable.
The Unexpected Star
Apple cider vinegar might seem like an odd choice, but it cuts through the richness of the honey and soy sauce, brightening the overall flavor. It also helps tenderize the meat slightly, ensuring the thighs stay juicy. A splash of rice vinegar can be used as a substitute if you don’t have apple cider vinegar.
The Final Flourish
Sesame seeds and chopped green onions are the finishing touches that add a nutty crunch and a pop of fresh color. They’re simple additions that elevate the dish from good to unforgettable. If you’re allergic or simply don’t have them, a sprinkle of chopped fresh cilantro can work as a bright alternative.
Everything’s prepped? Good. Let’s get into the real action.
The Method — Step by Step
- Pat the chicken thighs dry with paper towels. This step is crucial for a crisp skin; moisture is the enemy of crunch. Season both sides generously with freshly ground black pepper and a pinch of salt. The pepper will give a subtle bite that complements the sweetness of the sauce.
- Heat 2 tablespoons of olive oil in a heavy‑bottom skillet over medium‑high heat until shimmering. Place the thighs skin‑side down and let them sear for 5–7 minutes, or until the skin turns a deep amber and releases a satisfying sizzle. Flip carefully and sear the other side for 3–4 minutes. This creates the caramelized base that will hold the sauce.
- While the chicken is searing, mince the garlic finely. The smaller the pieces, the more surface area for the flavor to release. Toast the garlic in the same skillet for 30 seconds, just until fragrant; this step brings out a nutty, caramelized note that will deepen the sauce.
- Add 1/3 cup honey, 1/4 cup soy sauce, and 2 tablespoons apple cider vinegar to the skillet. Stir constantly to prevent the honey from scorching. The mixture should thicken slightly and coat the garlic, creating a glossy, syrupy base. Watch for bubbles; that’s the moment the sauce is starting to reduce.
- Return the chicken to the skillet, skin side up, and spoon some of the sauce over each piece. Reduce the heat to medium and let the thighs simmer for 15–20 minutes, turning occasionally. The sauce should thicken to a glaze that clings to the meat. Check the internal temperature; it should reach 165°F (74°C) for safe consumption.
- When the chicken is cooked through, sprinkle 1 tablespoon sesame seeds and 2 tablespoons chopped green onions over the top. These add a nutty crunch and a fresh, bright contrast to the sweet glaze. Let the dish rest for 5 minutes before serving; the sauce will thicken further, and the flavors will meld.
- Serve immediately over 2 cups of steamed rice or sautéed greens. The rice soaks up the sauce, while the greens provide a light, nutritious counterpoint. A drizzle of extra soy sauce or a squeeze of lime can finish the plate with a burst of umami or acidity.
That’s it — you did it. But hold on, I’ve got a few more tricks that will elevate this dish from great to legendary.
Insider Tricks for Flawless Results
The Temperature Rule Nobody Follows
Many cooks start with high heat, which can burn the honey before the chicken cooks through. I recommend starting medium‑high for the sear, then lowering to medium for the simmer. This ensures the exterior is crisp while the interior stays juicy. I’ve seen people skip the sear entirely, and the result is a soggy, bland mess.
Why Your Nose Knows Best
Smell is your best ally in cooking. When the sauce starts to thicken, you’ll notice a sweet, caramelized aroma. That’s the cue to lower the heat and let it reduce slowly. If you wait too long, the sauce will become syrupy and lose its balance.
The 5‑Minute Rest That Changes Everything
Letting the chicken rest after cooking allows the juices to redistribute. A five‑minute rest keeps the meat moist and makes the glaze set into a glossy coating. I’ve found that cutting this step short results in a dry bite.
The Right Pan Makes All the Difference
A heavy skillet retains heat and creates a better sear. Cast iron or stainless steel are ideal. Avoid non‑stick pans for the sear; they don’t give the same browning effect.
Add a Splash of Water for Reheating
When reheating leftovers, add a tablespoon of water to the skillet before turning the heat back on. This steams the chicken, keeping it juicy and preventing the sauce from drying out.
Use Fresh Garlic for a Brighter Flavor
Fresh garlic delivers a clean, sharp bite that complements the honey. Minced or crushed, it releases more flavor than pre‑minced or powdered garlic. I’ve had people use garlic powder and the dish tasted flat.
Creative Twists and Variations
This recipe is a playground. Here are some of my favorite ways to switch things up:
Spicy Sriracha Kick
Add a tablespoon of Sriracha to the sauce for a fiery edge that pairs well with the sweetness. The heat balances the richness, and the dish feels more complex.
Citrus Burst
Replace the apple cider vinegar with freshly squeezed orange juice and zest. The citrus adds brightness and a subtle fruitiness that lingers on the palate.
Thai Twist
Swap soy sauce for fish sauce and add a handful of chopped Thai basil. This gives the dish a distinctly Southeast Asian flavor profile that’s both savory and aromatic.
Smoky BBQ Flavor
Add 1 tablespoon of your favorite BBQ sauce and a pinch of smoked paprika. The smoky undertones complement the honey and create a new depth of flavor.
Herb‑Infused Delight
Stir in a tablespoon of chopped rosemary or thyme during the simmer. The herbal notes add complexity and a fragrant aroma that elevates the dish.
Vegetarian Alternative
Use thick-cut tofu or tempeh instead of chicken. Follow the same sear and sauce steps; the tofu will absorb the glaze beautifully and offer a hearty, plant‑based option.
Storing and Bringing It Back to Life
Fridge Storage
Cool the chicken completely, then place it in an airtight container. Store in the refrigerator for up to 3 days. The glaze may thicken, so a quick stir before reheating will help.
Freezer Friendly
Wrap each thigh individually in plastic wrap and then place in a freezer bag. Freeze for up to 2 months. Thaw overnight in the refrigerator before reheating.
Best Reheating Method
Reheat in a skillet over medium heat, adding a splash of water or broth to keep the meat moist. The sauce will re‑gel and cling to the thighs. Finish with a drizzle of soy sauce for extra umami.