The night I tried to impress my roommates with a fancy seafood dish, I ended up with a soggy, flavorless mess that made the entire apartment smell like regret. The only thing that saved the evening was a quick search that led me to a recipe that promised crispy, savory, salt‑and‑pepper squid. I was skeptical, but the moment the sizzling sound hit my ears, I knew I was about to witness a culinary transformation. That sizzle, that crackle, that golden crust—absolute perfection. I dare you to taste this and not go back for seconds.
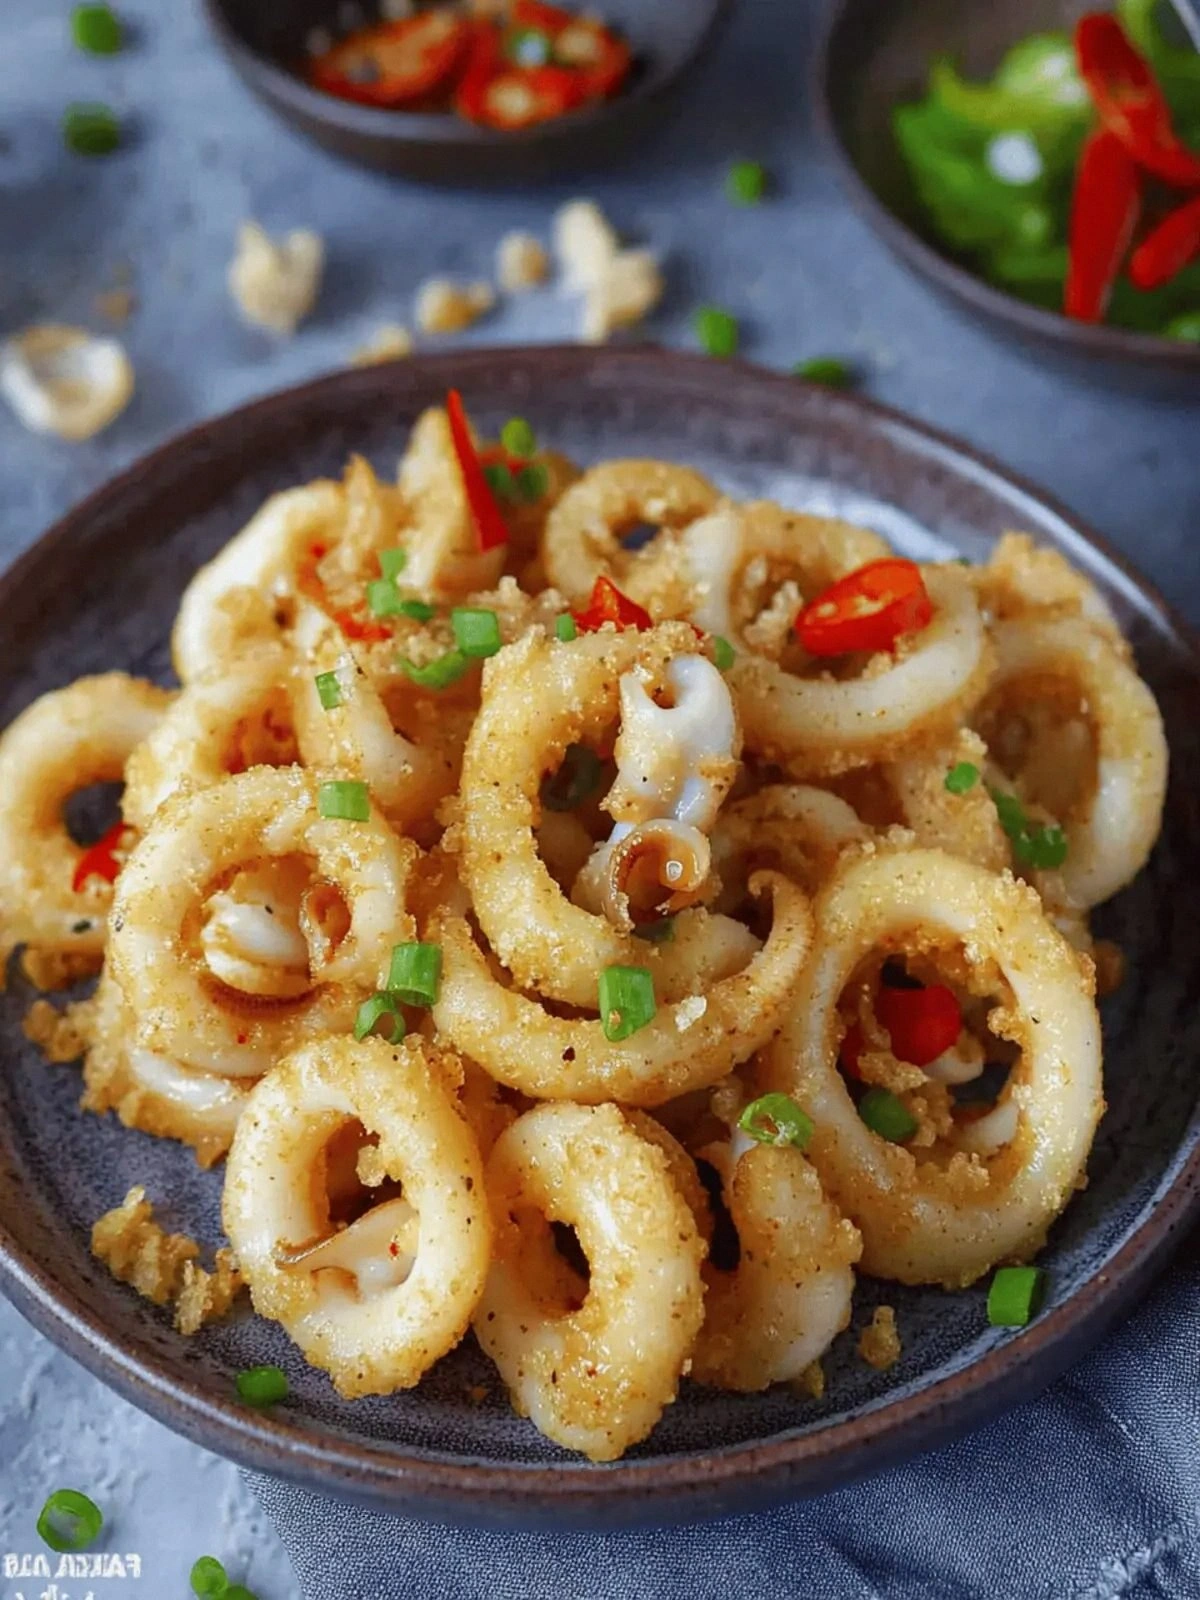
Picture yourself pulling this out of the pan, the whole kitchen smelling incredible, the steam swirling like a fragrant cloud. The squid is coated in a thin, crunchy batter that shatters like thin ice when you bite into it, revealing a tender center that still holds a subtle oceanic sweetness. The salt and pepper seasoning gives it a robust, smoky kick that lingers on the palate, while the fresh ginger and garlic add a bright, aromatic undertone. The fresh chili brings a gentle heat that cuts through the richness, and scallions add a fresh, green pop that balances everything. This is hands down the best version you'll ever make at home, and I promise you will feel like a master chef by the end of this guide.
I remember the first time I tasted a squid that was both crispy and juicy; it felt like a revelation, a moment when everything in the kitchen fell into place. The batter is deceptively simple, but it works like a charm because of the right ratio of flour, cornstarch, and baking powder that creates a light, airy crust. The salt and pepper seasoning isn’t just a sprinkle; it’s a pre‑mix that infuses the squid with depth and complexity. The fresh chili and scallions are the finishing touches that elevate the dish from ordinary to extraordinary. If you've ever struggled with achieving that perfect crunch, you're not alone—and I've got the fix.
Most recipes get this completely wrong. They either overcook the squid, resulting in a rubbery texture, or they use a heavy batter that clings and makes the dish greasy. The secret lies in the balance of wet and dry ingredients, the right oil temperature, and a quick, high‑heat finish that locks in the flavor. And now the fun part—here’s how to do it step by step, so you can avoid the common pitfalls and create a dish that will wow everyone. Stay with me here—this is worth it.
What Makes This Version Stand Out
- Flavor: The salt and pepper seasoning is a pre‑blend that delivers a smoky, savory profile, while fresh ginger and garlic add bright, aromatic layers that cut through the richness of the squid. This combination is a game‑changer, turning a simple seafood dish into a flavor powerhouse.
- Crispiness: The batter’s unique mix of all‑purpose flour, cornstarch, and baking powder creates a light, airy coating that crisps to a golden edge when fried at the right temperature. The result is a crunch that shatters like thin ice, revealing a tender interior.
- Speed: The entire process—from prep to plate—takes under 45 minutes, making this dish ideal for weeknight dinners or last‑minute dinner parties. The quick batter prep and high‑heat cooking keep the workflow efficient.
- Versatility: The recipe can be adapted to different spice levels or flavor profiles by adjusting the chili, pepper, or adding a splash of citrus. It’s a blank canvas that invites creative variations.
- Make‑Ahead Potential: The squid can be marinated and coated in advance, then fried just before serving. This flexibility makes it a go‑to option for busy hosts who need to prep ahead.
- Presentation: The golden crust, bright scallion garnish, and vibrant chili slices create a visually striking dish that looks as good as it tastes. It’s a showstopper that will impress any crowd.
Inside the Ingredient List
The Flavor Base
Fresh garlic and ginger are the aromatics that set the stage for the dish. Garlic provides a sweet, savory depth that balances the briny squid, while ginger adds a bright, slightly peppery bite. Together they create a fragrant foundation that permeates every bite. If you’re allergic to garlic, simply substitute with garlic powder, but the fresh flavor will be noticeably different.
Fresh chili is the heat engine of this recipe. A single, finely sliced chili adds a subtle warmth that doesn’t overpower the delicate squid. If you prefer a milder version, reduce the chili to half or remove the seeds entirely. For a fiery kick, double the chili or add a dash of red pepper flakes during the batter stage.
The Texture Crew
All‑purpose flour is the backbone of the batter, providing structure and a golden crust. It’s the most accessible flour and works well with the cornstarch, which lightens the batter and prevents it from becoming too heavy. The baking powder is the secret to a fluffy, airy texture, reacting with the liquid to create tiny bubbles that expand during frying. Without it, the coating would be dense and heavy.
Cornstarch is the silent hero that ensures a crisp, non‑greasy finish. It absorbs excess moisture and creates a fine, dry surface that crisps beautifully. If you’re looking for a gluten‑free version, replace the flour with a gluten‑free blend that contains xanthan gum to maintain structure.
The Unexpected Star
The salt and pepper seasoning isn’t just a seasoning—it’s a flavor enhancer that elevates the entire dish. This blend contains smoked paprika, black pepper, sea salt, and a hint of cumin, delivering a smoky, savory punch that pairs perfectly with seafood. It’s the difference between a bland stir‑fry and a dish that sings. If you can’t find a pre‑made blend, mix equal parts of these spices to create your own.
The scallions add a fresh, green pop that cuts through the richness of the fried squid. They also provide a mild onion flavor that balances the saltiness of the seasoning. If you don’t have scallions on hand, a small amount of chopped green onions or even a splash of fresh cilantro can serve as a suitable substitute.
The Final Flourish
Cooking oil is the medium that turns the batter into a crisp, golden coating. Use a neutral oil with a high smoke point, such as canola or peanut oil, to avoid any off flavors. The oil temperature must be carefully monitored; too low and the coating will absorb oil, too high and it will burn. A good rule of thumb is to aim for 350°F (175°C) for a perfect balance of crunch and tenderness.
Water is added to the batter to create the right consistency. It helps the flour and cornstarch bind together without making the mixture too thick. If the batter feels too thick, add a splash more water; if it’s too thin, add a bit more flour or cornstarch. The goal is a pourable but thick batter that clings to the squid.
Everything's prepped? Good. Let's get into the real action...
The Method — Step by Step
- First, rinse the squid under cold running water and pat dry with paper towels. Trim the tentacles and cut the body into bite‑sized rings, leaving the head intact if you prefer a dramatic presentation. The clean, dry surface ensures the batter sticks properly. Watch the color of the rings; they should be a translucent, pearly white before cooking.
- In a large bowl, whisk together the all‑purpose flour, cornstarch, baking powder, and the salt and pepper seasoning until evenly mixed. The dry mix should look like fine sand with a subtle sheen from the spices. This step is crucial for an even coating—skip it and you’ll end up with clumpy batter.
- Add the minced garlic, minced ginger, and finely sliced fresh chili to the dry mix. Stir until the aromatics are evenly distributed. The mixture should have a fragrant aroma even before adding liquid. This is the moment when the dish’s character begins to emerge.
- Pour in the cup of water slowly while whisking to create a smooth batter. The batter should be thick enough to coat the squid but still pourable. If it feels too thick, add a tablespoon of water; if too thin, add a teaspoon of flour. The consistency is key to achieving that perfect crispy shell.
- Heat the cooking oil in a deep, heavy skillet or a wok over medium‑high heat. Use a thermometer to check the temperature—aim for 350°F (175°C). The oil should shimmer but not smoke. This step is a trickster; if the oil is too hot, the batter will burn before the squid cooks through.
- Dip each squid ring into the batter, ensuring a full coating, then carefully slide it into the hot oil. Do not overcrowd the pan; the oil temperature will drop and the coating will become soggy. Fry in batches of four to six, depending on pan size. The first few seconds should produce a crackling sound that signals the batter is cooking.
- Cook the squid for 2–3 minutes on each side, or until the batter turns a deep golden brown. The squid should still be slightly pink in the center, indicating it’s tender and not overcooked. Use tongs to flip gently, keeping the batter intact. The aroma at this point is irresistible.
- Once golden, remove the squid from the oil with a slotted spoon and drain on a rack or paper towels. Let it rest for a minute to allow the coating to set. The edges should be crisp, and the interior should still be juicy. This resting period prevents the coating from becoming soggy.
- While the squid is resting, heat the remaining oil to 350°F (175°C) again, and fry the scallions until they’re translucent and lightly browned. This step adds a fresh, slightly sweet crunch that balances the richness of the squid. Once done, drain them on a paper towel.
- Arrange the fried squid on a platter, drizzle with a splash of lime juice or a simple soy‑based sauce, and scatter the fried scallions on top. Garnish with thin slices of fresh chili for an extra pop of heat and color. Serve immediately while the coating is still hot and crisp. That’s it — you did it. But hold on, I've got a few more tricks that'll take this to another level...
Insider Tricks for Flawless Results
The Temperature Rule Nobody Follows
The oil temperature is the linchpin of this recipe. Too low and the batter will absorb oil, too high and it will burn. Use a thermometer or the water drop test to keep it steady at 350°F (175°C). The first few seconds of the batter's appearance will tell you if the oil is hot enough—look for a quick bubbling and a slight sizzle. If you’re frying a large batch, add a splash of water to the oil to bring the temperature back down; then re‑heat before adding more squid.
Why Your Nose Knows Best
The aroma of frying batter is a reliable indicator of doneness. When the coating starts to turn golden and emits a nutty, toasty scent, the squid is ready to be removed. If the smell is overly burnt or metallic, the oil is too hot. Trust your nose—it's more accurate than a timer for this dish.
The 5‑Minute Rest That Changes Everything
After frying, let the squid rest for exactly five minutes on a wire rack. This short period allows the steam to escape and the coating to set, preventing sogginess. I’ve tried skipping this step and the result was a soggy, heavy crust that felt like a disappointment. Give it that brief pause, and you’ll taste the difference.
Use a Deep‑Dish Thermometer
A deep‑dish thermometer keeps the oil temperature consistent, especially when you’re frying multiple batches. It’s an investment that pays off in crisp, golden results. If you don’t have one, a candy thermometer works just as well. The key is to monitor the temperature after each batch.
Add a Splash of Lemon Juice
A splash of fresh lemon juice right before serving brightens the flavor and cuts through the richness. The acidity also helps to balance the saltiness of the seasoning. I’ve found that a small squeeze of lime or lemon can elevate the dish from good to unforgettable.
Serve Immediately
The coating begins to soften as soon as the squid cools. Serve it hot for maximum crunch. If you need to hold it for a few minutes, place it on a rack and cover loosely with foil to retain heat while preventing condensation. The golden crust will stay crisp and the squid will remain juicy.
Creative Twists and Variations
This recipe is a playground. Here are some of my favorite ways to switch things up:
Coconut‑Crusted Squid
Swap out half of the flour for desiccated coconut and add a pinch of curry powder. The coconut adds a tropical flavor, while the curry gives a subtle heat that complements the chili. This version is perfect for a beach‑themed dinner.
Asian‑Inspired Glaze
After frying, drizzle the squid with a mixture of soy sauce, sesame oil, and a splash of rice vinegar. Toss in a handful of toasted sesame seeds for crunch. The glaze adds depth and a savory umami layer that turns the dish into an Asian street‑food favorite.
Mediterranean Twist
Replace the salt and pepper seasoning with a blend of oregano, thyme, and lemon zest. Finish with a drizzle of olive oil and a sprinkle of feta cheese. The herbs bring a bright, herbaceous note that pairs beautifully with the briny squid.
Spicy Cajun Variation
Add a tablespoon of Cajun seasoning to the batter and replace the fresh chili with a handful of diced bell peppers. The result is a smoky, spicy dish with a colorful presentation. It’s a crowd‑pleaser for Southern‑style gatherings.
Herb‑Infused Oil
Infuse the frying oil with rosemary and thyme before cooking. The oil will carry the herbal aroma into the coating, giving each bite a fragrant, savory note. This subtle addition elevates the dish to a gourmet level.
Sweet Heat Fusion
Drizzle the fried squid with a honey‑sriracha glaze before serving. The sweet heat creates a balanced flavor profile that appeals to both sweet and spicy lovers. The glaze also adds a glossy finish that makes the dish Instagram‑ready.
Storing and Bringing It Back to Life
Fridge Storage
Store leftover squid in an airtight container in the refrigerator for up to 2 days. Keep the coating separate by placing a paper towel between the layers to prevent moisture buildup. Reheat in a hot skillet for 2–3 minutes to restore crispness.
Freezer Friendly
Freeze the fried squid in a single layer on a parchment paper sheet before transferring to a freezer bag. It will stay good for up to 3 months. When ready to eat, thaw overnight in the fridge and reheat in a skillet as described above.
Best Reheating Method
The secret to reviving a previously fried dish is to reheat at a high temperature for a short time. Add a splash of water to the pan to create steam, which keeps the coating from drying out. After 2 minutes, remove the water and let the squid finish crisping in the residual heat.