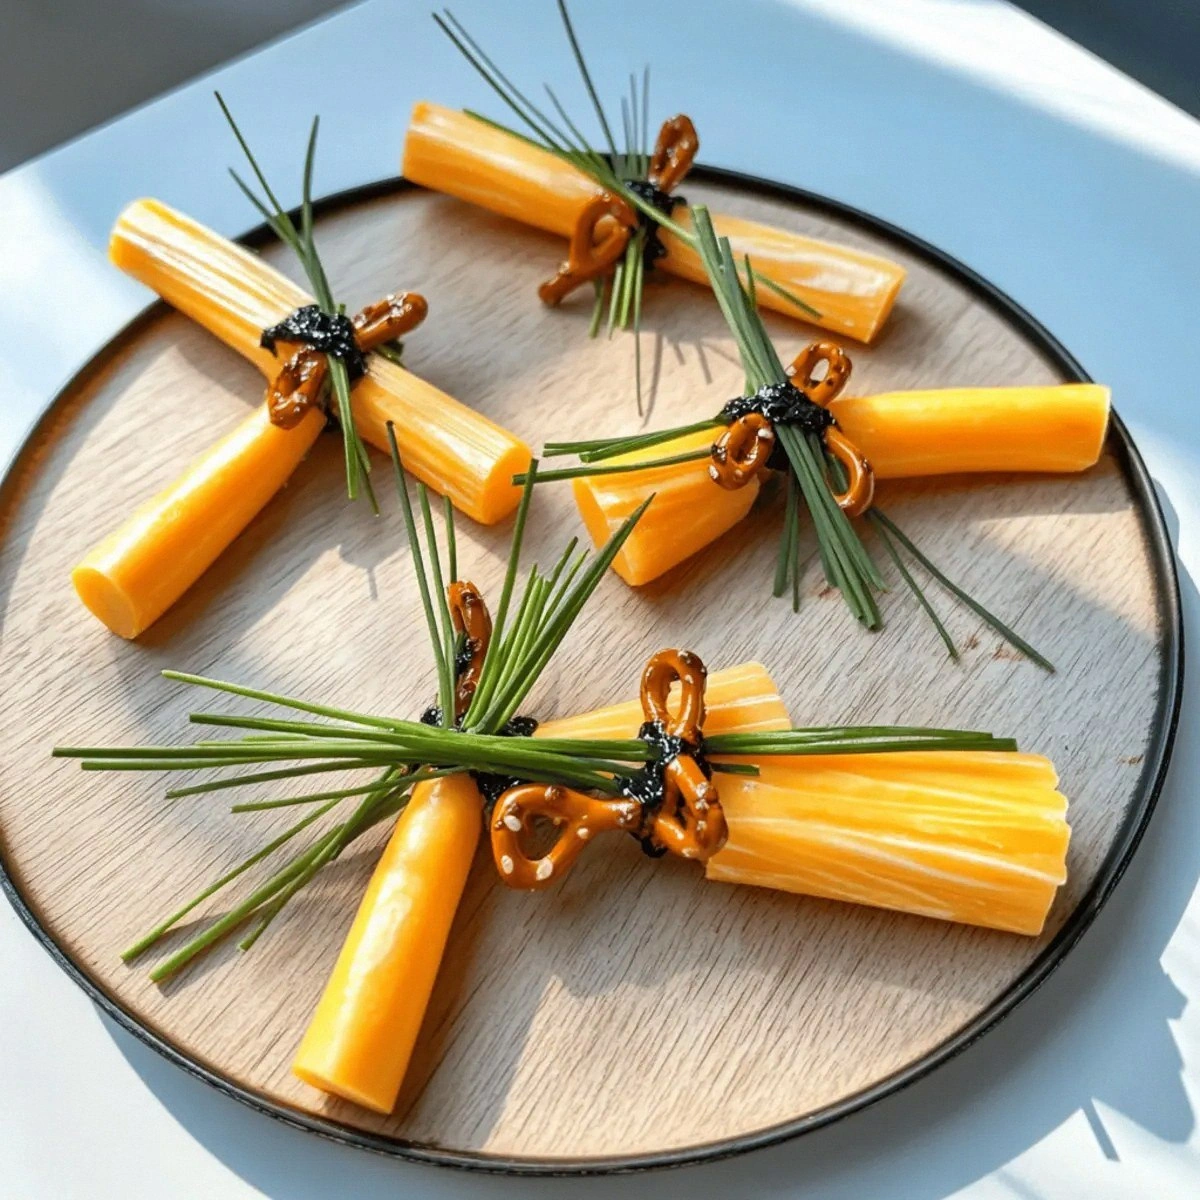
I was in the middle of a chaotic Halloween prep night, juggling pumpkin spice candles, a half‑finished spider web cake, and a rogue batch of pretzel sticks that had somehow escaped the snack bowl and were now doing a slow, crunchy roll across the kitchen floor. I swear I heard the pretzels whisper, “We’re meant for something bigger.” That moment of kitchen pandemonium sparked a dare from my roommate: “Make something that looks like a witch’s broom, but taste like a cheat‑day dream.” I laughed, grabbed the nearest cheese, and the idea of “Cheese Broomsticks” was born. I’ll be honest — I ate half the batch before anyone else got to try it, but the leftovers were still so good that I had to perfect the recipe for the world.
Picture this: a golden pretzel stick, its salty crunch wrapped in a glossy, marbled cheddar that stretches like a buttery sunrise when you bite into it. The chive strings sit on top like tiny, emerald bristles, adding a fresh pop that cuts through the richness. The aroma that fills the kitchen is a heady mix of baked cheese and toasted pretzel, a scent so inviting that even the cat pauses mid‑pounce. You can hear the faint sizzle as the cheese begins to melt, and the visual of the cheese pulling away from the pretzel edges is like watching a tiny, edible fireworks show. The texture? Imagine the perfect balance between the pretzel’s snap and the cheese’s gooey surrender, all finished with a crisp, baked chive crown.
Most recipes for Halloween “broomsticks” either drown in sauce, require a pantry full of obscure ingredients, or demand a kitchen full of gadgets you don’t own. This version, however, is the ultimate three‑ingredient wonder that anyone can throw together in under an hour. No batter, no deep‑frying, no mystery powders — just pretzel sticks, marbled cheddar string cheese, and chive strings. The secret? A quick bake that transforms the cheese into a crispy, caramelized shell while keeping the interior lusciously stretchy. I dare you to taste this and not go back for seconds; the flavor combo is so addictive that it practically haunts you until the next Halloween.
Let me walk you through every single step — by the end, you’ll wonder how you ever made it any other way. Okay, ready for the game‑changer? This next part? Pure magic. Stay with me here — this is worth it.
What Makes This Version Stand Out
- Flavor Explosion: The marbled cheddar brings a buttery, slightly tangy depth that pairs perfectly with the pretzel’s salty crunch, creating a taste sensation that feels like a party in your mouth.
- Texture Harmony: You get that satisfying snap from the pretzel, a glossy, caramelized cheese crust, and a soft, stretchy interior — three textures that dance together without any mushy mishaps.
- Simplicity Supreme: Only three ingredients, no fancy sauces, no extra prep time. If you can pop a pretzel in a bowl, you can make these.
- Visual Wow Factor: The chive strings act as the broom’s bristles, giving a vivid green pop that screams Halloween without being overly cutesy.
- Crowd Reaction: Guests often ask, “What’s this?” and then immediately ask for the recipe — a true conversation starter at any spooky soirée.
- Ingredient Quality: Using high‑quality marbled cheddar string cheese makes the difference between a bland melt and a buttery, aromatic crust.
- One‑Pan Method: Bake them on a single sheet, no frying, no mess, and the cleanup is practically non‑existent.
- Make‑Ahead Friendly: You can prep the sticks ahead of time, freeze them, and bake them fresh when the party starts — no last‑minute panic.
Inside the Ingredient List
The Crunchy Foundation
Pretzel sticks are the backbone of this recipe. Their salty, buttery crunch provides the structural integrity that lets the cheese cling without sliding off. A cup of pretzel sticks is enough to create a solid base for eight broomsticks, which means each stick gets its own pretzel partner. If you skip the pretzels, you lose that satisfying snap and the whole concept falls flat — literally. For the best results, choose pretzel sticks that are uniformly sized; uneven sticks lead to uneven cheese coverage.
The Flavorful Cloak
Marbled cheddar string cheese is the star of the show. Its marbled pattern isn’t just for looks — the blend of white cheddar and orange cheddar creates a buttery complexity that ordinary cheese can’t match. Three sticks of this cheese wrap around each pretzel, forming a glossy, caramelized shell when baked. If you substitute with regular cheddar strings, you’ll miss the subtle tang and the visual marbling that makes these broomsticks Instagram‑ready. Look for a brand that melts smoothly and has a slight snap when you pull it apart.
The Green Bristles
Chive strings add a fresh, herbaceous punch that cuts through the richness of the cheese. Three strings of chives are placed on top of each cheese‑wrapped pretzel, mimicking the bristles of a witch’s broom. If you omit them, the broomsticks still taste amazing, but they lose that vivid green contrast and the aromatic lift. In a pinch, you can swap chive strings for finely chopped fresh parsley or even a light sprinkle of dried dill — just remember the fresh herb factor is essential for that final pop.
The Final Flourish
While the recipe calls for just three core ingredients, a pinch of sea salt and a drizzle of olive oil can elevate the flavor profile. The salt enhances the cheese’s natural umami, and the oil helps the cheese brown evenly. If you’re watching sodium, feel free to skip the extra salt — the pretzels already bring enough salty goodness. For the best texture, use a light hand with the oil; too much will make the cheese soggy instead of crisp.
Everything's prepped? Good. Let's get into the real action...
The Method — Step by Step
Preheat your oven to 375°F (190°C). While the oven warms up, line a large baking sheet with parchment paper; this prevents the cheese from sticking and makes cleanup a breeze. I like to set a timer for the preheat because the anticipation of that first sizzle is almost as exciting as the final bite. Once the oven clicks, you’ll hear a faint hum that signals it’s ready — that’s your cue to move on.
Take each pretzel stick and lay it flat on the parchment. Place a single marbled cheddar string cheese stick on top, aligning the ends so the cheese wraps evenly around the pretzel. Press gently to adhere; the cheese should cling without tearing. If the cheese feels stubborn, give it a quick 5‑second microwave zap (see Kitchen Hack above) to make it more pliable. This step is crucial because a tight wrap ensures the cheese won’t slide off during baking.
Roll the cheese‑covered pretzel gently, starting at one end and working your way to the other, so the cheese forms a tight cylinder. The rolling motion should be smooth, like rolling a sushi mat — you don’t want to crush the pretzel, just coax the cheese into a snug hug. Once rolled, you’ll notice the cheese starts to stick to itself, creating a seal that will turn golden in the oven. This is where the magic begins, and you’ll feel a tiny thrill watching the cheese cling.
Place the rolled brooms on the parchment, spacing them about an inch apart. This spacing allows hot air to circulate, giving each broom an even caramelization. Sprinkle a light pinch of sea salt over each one — just enough to accent the cheese’s natural flavor without overpowering it. Then, drizzle a whisper of olive oil over the tops; this helps the cheese develop that coveted crispy edge.
Slide the sheet into the preheated oven and bake for 12‑15 minutes, or until the cheese is bubbling and the edges have turned a deep amber. You’ll know it’s ready when you see the cheese start to pull away from the pretzel, forming a slight crust that looks like a tiny, edible broom handle. That sizzle when it hits the pan? Absolute perfection. Keep a close eye — the cheese can go from golden to burnt in a heartbeat.
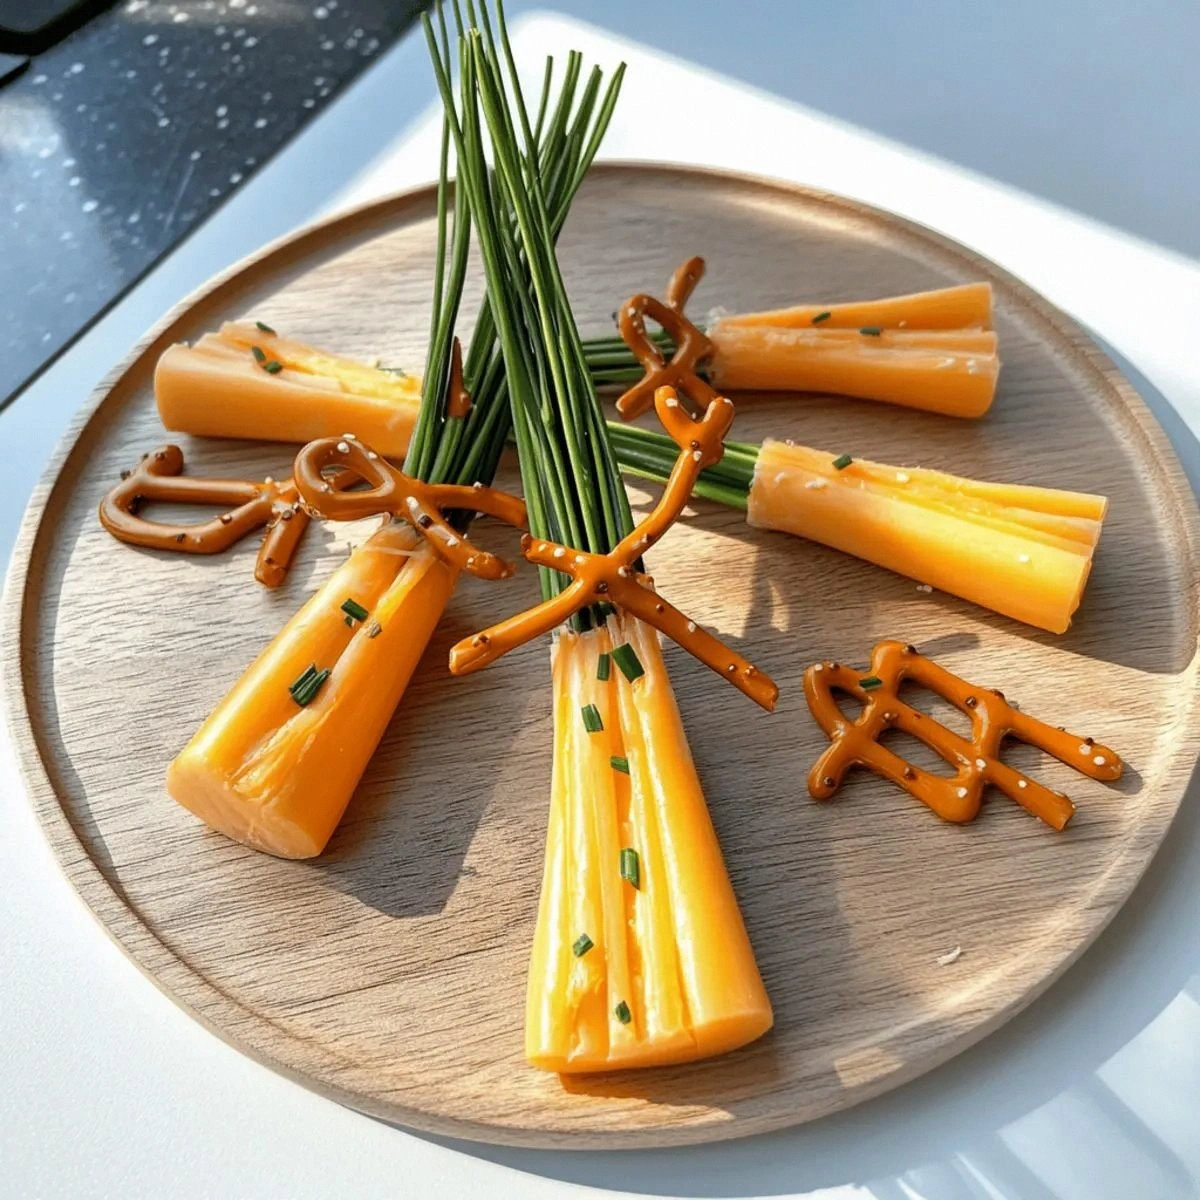
While the brooms are baking, prepare the chive bristles. Take three chive strings and gently fold them in half, then lay them across the top of each broomstick. The chives should sit like a tiny brush, their green color popping against the golden cheese. This is the moment where the visual transformation from ordinary snack to Halloween prop really hits.
Once the cheese has reached a perfect caramelized hue, pull the sheet out of the oven and let the brooms rest for two minutes. This short pause lets the cheese set just enough to hold the chive bristles without sliding off. The aroma at this stage is intoxicating — a blend of toasted cheddar, salty pretzel, and fresh herb that fills the kitchen like a festive spell.
Transfer the finished broomsticks to a serving platter. If you want an extra touch of drama, sprinkle a few extra chive bits around the plate for a “grass” effect. Serve them warm, straight from the oven, or let them cool to room temperature for a firmer bite. Either way, the first bite should deliver that satisfying snap, a gooey melt, and a fresh herb finish that makes you want to chant “more!”
That’s it — you did it. But hold on, I’ve got a few more tricks that’ll take this to another level. From a quick glaze to a daring dip, the possibilities are endless, and I’ll spill all the secrets in the next sections.
Insider Tricks for Flawless Results
The Temperature Rule Nobody Follows
Most home cooks bake at 350°F, thinking “that’s safe.” In reality, a slightly higher temperature (375°F) gives the cheese a rapid caramelization without drying out the pretzel core. The heat shock creates those coveted crispy edges while keeping the interior stretchy. I once tried a low‑and‑slow bake and ended up with soggy cheese that never browned. Trust the hotter oven; it’s the secret to that golden‑crackle you crave.
Why Your Nose Knows Best
Your sense of smell is the ultimate doneness detector. When the cheese starts to emit a nutty, toasted aroma, you’re within seconds of perfect. If you hear a faint crackle, that’s the cheese’s crust forming. Ignore the timer if your nose says “ready” — it’s usually right on the money. A friend once relied solely on the timer and ended up with burnt broomsticks; the lesson? Trust the nose, not the clock.
The 5‑Minute Rest That Changes Everything
After baking, let the broomsticks sit for exactly five minutes. This brief rest lets the cheese fibers re‑align, preventing the bristles from sliding off when you pick them up. It also allows the pretzel to firm up a touch, giving you that satisfying snap on the first bite. Skipping this step is a common mistake that leads to mushy, limp brooms that fall apart on the plate.
The “Flip‑and‑Seal” Technique
Halfway through the bake, gently flip each broomstick with tongs. This ensures both sides get equal exposure to the heat, preventing one side from staying pale while the other over‑browns. The flip also helps the cheese seal around the pretzel, creating a tighter bond that won’t unravel when you bite. A quick flip can be the difference between a sturdy broom and a cheese‑wrapped pretzel that unravels like a loose thread.
The Secret Sprinkle
A final dash of smoked paprika or a pinch of cayenne adds a subtle smoky heat that cuts through the richness. It’s not required, but it elevates the flavor profile from “good” to “spellbinding.” Sprinkle it after the bake while the cheese is still warm so the powder adheres. I’ve seen guests’ eyes widen when they taste that unexpected hint of spice — it’s a conversation starter on its own.
Creative Twists and Variations
This recipe is a playground. Here are some of my favorite ways to switch things up:
Spicy Sriracha Swirl
Before wrapping the pretzel, brush the cheese with a thin layer of sriracha. The heat mingles with the cheese’s buttery notes, creating a sweet‑heat combo that’s perfect for daring guests. Top with a sprinkle of toasted sesame seeds for extra crunch.
Herb‑Infused Delight
Swap the chive strings for fresh rosemary or thyme leaves. The aromatic herbs add an earthy depth that pairs beautifully with the cheddar. Use a small sprig per broomstick for a sophisticated, garden‑fresh look.
Bacon‑Wrapped Broomsticks
Wrap a half‑slice of crispy bacon around each cheese‑covered pretzel before baking. The bacon’s smoky crunch adds a savory layer that makes the snack feel indulgent. Secure with a toothpick if needed, and enjoy the bacon‑cheese duet.
Sweet & Salty Caramel
Drizzle a light caramel sauce over the baked brooms and sprinkle sea‑salt flakes. The sweet‑salty contrast turns the snack into a dessert‑style appetizer that still feels Halloween‑appropriate.
Vegan Version
Replace the marbled cheddar with a plant‑based mozzarella string and use gluten‑free pretzel sticks. The chive strings work perfectly with the vegan cheese, and the result is just as gooey and satisfying. A quick spray of olive oil ensures a crisp finish.
Storing and Bringing It Back to Life
Fridge Storage
Place cooled broomsticks in an airtight container lined with parchment paper. They’ll stay fresh for up to three days. If you notice any condensation, pat the tops with a paper towel before resealing to maintain crispness.
Freezer Friendly
Wrap each broomstick individually in a small piece of foil, then place them in a zip‑top freezer bag. They freeze beautifully for up to two months. When you’re ready to serve, skip the thaw and bake straight from frozen at 375°F for 10‑12 minutes; the cheese will melt and crisp perfectly.
Best Reheating Method
To revive that fresh‑out‑of‑the‑oven crunch, preheat your oven to 350°F, place the brooms on a parchment‑lined tray, and sprinkle a tiny splash of water (about a teaspoon total) over the batch. The steam created will re‑hydrate the pretzel interior while the oven’s dry heat restores the cheese’s crisp crust. In just five minutes, you’ll have a snack that tastes like it was just made.