Picture this: it’s a frosty Saturday morning, the kind where the world outside looks like a powdered sugar snow globe, and you’re stuck in a kitchen that smells like a bakery that just got a promotion. I was half‑asleep, clutching a mug of coffee that tasted like burnt toast, when the phone rang. My best friend dared me to create a holiday‑themed bread that could actually win the “most festive” award at our family’s annual potluck. I laughed, I accepted, and I immediately felt the pressure of a thousand Christmas carols echoing in my head.
The first attempt was a disaster—think dense, bland, and about as exciting as a plain white sweater. I stared at the dough, feeling the weight of disappointment, and thought, “If this doesn’t turn out, I’m going to need a new hobby.” Then, like a flash of tinsel, the idea hit me: what if I combined the tangy lift of buttermilk with the sparkle of red and green sprinkles, and gave the crust a buttery, sugary crunch? The result? A loaf that looks like a festive confetti bomb and tastes like a hug from Santa himself.
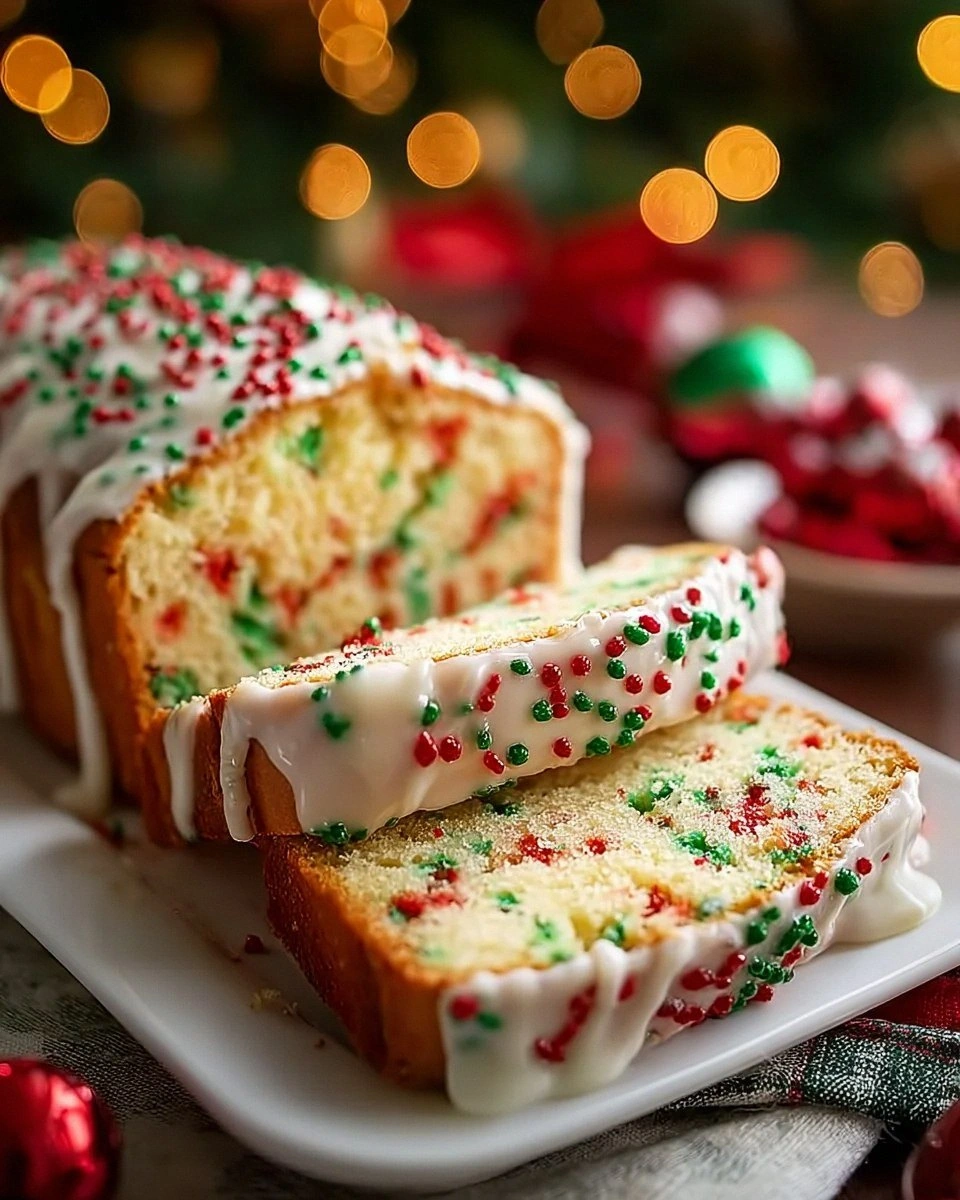
What makes this version truly unforgettable is the marriage of textures. The crumb is feather‑light, almost cloud‑like, thanks to the buttermilk’s acidity reacting perfectly with baking soda. Meanwhile, the crust forms a caramelized shell that snaps under your teeth like a fresh piece of candy cane. And let’s not forget the visual punch—those bright sprinkles burst through the golden top, turning any ordinary table into a winter wonderland.
But the real secret is a tiny trick I stumbled upon while watching a vintage cooking show: a brief, high‑heat blast at the end of baking that locks in moisture and gives the sprinkles a glossy, glass‑like finish. I’ll walk you through every single step — by the end, you’ll wonder how you ever made any other bread without this magic.
What Makes This Version Stand Out
- Flavor Explosion: The sweet vanilla and buttery notes are amplified by the tang of buttermilk, creating a balanced taste that sings louder than a choir of carolers.
- Texture Harmony: A tender, airy crumb meets a crisp, caramel‑kissed crust, delivering a bite that’s both soft and satisfyingly crunchy.
- Simplicity Meets Showstopper: Only pantry staples and a handful of sprinkles are needed, yet the result looks like it came from a professional patisserie.
- Festive Visuals: The red and green sprinkles aren’t just decoration; they’re woven into the dough, ensuring every slice bursts with holiday color.
- Universal Appeal: Kids love the sprinkles, adults love the sophisticated flavor profile—everyone ends up reaching for seconds.
- Ingredient Quality: Using real buttermilk and unsalted butter gives a richness you can’t fake with shortcuts.
- One‑Pan Wonder: No need for fancy pans; a simple loaf tin does the trick, making cleanup as easy as a winter breeze.
- Make‑Ahead Magic: This bread freezes beautifully, so you can prep it ahead of time and still serve it fresh on the big day.
Inside the Ingredient List
The Flavor Base
All‑purpose flour: This is the backbone of the loaf, providing structure and the ability to trap air bubbles for that lofty rise. If you swap it for cake flour, the bread will be too tender and may collapse; using whole‑wheat will add heft and a nutty note you might not want. Look for a flour that feels powdery, not gritty, and store it in an airtight container to keep it fresh.
Granulated sugar: Sugar not only sweetens but also contributes to the Maillard reaction, giving the crust its golden hue. Reducing it will make the crumb less tender, while extra sugar can lead to an overly caramelized top that might burn. If you’re watching carbs, try a ¼‑cup of coconut sugar for a subtle caramel twist.
Vanilla extract: A splash of vanilla adds warmth that balances the tang of buttermilk. Real vanilla beans can be used for an even richer flavor—just split a bean and scrape the seeds into the wet mix. Avoid imitation vanilla if you want that authentic, aromatic finish.
The Texture Crew
Baking powder: This leavening agent gives the bread its initial rise, creating those airy pockets. Too much will cause the loaf to puff up then collapse; too little leaves it dense. Stick to the measured amount and sift it with the flour for even distribution.
Baking soda: Works hand‑in‑hand with the acidity of buttermilk, producing carbon dioxide bubbles that lift the dough. If you forget it, the bread will be flat and lack that signature lightness. Ensure your soda is fresh—older soda loses potency.
Salt: Salt is the unsung hero that amplifies all other flavors and keeps the yeast (well, the chemical leaveners) in check. A pinch too much can make the crumb gritty; a pinch too little leaves the bread bland. Use fine sea salt for even dissolution.
The Unexpected Star
Unsalted butter: Melted butter adds richness and helps create a tender crumb. If you use salted butter, reduce the added salt accordingly. Let the butter cool slightly before mixing—if it’s too hot, it can melt the sugar crystals and affect texture.
Buttermilk: The star of the show, its acidity reacts with the baking soda to create a lofty rise while imparting a subtle tang that cuts through the sweetness. If you don’t have buttermilk, whisk 1 cup of milk with 1 tablespoon of lemon juice or white vinegar and let it sit for 5 minutes.
The Final Flourish
Red and green sprinkles: These are the festive fireworks that turn an ordinary loaf into a holiday masterpiece. They add a slight crunch and a burst of color that stays visible even after baking. For a more sophisticated look, use non‑sugar, edible glitter sprinkles that melt into a subtle sheen.
Optional Topping – Coarse sugar: Sprinkling coarse sugar on top before baking creates a sweet, crackly crust that glistens like frost. If you skip it, you’ll still have a beautiful loaf, but the crunch factor will be missing.
Additional sprinkles: Use these as a garnish after the loaf cools for an extra pop of color and a playful finish that makes kids squeal.
Everything's prepped? Good. Let's get into the real action...
The Method — Step by Step
Start by preheating your oven to 350°F (175°C). While the oven warms, grease a standard 9×5‑inch loaf pan with a thin layer of butter and dust it lightly with flour. This little ritual not only prevents sticking but also adds a subtle crust flavor that you’ll thank yourself for later. I dare you to taste this and not go back for seconds; the buttery aroma will already be dancing in the kitchen.
In a large bowl, whisk together the flour, baking powder, baking soda, and salt. This dry blend should look like a fine snowstorm—no lumps, just pure, white powder. Sifting isn’t mandatory, but it guarantees an even distribution of leavening agents, which is the difference between a lofty loaf and a flat pancake. Okay, ready for the game‑changer? The next step is where the magic truly begins.
In a separate saucepan, melt the butter over low heat until it’s just liquid, then set it aside to cool to lukewarm. This temperature is crucial: too hot and it will melt the sugar crystals, too cold and it won’t incorporate properly.
Kitchen Hack: Add a pinch of sea salt to the melted butter; it enhances the buttery flavor without making the loaf salty.In a mixing bowl, combine the granulated sugar, eggs, and vanilla extract. Beat them together until the mixture lightens in color and becomes slightly frothy—think sunrise on a winter morning. This aeration step traps air that will later expand in the oven, giving you that airy crumb you crave. If you over‑beat, you risk breaking down the protein structure, so stop once it looks glossy and smooth.
Now, gently fold in the cooled melted butter, followed by the buttermilk. The batter will look thick but glossy, like a luxurious frosting. At this point, stir in the red and green sprinkles, reserving a handful for the topping. The sprinkles will sink slightly, creating pockets of color throughout the loaf—visual proof that festive fun is baked right in.
Gradually add the dry flour mixture to the wet ingredients, stirring with a spatula just until combined. Over‑mixing will develop gluten, resulting in a tougher texture, so stop as soon as you see no streaks of flour. The batter should be slightly lumpy; that’s the hallmark of a tender crumb.
Transfer the batter into the prepared loaf pan, smoothing the top with a dampened spatula. Sprinkle the reserved sprinkles and the coarse sugar evenly across the surface. This final dust not only adds crunch but also creates a glossy, caramelized finish that catches the light like fresh snow.
Slide the pan into the preheated oven and bake for 25 minutes. Then, crank the heat up to 425°F (220°C) for the last 5‑7 minutes—this high‑heat blast is pure magic, giving the crust that crackly, caramelized edge while locking in moisture.
When the loaf is done, the top should be a deep golden‑amber, the edges will pull away slightly from the pan, and a gentle tap on the bottom will sound hollow.Watch Out: If your oven runs hot, the sugar topping can burn quickly; keep a close eye during the high‑heat phase.Remove the loaf from the oven and let it rest in the pan for 10 minutes. Then, turn it out onto a wire rack to cool completely. Patience is key—cutting into it too early will cause the crumb to collapse, ruining that cloud‑like texture you worked so hard to achieve. And now the fun part: watch the sprinkles sparkle as the loaf cools, promising a festive bite with every slice.
That's it — you did it. But hold on, I've got a few more tricks that'll take this to another level...
Insider Tricks for Flawless Results
The Temperature Rule Nobody Follows
Never bake a quick bread at a low temperature and expect a lofty rise. The initial 350°F sets the structure, while the final 425°F blast creates that coveted crust. If you skip the high‑heat finish, you’ll end up with a soft‑top loaf that looks more like a muffin than a festive loaf. I once tried a single‑temperature bake and the result was soggy—lesson learned.
Why Your Nose Knows Best
When the bread is about 20 minutes in, start sniffing. The moment you catch a buttery, caramel scent, you know the crust is forming. Trust that nose cue more than the timer; ovens can be unpredictable. I’ve seen friends pull a loaf out too early just because the timer rang, only to find a doughy interior.
The 5‑Minute Rest That Changes Everything
After removing the loaf from the pan, give it a 5‑minute rest before turning it onto the rack. This short pause lets the steam escape, preventing the bottom from getting soggy. It also allows the crumb to set, making slicing cleaner. Skip this, and you’ll see those dreaded gummy slices.
Egg‑White Shine for a Glossy Top
If you crave an extra‑shiny finish, whisk an egg white with a splash of water and brush it over the loaf before the final high‑heat blast. This creates a glossy, almost lacquered surface that catches the light beautifully. Just be careful not to over‑brush; a thin veil is enough.
Sprinkle Timing is Everything
Adding sprinkles too early can cause them to melt into the batter, losing their crunch. By sprinkling them right before the final 5‑minute high‑heat phase, they stay distinct, providing that satisfying pop when you bite. I’ve seen novice bakers dump the sprinkles in the batter and end up with a bland, uniformly colored loaf—don’t be that person.
Don’t Rush the Cool‑Down
Patience really is a virtue here. Let the loaf cool completely before slicing; the interior continues to set as it loses heat. Cutting too soon will cause the crumb to smear, and you’ll lose that airy texture. Trust me, the wait is worth it when you see those perfect, fluffy slices.
Creative Twists and Variations
This recipe is a playground. Here are some of my favorite ways to switch things up:
Chocolate Chip Surprise
Swap half of the sprinkles for mini chocolate chips. The melty pockets contrast beautifully with the buttery crumb, turning the loaf into a holiday dessert that even chocolate lovers adore.
Citrus Zest Boost
Add the zest of one orange and a teaspoon of orange extract to the wet mix. The citrus brightens the flavor, making the bread feel fresh and festive—perfect for a brunch spread.
Nutty Crunch
Fold in a quarter cup of toasted chopped pecans or walnuts. The nuts add a buttery crunch that pairs wonderfully with the sweet sprinkles, creating a sophisticated texture profile.
Spiced Holiday
Incorporate a teaspoon of ground cinnamon, a pinch of nutmeg, and a dash of ground cloves. This spice blend turns the loaf into a warm, aromatic centerpiece that smells like a Christmas market.
Gluten‑Free Adaptation
Replace the all‑purpose flour with a 1‑to‑1 gluten‑free flour blend, add a tablespoon of xanthan gum, and follow the same method. The result is just as fluffy, and the sprinkles still shine.
Vegan Version
Swap butter for coconut oil, use flax‑egg replacer (1 tbsp ground flaxseed + 3 tbsp water per egg), and replace buttermilk with soy or almond milk mixed with a tablespoon of lemon juice. The flavor shifts slightly, but the festive look stays intact.
Storing and Bringing It Back to Life
Fridge Storage
Wrap the cooled loaf tightly in plastic wrap or store it in an airtight container. It will stay fresh for up to five days, and the sprinkles will retain their crunch. For an extra moisture boost, place a slice of apple in the container—its humidity helps keep the crumb soft.
Freezer Friendly
Slice the loaf before freezing; this way you can pull out individual pieces as needed. Wrap each slice in parchment paper, then place them in a zip‑top bag. Freeze for up to three months. When you’re ready, let them thaw at room temperature for 30 minutes.
Best Reheating Method
Preheat your oven to 300°F (150°C), place the slice on a baking sheet, and add a tiny splash of water (about a teaspoon) on the top. Cover loosely with foil and heat for 8‑10 minutes. The steam revives the crumb, and the crust regains its crispness—like magic.