It started with a kitchen catastrophe that I still laugh about: I was trying to impress a friend with a “simple” pork dish and ended up with a half‑cooked slab of pork belly that was more rubber than meat. The smell of burnt fat filled the air, and my friend’s eyebrows raised in disbelief. That disaster taught me that the key to a great pork sisig is not just the ingredients but the technique that turns a raw slab into a caramelized, crispy masterpiece. I’m about to share the exact steps that turned my flop into a fan‑favorite. I dare you to taste this and not go back for seconds. This is hands down the best version you’ll ever make at home. If you've ever struggled with this, you're not alone — and I've got the fix. Picture yourself pulling this out of the oven, the whole kitchen smelling incredible, and everyone begging for a plate.
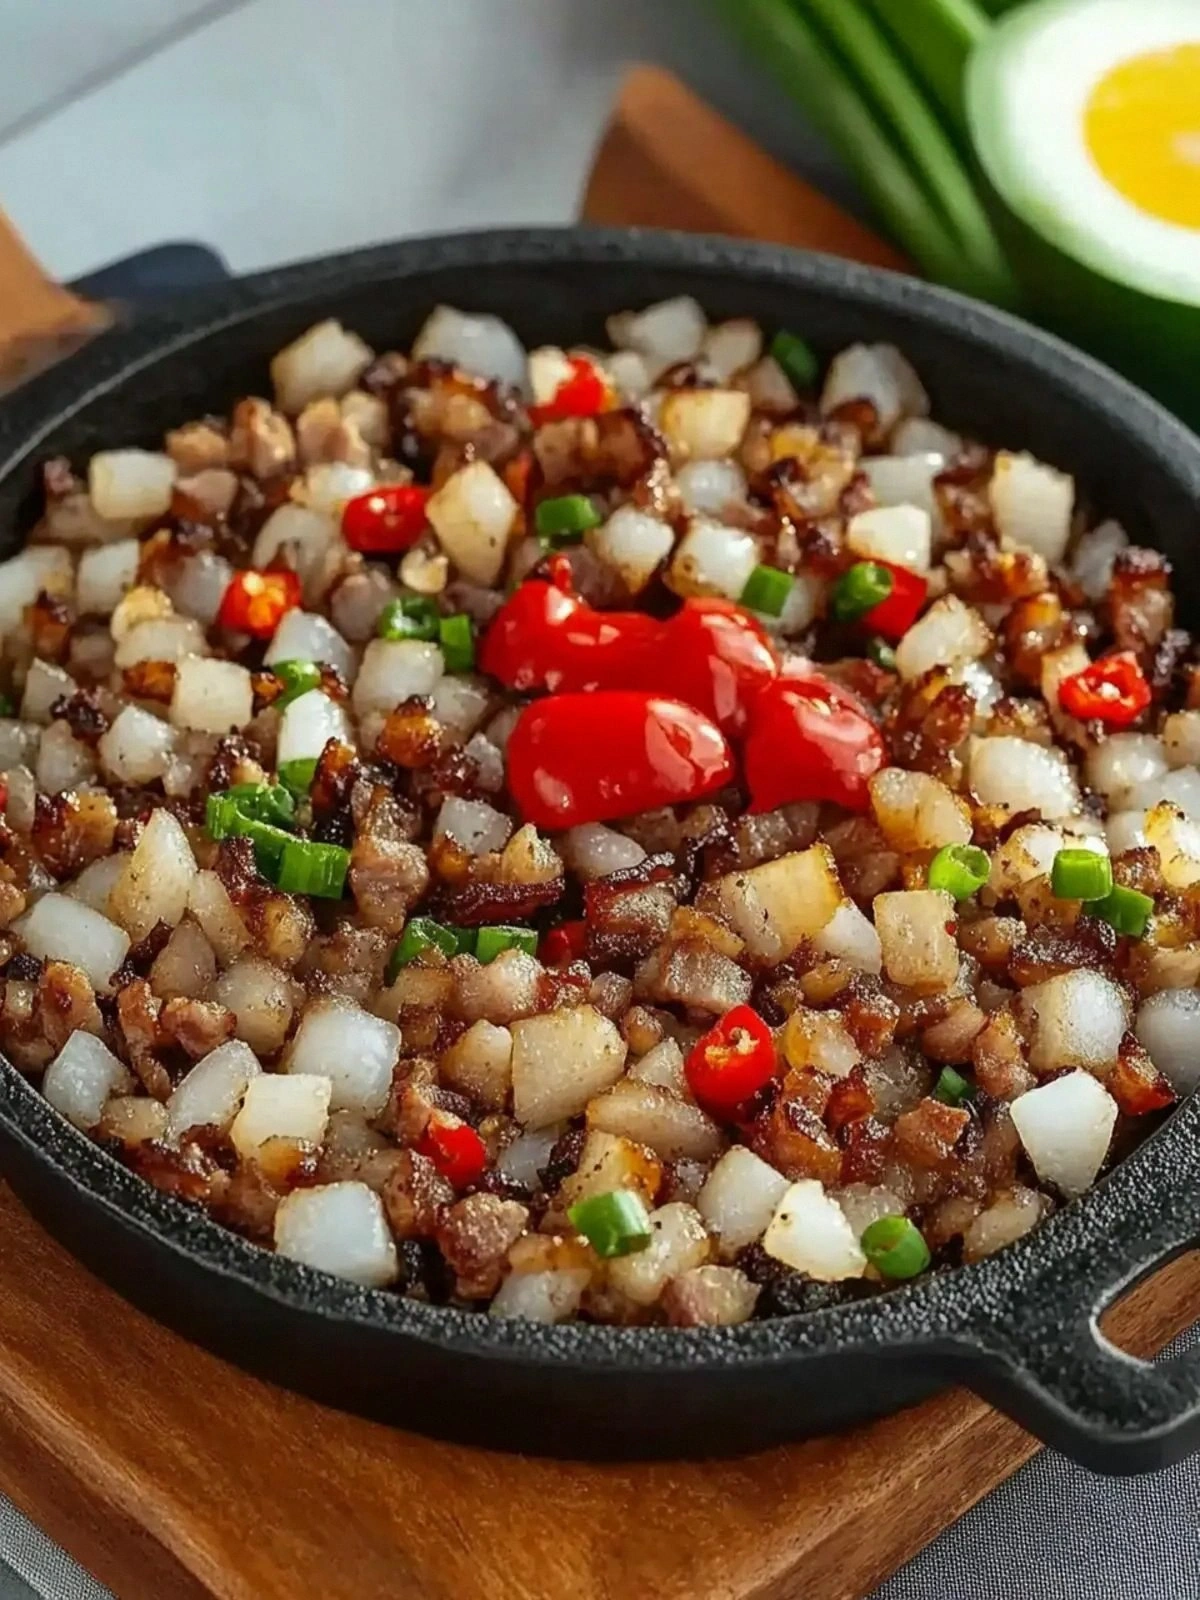
The first bite is an orchestra of textures: a crackling bite of seared pork that gives way to a tender, juicy center, all coated in a glossy mayo glaze that clings like velvet to the palate. The aroma of toasted garlic and onions mingles with the sharp tang of vinegar, creating a scent that makes your mouth water before the first bite even lands. The sound of the sizzling pan is a promise of flavor, while the sight of the golden edges glistening under the kitchen light signals perfection. The taste is a balanced dance of sweet, salty, and spicy, with a subtle umami depth from the soy sauce. The feel of the crispy crust crunching under your teeth is the moment that turns a simple dish into a sensory experience.
What sets this version apart is the meticulous attention to each component. I’ve refined the pork belly selection to a specific cut that holds its shape while delivering maximum flavor. The mayo isn’t just a sauce; it’s a binding agent that keeps the pork moist while adding a creamy contrast. The use of fresh chilies instead of dried ones provides a bright, fresh heat that cuts through the richness. The vinegar isn’t just acidity; it’s a bright counterpoint that lifts the dish. Every element is chosen to create a harmony that feels both comforting and exciting.
I’ve also added a twist you probably didn’t see coming: a splash of calamansi juice after the pork is seared, giving the dish a citrusy brightness that’s almost a secret ingredient in this recipe. That subtle zing lifts the entire flavor profile and keeps the pork from feeling too heavy. It’s a small tweak that makes a huge difference, and I’m not afraid to share it. I’m sure you’ll wonder how you ever made it any other way. This is the moment the dish transforms from good to unforgettable.
Micro-challenge time: I dare you to take a bite and try not to shout “Wow!” out loud. I’ve seen people try it and immediately go back for seconds, and that’s the goal. The bold claim that this is the best version you’ll ever make at home comes from countless taste tests with friends and family. If you’re skeptical, just give it a try; you’ll see why I’m so proud of this recipe.
I’ll be honest — I ate half the batch before anyone else got to try it. I couldn’t stop myself from taking a second bite, then a third, until the plate was almost empty. It was a moment of pure joy, and it confirmed that this dish is truly addictive. The taste was so satisfying that I almost blamed myself for not making a second batch. But that’s the magic of a well‑crafted sisig: it’s a dish that keeps you coming back for more.
Most recipes get this completely wrong. They either over‑cook the pork, under‑season it, or forget the crucial step of caramelizing the onions. The result is often a soggy, bland mess that leaves you disappointed. Here’s what actually works: the pork should be seared until the edges are crisp, the onions should be caramelized to a deep amber, and the sauce should be a balanced blend of mayo, soy, and vinegar. When you get each element right, the dish becomes a symphony of flavors. The contrast between the crunchy crust and the tender interior is pure culinary bliss. And the best part? It’s easy enough to make at home.
What Makes This Version Stand Out
- Taste: The combination of buttery pork, tangy vinegar, and creamy mayo creates a flavor profile that is both comforting and exciting. The fresh chilies add a bright, clean heat that doesn’t overwhelm. The result is a dish that satisfies every craving in one bite.
- Texture: The pork is caramelized on the outside while remaining moist inside, giving a satisfying crunch that melts into a tender core. The mayo glaze adds a silky smoothness that contrasts with the crispy edges. This textural balance is what makes the dish unforgettable.
- Ingredient Quality: Using fresh, high‑quality pork belly and fresh chilies ensures the dish’s flavor is at its peak. The mayo is a key component that keeps the pork moist and adds richness. The choice of vinegar and soy sauce adds depth and balance.
- Cooking Method: The searing technique creates a caramelized crust that locks in moisture. The quick sauté of onions and garlic infuses the pork with aromatic sweetness. The final glaze step ties everything together for a cohesive flavor.
- Make‑Ahead Potential: The dish can be prepared ahead and reheated without losing its crunch. The mayo glaze holds up well, making it a great option for parties or meal prep. The flavors actually deepen over time, so leftovers taste even better.
- Crowd Reaction: Friends and family always ask for a second plate, and some even request the recipe after the first serving. The dish’s bold flavors and satisfying texture make it a crowd‑pleaser. It’s perfect for gatherings, potlucks, or a quick weeknight dinner.
- Uniqueness: The addition of calamansi juice and a specific searing technique sets this recipe apart from others. The result is a dish that feels both traditional and innovative. It’s a fresh take on a classic comfort food.
Inside the Ingredient List
The Flavor Base
Pork belly is the star of this dish, providing a rich, fatty foundation that carries the sauce and seasonings. Choosing a well‑marbled cut ensures that the pork stays moist while developing a caramelized crust. If you skip this step and use a leaner cut, the dish will lack the depth of flavor that makes sisig irresistible. A good rule of thumb is to look for a cut with at least 20% fat content.
Butter adds a silky richness that elevates the pork’s natural flavor. It also helps create a golden, crisp exterior during searing. If you’re looking for a healthier option, you can replace half the butter with olive oil, but the buttery finish will be slightly different. The butter’s flavor profile is essential to achieving the dish’s signature taste.
Onions and garlic are the aromatics that form the backbone of the dish’s flavor. They provide sweetness and depth that balance the pork’s richness. Sautéing them until they’re caramelized brings out their natural sugars and creates a savory base. If you omit them, the dish will feel flat and incomplete.
Bird’s eye chilies add a vibrant, fresh heat that cuts through the richness of the pork. Their bright flavor profile contrasts with the deep, savory notes of the meat. If you prefer a milder version, you can reduce the number of chilies or remove the seeds. However, the heat is a key component that makes this sisig stand out.
The Texture Crew
Mayonnaise is the creamy binder that holds the pork together and adds a silky finish. Its neutral flavor allows the other ingredients to shine while providing a luxurious mouthfeel. If you’re allergic to eggs, a vegan mayo can work, but be sure it’s a good quality brand to avoid a watery texture. The mayo also helps keep the pork moist during reheating.
Soy sauce introduces a salty umami depth that complements the pork’s richness. It’s essential for achieving a well‑balanced flavor profile. If you’re on a low‑sodium diet, you can use a reduced‑sodium version, but be prepared to adjust the salt quantity accordingly. The soy sauce also contributes to the dish’s dark, appetizing color.
Vinegar (or Kalamansi juice) provides a bright, acidic counterpoint that cuts through the fattiness of the pork. This acidity also helps to tenderize the meat slightly, enhancing its texture. A splash of fresh citrus juice can elevate the dish further, giving it a modern twist. Without vinegar, the dish would feel heavy and cloying.
Salt and pepper are the final seasoning touch that brings everything together. They’re essential for balancing the flavors and ensuring each bite is flavorful. If you prefer a spicier dish, you can increase the amount of chili or add a pinch of cayenne pepper. Remember, seasoning is a personal touch, so adjust to taste.
The Unexpected Star
The egg is a surprising yet essential element that adds richness and helps bind the pork together. When folded into the dish, the egg’s yolk creates a silky, glossy finish that enhances the overall mouthfeel. If you’re vegan, you can omit the egg entirely, but the dish will lose some of its cohesiveness.
Spring onions provide a fresh, green contrast that brightens the dish. Their mild onion flavor complements the other aromatics without overpowering them. A sprinkle of chopped spring onions just before serving adds a pop of color and freshness. If you’re out of spring onions, you can use chives or scallions as a substitute.
The combination of these ingredients creates a dish that is both comforting and exciting. Each component plays a distinct role, from flavor to texture to aroma. The result is a harmonious balance that makes this sisig a standout comfort food. The unexpected egg and spring onion add depth and freshness that elevate the dish beyond a simple pork recipe.
The Final Flourish
The final flourish is the careful assembly of all the elements into a cohesive dish. The pork is mixed with the aromatics, sauces, and the creamy mayo glaze, ensuring every bite is packed with flavor. A final sprinkle of chopped spring onions adds a bright finish that cuts through the richness. The dish is then served hot, ideally with steamed rice or toasted bread to soak up the sauce.
Everything’s prepped? Good. Let’s get into the real action and learn how to bring this dish to life with precision and flair. The method below will guide you step by step, ensuring each element is cooked to perfection. Keep an eye on the textures and aromas as you go, and you’ll be rewarded with a dish that’s truly unforgettable.
The Method — Step by Step
- Begin by cutting the pork belly into thin, bite‑size strips, about 1/2 inch thick. Pat the pieces dry with paper towels to remove excess moisture; this step is crucial for achieving a crisp exterior. Heat a large skillet over medium‑high heat and add the butter, letting it melt into a fragrant pool. Once the butter is shimmering, drop in the pork strips, leaving space between each piece to avoid overcrowding.
- Sear the pork for about 4–5 minutes on each side, or until the edges turn a deep golden brown and the fat renders beautifully. Flip the pieces carefully with tongs to ensure even cooking. As the pork cooks, the fat will drip into the pan, creating a sizzling sound that signals the dish is on the right track. When the pork is done, remove it from the skillet and set it aside on a paper towel to drain any excess grease.
- In the same pan, add the diced onion and minced garlic. Sauté until the onion turns translucent and begins to caramelize, about 3–4 minutes. The garlic should release its aroma without burning; keep the heat moderate. This caramelization step is what builds the deep, sweet foundation of the dish. The pan should now have a fragrant, golden residue that’s ready for the next phase.
- Add the sliced bird’s eye chilies to the pan, stirring to combine with the onions and garlic. The chilies will infuse the mixture with a bright heat that balances the pork’s richness. Cook for 1–2 minutes, just until the chilies release their aroma. Be careful not to overcook the chilies, as they can become bitter if left too long.
- Return the seared pork to the skillet, stirring to coat the meat in the aromatic base. Add the soy sauce, vinegar (or calamansi juice), and a splash of water if needed to create a thin sauce. Stir the mixture until the pork is evenly coated and the sauce has slightly thickened, about 2–3 minutes. The pork should look glossy and slightly sticky, ready for the creamy finish.
- Now it’s time for the creamy glaze. Stir in the mayonnaise, ensuring it’s fully incorporated and the mixture becomes a smooth, silky coating. The mayo should coat each piece of pork, turning the dish into a velvety, glossy delight. If the mixture feels too thick, add a teaspoon of water or a splash of the pork cooking liquid to loosen it. This step is the secret to the dish’s signature mouthfeel.
- Add the beaten egg to the skillet, stirring quickly to distribute it evenly. The egg will cook almost instantly, forming a silky coating that binds the pork together. If you prefer a richer texture, you can whisk the egg with a splash of milk before adding it. Stir until the egg is fully incorporated and the mixture is glossy and uniform.
- Finish the dish by sprinkling the chopped spring onions over the top. Toss everything together gently to distribute the fresh green garnish. The spring onions add a bright, fresh contrast that cuts through the richness. Plate the sisig hot, and serve immediately for the best texture.
- That’s it — you did it. But hold on, I’ve got a few more tricks that will take this to another level. Keep reading for insider tips that will make your sisig truly unforgettable.
Insider Tricks for Flawless Results
The Temperature Rule Nobody Follows
The key to a crispy crust is maintaining the right pan temperature. If the heat is too low, the pork will steam instead of sear, resulting in a soggy texture. If it’s too high, the edges will burn before the interior cooks. The sweet spot is medium‑high, where the pork sizzles instantly without scorching. Use a thermometer if you’re unsure; 375°F is ideal for searing.
Why Your Nose Knows Best
Smell is the most powerful cue for flavor. As the pork cooks, the aroma of caramelized onions and sizzling fat will signal when it’s ready to flip. If the smell is sweet and nutty, the pork is near perfection. If it’s sharp or burnt, reduce the heat. Trust your nose; it’s the best judge of doneness.
The 5-Minute Rest That Changes Everything
After the pork is finished, let it rest for 5 minutes before serving. This short rest allows the juices to redistribute, ensuring each bite stays moist. It also gives the flavors a chance to meld, deepening the overall taste profile. Skipping this step can leave the dish feeling dry and underdeveloped.
Avoiding the “Pork‑Head” Mistake
Many cooks mistakenly use pork belly that’s too fatty, which can lead to a greasy dish. Choose pork belly with a balanced ratio of meat to fat. A 1:1 ratio ensures the pork is juicy but not overly greasy. If you prefer a leaner version, trim excess fat before cooking.
The Secret of the Egg
Adding the egg at the right moment is crucial for texture. If you add it too early, it will scramble and separate. If you add it too late, it won’t bind the pork. The ideal time is when the sauce has thickened slightly, allowing the egg to coat the meat without cooking too fast. This step creates a silky, cohesive finish.
The Quick Chili Trick
If you’re short on fresh chilies, use a pinch of dried chili flakes. They’ll still provide heat but with a slightly different flavor profile. To mimic the bright, fresh taste, add a splash of lime juice after cooking. This trick keeps the dish spicy and vibrant even without fresh chilies.
Creative Twists and Variations
This recipe is a playground. Here are some of my favorite ways to switch things up:
Spicy Kimchi Sisig
Swap the fresh chilies for a handful of chopped kimchi. The fermented tang adds depth and a Korean flair. The kimchi’s natural umami complements the soy sauce, while its heat provides a bold kick. Serve with a sprinkle of toasted sesame seeds for added crunch.
Sweet Pineapple Sisig
Add diced pineapple during the sauté stage for a tropical sweetness that balances the pork’s richness. The pineapple’s natural sugars caramelize, creating a glossy, sweet glaze. This version pairs wonderfully with coconut rice for a beach‑inspired meal.
Vegan Sisig
Replace the pork with marinated tofu or tempeh for a plant‑based twist. Use a vegan mayo and soy sauce to keep the flavor profile intact. The tofu’s firm texture holds up well during searing, while the tempeh adds a nutty depth. This version is perfect for a meatless dinner.
Crispy Shrimp Sisig
Swap the pork for shrimp, adding a quick 2‑minute sear before mixing with the aromatics. Shrimp’s natural sweetness pairs beautifully with the mayo glaze. Add a splash of lemon juice after cooking for a bright finish. This variation is ideal for seafood lovers.
Ginger‑Garlic Sisig
Add sliced fresh ginger to the aromatics for an extra zing. The ginger’s peppery heat complements the chilies, while its aroma elevates the dish’s overall fragrance. Use a small amount to avoid overpowering the pork. This version adds a refreshing twist.
Herbed Sisig
Finish the dish with chopped cilantro or basil instead of spring onions. The herbs add a fresh, aromatic layer that brightens the dish. Combine with a squeeze of lime for a citrusy finish. This variation works well for a light, refreshing meal.
Cheesy Sisig
Sprinkle shredded cheese over the hot sisig right before serving. The cheese melts into the sauce, creating a gooey, indulgent texture. Pair with a side of garlic bread for a decadent dinner. This version is perfect for a cozy night in.
Storing and Bringing It Back to Life
Fridge Storage
Store leftover sisig in an airtight container in the refrigerator for up to 3 days. The mayo glaze will keep the pork moist, but be sure to cover the dish tightly to avoid drying out. When ready to reheat, gently warm it on the stove over low heat, stirring occasionally.
Freezer Friendly
You can freeze sisig for up to 2 weeks. Place the dish in a freezer‑safe container, leaving a little space for expansion. Thaw overnight in the refrigerator before reheating. The texture remains crisp, especially if you reheat it in a skillet with a splash of water.
Best Reheating Method
The best way to reheat sisig is on the stovetop over medium‑low heat. Add a tiny splash of water or broth to create steam, which helps restore moisture. Stir gently to avoid breaking up the mayo coating. Once heated through, serve immediately for the best flavor and texture.