I still remember the first time I tried to make Japanese curry at home like it was yesterday. I was living in a tiny studio apartment with a stove that had two working burners and a dream. I'd just come back from a week in Tokyo where I had curry rice at this little underground spot in Shibuya that changed my life. The owner didn't speak English, I didn't speak Japanese, but when he placed that steaming bowl in front of me, we both understood the universal language of "this is going to blow your mind." I came home determined to recreate that magic, armed with nothing but a package of store-bought curry roux and pure stubbornness. Three failed attempts later, I was ready to admit defeat. The first one tasted like dishwater, the second burned so badly I had to throw out my pan, and the third congealed into something that resembled chocolate pudding gone wrong.
But here's the thing about obsession — it makes you persistent in ways that border on ridiculous. I spent months testing different techniques, hunting down the perfect ingredients, and probably consuming enough curry to permanently tint my bloodstream a gentle golden color. Friends started calling me the "Curry Whisperer" (okay, maybe that was just my mom being supportive, but still). What I discovered along the way completely transformed not just how I make curry, but how I understand comfort food itself. This isn't just about following a recipe; it's about understanding why each element matters, from the way onions transform when you give them time to develop their sweetness, to the moment when the roux hits the pot and everything comes together like a beautiful, aromatic symphony.
Fast forward to today, and I'm sharing the culmination of years of delicious experiments. This version of Japanese curry rice isn't just good — it's the kind of good that makes you cancel dinner plans because you'd rather stay home with leftovers. It's the kind of good that has my neighbor knocking on my door at 9 PM asking if I "accidentally" made too much again (spoiler alert: it's never an accident). The sauce is velvety and complex, coating each grain of rice like a warm blanket, with vegetables that hold their shape but melt in your mouth, and a depth of flavor that makes you close your eyes involuntarily when you take the first bite.
What makes this version different? We're going to layer flavors like we're building a skyscraper of taste. We'll caramelize those onions until they're practically jam, add a secret ingredient that'll make your taste buds do a double-take, and use a technique that ensures your curry has that restaurant-quality gloss that makes people think you've got some serious culinary training. Trust me on this — by the time we're done, you'll be making excuses to have people over just so you can show off. Let me walk you through every single step — by the end, you'll wonder how you ever made it any other way.
What Makes This Version Stand Out
Ridiculously Rich: This curry achieves a depth that usually takes hours of simmering by using a combination of caramelized onions and a touch of honey that creates layers of sweet-savory complexity. The result is a sauce that tastes like it's been developing for days, not minutes.
Silky Smooth Sauce: While most home versions end up grainy or separated, our technique ensures a velvety consistency that coats your spoon like liquid velvet. The secret lies in the temperature control when adding the roux — we'll show you exactly when and how.
Foolproof Technique: I've tested this recipe on friends who claim they can't even boil water successfully. Every single one nailed it on their first try. The method is so forgiving that even if you wander off to answer a text, dinner won't be ruined.
Ingredient Flexibility: Don't have chicken? Use beef. Hate carrots? Double the potatoes. Vegetarian? Skip the meat entirely and add some mushrooms. This recipe bends to your preferences without breaking.
Leftover Gold: If you think this is good on day one, wait until you try it reheated. The flavors meld and deepen overnight, transforming leftovers into something even more spectacular than the original meal.
Weeknight Friendly: Despite tasting like a weekend project, this entire dish comes together in under an hour. Most of that is hands-off simmering time when you can set the table, help with homework, or just collapse on the couch.
Authentic Taste, Home Kitchen Approved: This captures that authentic Japanese curry house flavor using ingredients you can find at any regular grocery store. No specialty shops required, no obscure ingredients you'll use once and forget.
Alright, let's break down exactly what goes into this masterpiece...
Inside the Ingredient List
The Flavor Foundation
The onion in this recipe isn't just a supporting player — it's the entire foundation upon which we build our flavor empire. When you slice that large onion thinly and let it slowly transform in the pan, something magical happens. The natural sugars begin to break down and caramelize, creating complex compounds that add incredible depth to your curry. This process takes about 15-20 minutes, but don't rush it. The difference between properly caramelized onions and merely softened ones is the difference between a good curry and a life-changing one. If you skip this step, your curry will taste flat and one-dimensional, like listening to your favorite song with one headphone broken.
Garlic and ginger might be optional in some recipes, but here they're essential supporting actors that elevate the entire performance. Fresh ginger adds a bright, spicy note that cuts through the richness of the curry, while garlic provides that umami backbone that makes everything taste more complex. If you don't have fresh ginger, ground ginger works in a pinch, but use only a third of the amount since dried spices are more concentrated. The key is to add them at just the right moment — too early and they'll burn, too late and they'll taste raw and harsh.
Soy sauce might seem out of place in Japanese curry, but it's the secret weapon that adds an incredible depth of flavor. Just one tablespoon enhances all the other ingredients, making them taste more like themselves. It's like the bass player in a band — you might not notice it's there, but you'd definitely miss it if it were gone. Use regular soy sauce, not low-sodium, because we want that punch of umami that only properly fermented soy sauce can provide.
The Texture Crew
Carrots aren't just here for their pretty color — they're natural sweeteners that balance the savory elements of the curry. When you cut them into chunks, they cook evenly and become tender without turning to mush. The key is to cut them into pieces that are roughly the same size as your potato chunks so everything cooks at the same rate. If you cut them too small, they'll dissolve into the sauce and you'll lose that satisfying bite. Too large, and they'll still be crunchy when everything else is perfectly tender.
Potatoes are the comfort food champions of this dish, soaking up all the curry flavor like little flavor sponges. I prefer Yukon Gold potatoes because they hold their shape better than Russets, which tend to fall apart. When you cut them into bite-sized pieces, aim for about 1-inch chunks — large enough to stay intact during simmering, but small enough to fit comfortably on your spoon with rice. Pro tip: soak your cut potatoes in cold water for 10 minutes before cooking to remove excess starch and prevent them from sticking together.
The Japanese curry roux is the heart and soul of this dish, and not all curry roux is created equal. The most common brands you'll find are Golden Curry, Vermont Curry, and Java Curry, each with its own flavor profile. Golden Curry is the most traditional and has a medium spice level, Vermont is slightly sweeter with honey and apple, and Java is more complex with a bit more heat. Buy the block form, not the powder, because the block contains the perfect ratio of spices, flour, and fat to create that signature glossy sauce. If you can't find Japanese curry roux, you can make your own with curry powder, flour, and butter, but trust me — the store-bought blocks are worth seeking out.
The Unexpected Star
Here's where we separate the amateurs from the pros: honey or grated apple. This tiny addition transforms good curry into restaurant-quality curry by adding a subtle sweetness that rounds out all the flavors. The natural sugars help balance the savory elements and create that complex flavor profile that keeps you coming back for more. Use honey for convenience, or grate a quarter of an apple if you want to be extra authentic. Fuji apples work best because they're sweet but not cloying, and they dissolve completely into the sauce. Don't skip this step — it's the difference between curry that tastes homemade and curry that tastes like it came from a proper Japanese kitchen.
Water versus chicken broth is a debate that rages in curry circles, but here's my take: use broth if you want richer flavor, water if you want the pure taste of the curry roux to shine through. I usually go with water because good curry roux has enough flavor on its own, and using broth can sometimes muddle the clean curry taste. That said, if you're adding chicken to the recipe, chicken broth creates a beautiful harmony between the protein and the sauce. Vegetable broth works too, but avoid beef broth — it can make the curry taste heavy and muddy.
The Protein Player
Boneless chicken thighs are my protein of choice because they're forgiving and packed with flavor. Unlike chicken breast, which dries out faster than a sponge in the Sahara, thighs stay juicy and tender even if you accidentally overcook them a bit. Cut them into 1-inch pieces so they cook quickly and evenly, and don't forget to pat them dry before seasoning — moisture is the enemy of good browning. If you can't find boneless thighs, bone-in works too, but you'll need to add 10 minutes to the cooking time. Just make sure to remove the skin, which can make the curry greasy.
Beef is an excellent alternative that creates a completely different but equally delicious curry. Use stew beef or chuck roast, cut into similar-sized pieces as the chicken. The key with beef is to brown it well at the beginning — those browned bits on the bottom of the pan are pure flavor gold. Beef curry takes a bit longer to cook, but the result is a rich, hearty dish that's perfect for cold winter nights. If you're feeling fancy, a mix of half chicken and half beef gives you the best of both worlds.
Going vegetarian? No problem — just skip the meat entirely and add some hearty vegetables like mushrooms, zucchini, or even some canned chickpeas for protein. The curry is so flavorful that you won't miss the meat at all. If you're adding mushrooms, use a mix of varieties for different textures: shiitake for meaty bite, oyster for silkiness, and cremini for earthiness. Add them after you caramelize the onions so they can brown and develop their own umami flavors.
Everything's prepped? Good. Let's get into the real action...
The Method — Step by Step
- Start by heating your vegetable oil or butter in a large, heavy-bottomed pot over medium heat. You want the fat to shimmer but not smoke — if it starts smoking, your heat is too high and you'll burn the onions before they caramelize. Add your thinly sliced onion and spread it out in an even layer. Now, here's where patience becomes your superpower. Let the onions cook slowly, stirring only every 3-4 minutes. They'll go through stages: first they'll turn translucent, then they'll start to brown at the edges, and finally they'll turn a deep golden color and smell incredibly sweet. This process takes about 15-20 minutes, but it's the foundation of incredible flavor. If you try to rush this step, you'll end up with bitter, burnt onions that will ruin your entire curry.
- While your onions are working their magic, prep your other vegetables. Cut your carrots into chunks that are roughly the same size — I like to cut them on the bias for more surface area, which means more flavor. For the potatoes, peel them and cut them into 1-inch chunks, then place them in a bowl of cold water to prevent browning. If you're using chicken, pat it dry with paper towels and season it with a pinch of salt and pepper. Moisture is the enemy of good browning, so really get in there and dry those pieces off. This is also a great time to measure out your curry roux — you'll need about half a box for four servings, but having it ready to go makes the final assembly much smoother.
- Once your onions are deeply caramelized and smell like heaven, push them to the sides of the pot and add your protein to the center. Let the meat sit undisturbed for 2-3 minutes so it can develop a nice brown crust. This is where the flavor magic happens — those browned bits on the bottom of the pot are called fond, and they're pure gold. Don't crowd the pan or the meat will steam instead of brown. If you're making a large batch, brown the meat in batches instead of all at once. When the meat is browned on all sides, stir everything together and add your minced garlic and ginger. Cook for just 30 seconds — you want to wake up their flavors but not burn them.
- Now it's time for the vegetables. Drain your potatoes and add them to the pot along with the carrots. Stir everything together so the vegetables get coated in all those beautiful browned flavors. Add your water or chicken broth — it should just barely cover the vegetables. If you need more liquid, add it; if you have too much, pour some off. You want everything to be submerged but swimming in a pool of liquid. Bring this to a gentle boil, then reduce the heat to low and let it simmer for about 15 minutes. The vegetables should be tender enough to pierce with a fork but not falling apart.
- Here's where we separate the amateurs from the pros: turn off the heat before adding your curry roux. I know, I know — it seems counterintuitive, but trust me on this. When the liquid is boiling, the roux can seize up and create lumps that no amount of stirring will fix. Let the pot sit for about 2 minutes until the bubbling stops, then break your curry roux into pieces and add them one at a time, stirring constantly. Each piece should dissolve completely before you add the next one. This gradual incorporation creates a smooth, glossy sauce that'll make you look like a culinary genius.
- Once all the roux is incorporated, it's time for our secret weapons: soy sauce and honey (or grated apple). Stir in the soy sauce first — it'll darken the curry slightly and add incredible depth. Then add your honey or grated apple. The sweetness balances the savory elements and creates that complex flavor profile that makes Japanese curry so addictive. If you're using apple, grate it directly into the pot so you capture all the juice. Stir everything together and turn the heat back on to low. Let it simmer gently for 5-7 minutes, stirring occasionally. The sauce will thicken and take on a beautiful glossy sheen.
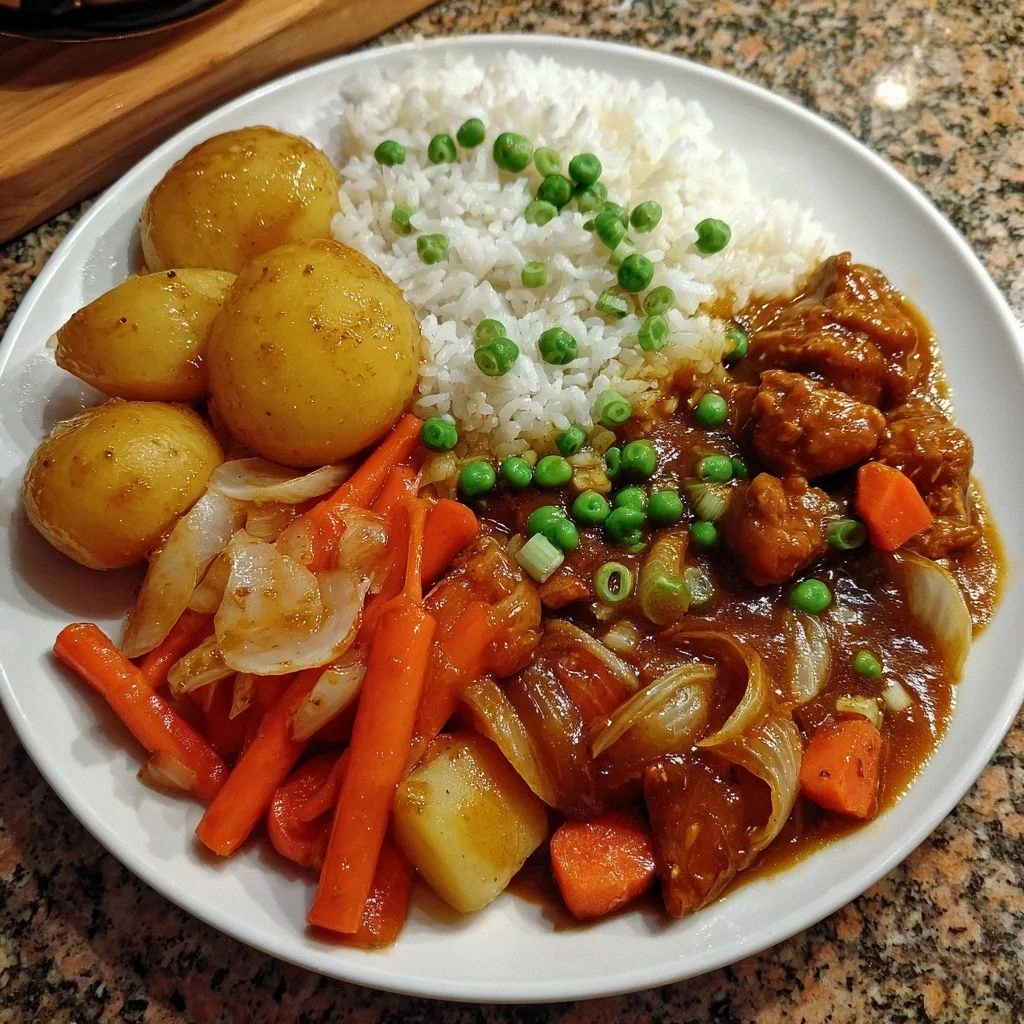
- Now comes the moment of truth: taste your curry and adjust the seasoning. It might need a pinch more salt, a splash more soy sauce, or another drizzle of honey. Everyone's taste buds are different, so make it yours. If it's too thick, add a splash more water or broth. Too thin? Let it simmer a bit longer. The consistency should coat the back of a spoon but still be pourable. Remember that the sauce will continue to thicken as it cools, so err on the slightly thinner side. Serve it over steaming hot Japanese rice, garnish with a few fukujinzuke (pickled vegetables) if you're feeling authentic, and prepare for the compliments to roll in.
- The final step is crucial but often overlooked: let your curry rest for at least 5 minutes before serving. This allows the flavors to meld and the sauce to reach the perfect consistency. While it's resting, fluff up your rice with a rice paddle or fork. Japanese short-grain rice should be sticky enough to pick up with chopsticks but not gummy or mushy. If you're using leftover rice, reheat it with a splash of water in the microwave, covered, for about 30 seconds. The steam will refresh it and make it taste freshly made. Serve your curry in deep bowls with a generous mound of rice on the side, letting people mix them together as they eat. That's the traditional way, and traditions exist for a reason — they just work.
That's it — you did it. But hold on, I've got a few more tricks that'll take this to another level...
Insider Tricks for Flawless Results
The Temperature Rule Nobody Follows
Here's something that'll change your curry game forever: pay attention to temperature at every stage. When you caramelize onions, medium heat is your sweet spot — hot enough to brown but cool enough to prevent burning. When you add the roux, the liquid should be hot but not boiling (around 180°F if you're using a thermometer). And here's the kicker that nobody tells you: when you reheat leftover curry, do it gently over low heat with a splash of water. High heat breaks the emulsion and gives you that greasy separation that makes leftover curry sad. I learned this the hard way after nuking a bowl on high power and ending up with an oil slick that would make an environmentalist cry.
Why Your Nose Knows Best
Your nose is actually the best tool for knowing when each stage is perfectly done. Onions are properly caramelized when they smell sweet and slightly nutty, not sharp or sulfurous. The curry is perfectly seasoned when you can smell all the different spices distinctly — if one aroma overpowers the others, you need to adjust. And here's a weird but true fact: if your curry smells slightly sweet and floral, you've nailed the honey/apple balance. If it smells only savory, it needs a touch more sweetness. This sounds like kitchen voodoo, but trust your senses — they've been evolving for millions of years specifically to help you cook better food.
The 5-Minute Rest That Changes Everything
After your curry finishes cooking, turn off the heat and let it sit, covered, for exactly five minutes. Not ten, not two — five. This is when the magic happens: the sauce thickens to the perfect consistency, the flavors distribute evenly, and the temperature drops to that ideal "hot but won't burn your tongue" level. During this time, the starches from the potatoes continue to thicken the sauce naturally, and the aromatics settle down so you taste complexity instead of just heat. A friend tried to skip this step once and ended up with curry that tasted flat and one-dimensional. Don't be that friend.
The Rice Ratio Revelation
The ratio of curry to rice is more important than you think. Traditional Japanese serving style is about 60% rice to 40% curry, which might seem rice-heavy if you're used to drowning your rice in sauce. But here's why it works: Japanese short-grain rice is sticky and mild, designed to complement rather than compete with the curry. Too much sauce overwhelms the subtle sweetness of the rice and throws off the balance. Plus, the stickiness of the rice helps pick up every last drop of curry, so nothing goes to waste. If you're using jasmine or basmati rice, you can be more generous with the sauce since those varieties are more aromatic and can stand up to heavier saucing.
The Make-Ahead Miracle
Japanese curry actually improves with age, making it the perfect make-ahead meal. The flavors continue to develop and meld in the refrigerator, creating a more complex and harmonious taste. Make a double batch on Sunday, and you'll have dinner sorted for the week. Store the curry and rice separately — the rice in an airtight container in the fridge, and the curry in a separate container. When reheating, add a splash of water to the curry and warm it gently over low heat. The rice can be refreshed with a damp paper towel in the microwave. Properly stored, curry keeps for up to four days in the refrigerator, though honestly, it's never lasted that long in my house.
Creative Twists and Variations
This recipe is a playground. Here are some of my favorite ways to switch things up:
The Veggie Lover's Dream
Skip the meat entirely and load up on vegetables for a rainbow curry that's as beautiful as it is delicious. Add zucchini, bell peppers, and mushrooms along with the carrots and potatoes. Use vegetable broth instead of water, and add a can of drained chickpeas for protein. The secret is to cut each vegetable to a size that matches its cooking time — bell peppers can go in with the potatoes, but delicate zucchini should be added in the last 10 minutes. This version is so satisfying that even dedicated carnivores won't miss the meat.
The Heat Seeker's Version
For those who like to live dangerously, turn up the heat with some spicy additions. Add a tablespoon of sriracha with the soy sauce, or toss in some sliced Thai chilies with the vegetables. You can also use a spicier curry roux — brands like Java Curry have more kick than Golden Curry. For true heat lovers, add a teaspoon of Korean gochujang along with the roux. It adds a fermented, spicy depth that plays beautifully with the curry spices. Just remember that the heat will intensify as the curry sits, so start conservative and add more to taste.
The Coconut Curry Conversion
Transform your Japanese curry into a tropical fusion by replacing half the water with full-fat coconut milk. This creates a richer, creamier sauce with a subtle coconut sweetness that pairs beautifully with the curry spices. Add some fresh cilantro as a garnish and a squeeze of lime juice just before serving. This version works especially well with shrimp instead of chicken — add the shrimp in the last 5 minutes of cooking so they stay tender and don't overcook. It's like a vacation in a bowl.
The Breakfast Curry Surprise
Leftover curry for breakfast is a revelation, especially when you top it with a fried egg. The runny yolk creates a sauce that's so good you'll wonder why eggs aren't standard curry equipment. Heat up leftover curry and rice, fry an egg sunny-side up, and place it right on top. Break the yolk and let it run into the curry. Add a side of toast for dipping, and you've got a breakfast that'll power you through the entire morning. This is especially good on cold weekend mornings when you want something comforting but more exciting than oatmeal.
The Curry Croquette Creation
Turn leftover curry into Japanese-style croquettes (korokke) that'll make you look forward to leftovers. Thicken leftover curry by cooking it down until it's very thick, then chill it completely. Form the cold curry into small logs, coat them in flour, beaten egg, and panko breadcrumbs, then deep-fry until golden brown. Serve these with tonkatsu sauce or just plain rice for a completely different experience. These freeze beautifully — make a big batch and you'll have instant appetizers or a quick lunch option that reheats in the air fryer.
The Fusion Taco Tuesday
This might sound crazy, but curry makes incredible taco filling. Use a slotted spoon to serve the curry (drain off most of the sauce) in warm tortillas. Top with shredded cabbage, pickled onions, and a drizzle of sriracha mayo. The combination of warm spices with fresh, crunchy toppings is absolutely addictive. These tacos are especially good with the vegetarian version of the curry. Serve them with a side of edamame or a simple cucumber salad for a fusion meal that'll have everyone asking for the recipe.
Storing and Bringing It Back to Life
Fridge Storage
Store leftover curry in an airtight container in the refrigerator for up to 4 days. The key is to cool it completely before refrigerating — hot curry in a cold fridge creates condensation that can water down your sauce and promote bacterial growth. If you made a large batch, divide it into smaller containers so it cools faster. Always store the curry and rice separately — the rice will absorb liquid from the curry and become mushy if stored together. For best results, press plastic wrap directly onto the surface of the curry to prevent a skin from forming.
Freezer Friendly
Japanese curry freezes beautifully and keeps for up to 3 months in the freezer. Portion it into freezer-safe containers or zip-top bags, removing as much air as possible to prevent freezer burn. Label each container with the date and contents — trust me, three months from now, that mystery block of brown stuff will not be appetizing. Thaw frozen curry overnight in the refrigerator, then reheat gently on the stove with a splash of water. The sauce may separate slightly after freezing, but a good stir while reheating will bring it back together.
Best Reheating Method
The best way to reheat curry is low and slow on the stovetop with a splash of water or broth. Heat it gently over medium-low heat, stirring occasionally, until it's steaming hot. If you're in a hurry, the microwave works too — just use 50% power and stir every minute to prevent hot spots. Always add a tablespoon of water per serving when reheating to restore the perfect consistency. Rice can be refreshed with a damp paper towel in the microwave, or better yet, make fresh rice and use the leftover curry as a quick topping. Whatever you do, don't overheat the curry — high heat can break the emulsion and give you a greasy, separated mess.