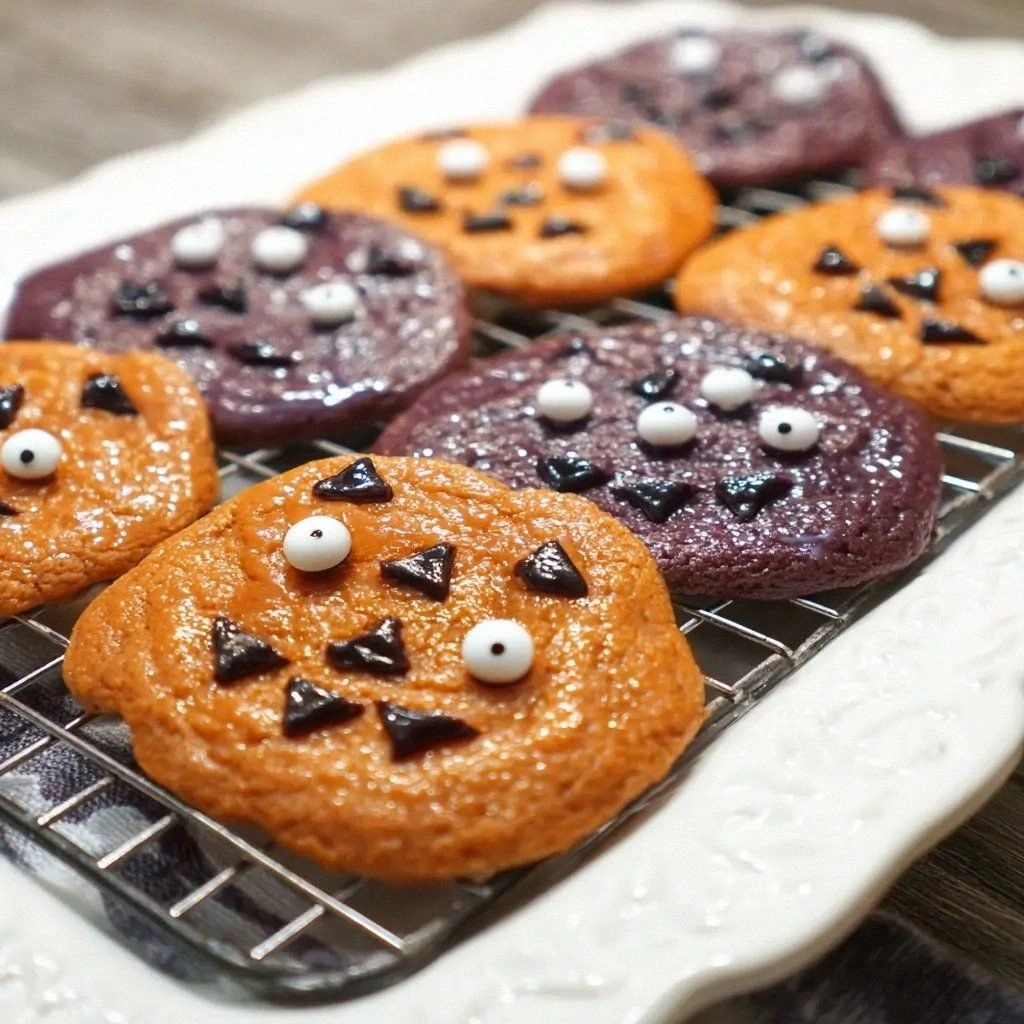
Picture this: it’s the night before Halloween, the house is a swirl of orange lights, and you’re standing in the kitchen with a bag of flour that’s about to become the most coveted treat of the season. I had a craving that wasn’t just for something sweet—there was a deep, almost nostalgic yearning for a cookie that could feel like a hug wrapped in chocolate and pumpkin. I remember the kitchen disaster that set the stage for this recipe: a batch of brownies that turned into a sticky, uneven mess because the batter had too much moisture and the oven was too hot. That night, I was determined to find the sweet spot between fudgy and chewy, a texture that would keep the cookies moist yet crisp. The result? A pudding cookie that melts in your mouth like velvet, leaving a lingering chocolate‑pumpkin aftertaste that feels like a secret whispered by a friendly ghost. If you’re ready for a cookie that will make you question everything you thought you knew about dessert, let me walk you through every single step—by the end, you’ll wonder how you ever made it any other way.
Now, before you even think about grabbing your mixing bowls, imagine the scent of freshly baked chocolate and warm spices drifting through the air, a scent that instantly transports you to a cozy cabin in the woods. That scent is the promise of what’s to come: a cookie that feels like a warm hug, with a subtle crunch from the chocolate chips that crackle like tiny, edible fireflies. I dare you to taste this and not go back for seconds because the first bite will have you hooked, and the second will have you planning a midnight snack run. I’ll be honest—when I first baked these, I ate half the batch before anyone else got a chance to try them, and that was a clear sign I had stumbled onto something special. Most recipes get this completely wrong by either overbaking or underseasoning, but this version balances everything like a well‑tuned orchestra. Picture yourself pulling this out of the oven, the whole kitchen smelling incredible, and knowing you’ve just created a Halloween classic that will become the talk of the town.
The magic of these pudding cookies lies in their ability to blend the comfort of a classic chocolate cookie with the seasonal flair of pumpkin and warm spices. The result is a cookie that’s chewy, yet has a slight crunch on the edges, and each bite releases a wave of chocolatey sweetness that lingers like a ghostly echo. I’ve spent hours experimenting with ratios, and the final formula feels like a secret handshake between you and the kitchen. This isn’t just another cookie recipe; it’s a culinary experience that brings a little bit of Halloween into every bite. Whether you’re a seasoned baker or a newbie, this recipe will feel like a friendly guide, turning your kitchen into a haunted house of flavor. Let’s dive in and see why this version stands out from every other recipe out there.
One of the biggest challenges with pudding cookies is getting the texture just right—too dry, and they’re like brittle sugar cookies; too wet, and they’re a soggy mess that falls apart. I spent countless afternoons measuring, mixing, and tasting, trying to find that sweet spot where the cookies are soft enough to melt in your mouth but still hold their shape. The secret, I discovered, is in balancing the moisture content with the right amount of fat and the precise baking time. With the right technique, these cookies come out with a glossy, almost syrupy surface that’s as beautiful as it is delicious. The result is a cookie that feels like a piece of chocolate cake in your hand, with a hint of pumpkin that keeps it grounded in the Halloween spirit. Trust me, once you try this, you’ll never go back to your old cookie recipe again.
But here’s the twist that will make your mouth water before you even start: I incorporated a small amount of instant pudding mix into the batter, giving the cookies an extra layer of moisture and a subtle vanilla undertone that elevates the chocolate flavor. This technique is a game‑changer, adding a silky texture that makes each bite feel like a decadent dessert. I’ve never seen a pudding mix used in a cookie recipe before, and it’s a secret that will keep your guests asking for the recipe after every bite. The result is a cookie that feels like a sweet, comforting hug wrapped in chocolate, with a hint of pumpkin spice that will make your taste buds dance. If you’ve ever struggled with chewy cookies that don’t quite hold together, this is the fix you’ve been looking for. Let’s break down exactly what goes into this masterpiece…
What Makes This Version Stand Out
Texture: These cookies strike the perfect balance between chewy and slightly crisp, thanks to the precise mix of flour, cocoa, and a touch of instant pudding. The result is a cookie that feels like a chocolate cake in your hand, with a subtle crunch that adds depth. This texture is achieved by carefully controlling the moisture content and baking time, ensuring each bite is a delightful experience.
Flavor Depth: The addition of pumpkin puree and warm spices like cinnamon, nutmeg, and ginger creates a flavor profile that’s both comforting and festive. The chocolate base is rich and velvety, while the spices provide a warm, earthy undertone that’s unmistakably Halloween. This layered flavor experience makes the cookies a standout dessert for any spooky gathering.
Simplicity: Despite its complex flavor profile, the recipe is incredibly simple to follow. With just a few pantry staples and a handful of fresh ingredients, you can create a cookie that feels like a gourmet treat. The recipe’s step‑by‑step instructions make it accessible for bakers of all skill levels.
Make‑Ahead Potential: These cookies can be baked ahead of time and stored in an airtight container for up to a week, making them a convenient option for holiday parties and last‑minute treats. The cookies hold up well, maintaining their moist interior while still having a crisp edge.
Ingredient Quality: By using high‑quality cocoa powder and fresh pumpkin puree, the recipe elevates the flavor and texture of the cookies. The choice of ingredients makes a noticeable difference, ensuring each cookie is a masterpiece of flavor.
Audience Appeal: Whether you’re a kid who loves sweet treats or an adult looking for a sophisticated dessert, these pudding cookies cater to all ages. Their Halloween theme adds a playful element that makes them a hit with guests of all ages.
Visual Appeal: The glossy, chocolatey surface of these cookies is almost too pretty to eat, with chocolate chips that look like tiny edible stars. The cookies look like they’ve been baked by a professional pastry chef, adding an extra layer of allure to the dessert. This visual appeal enhances the overall experience, making the cookies a showstopper.
Alright, let’s break down exactly what goes into this masterpiece…
Inside the Ingredient List
The Flavor Base
At the heart of these cookies is a rich chocolate base made from unsweetened cocoa powder and a generous amount of granulated sugar. The cocoa powder not only provides depth but also balances the sweetness, creating a chocolate that’s neither too sweet nor too bitter. By using high‑quality cocoa, you’re ensuring a smoother, more velvety finish that elevates the entire cookie.
The granulated sugar is crucial for achieving that glossy, almost syrupy surface. It caramelizes slightly during baking, giving the cookies a beautiful sheen that’s both appetizing and professional. If you prefer a slightly less sweet cookie, you can reduce the sugar by a quarter cup, but be prepared for a slightly drier texture.
When combining the cocoa and sugar, it’s essential to sift both together first. Sifting removes lumps and ensures a uniform batter, which is vital for a consistent texture throughout each cookie. This step also helps incorporate air into the batter, giving the cookies a lighter feel.
The Texture Crew
Instant pudding mix is the secret weapon that locks in moisture and gives the cookies that signature pudding‑like chew. It’s a simple addition that transforms the batter into a silky, luxurious dough. The pudding mix also helps bind the ingredients together, preventing the cookies from falling apart during baking.
Butter, melted and cooled slightly, adds richness and a buttery flavor that complements the chocolate. The fat from the butter also helps create a tender crumb, making the cookies feel indulgent. Be sure to use unsalted butter so you can control the salt level precisely.
Eggs act as the glue that holds everything together. They also provide structure, giving the cookies their shape and preventing them from spreading too much. Two large eggs are the perfect amount for this recipe, ensuring a stable batter without becoming too runny.
The Unexpected Star
Pumpkin puree brings a subtle sweetness and a hint of earthiness that is unmistakably Halloween. It also adds moisture, ensuring the cookies stay soft and chewy. When selecting pumpkin puree, choose a pure, unseasoned variety to avoid overpowering the other flavors.
The spices—cinnamon, nutmeg, ginger, and cloves—add depth and warmth that make the cookies feel cozy and festive. These spices are carefully balanced to create a harmonious flavor profile that doesn’t dominate the chocolate but enhances it. If you’re a spice enthusiast, feel free to tweak the amounts to suit your taste.
The Final Flourish
Chocolate chips are the finishing touch that adds a delightful crunch to each bite. They also provide a burst of chocolate flavor that complements the base. Use semi‑sweet chips for the best balance of sweetness and richness.
Milk, just a splash, helps bring the batter together and ensures the cookies have a slightly moist interior. It also helps activate the baking soda and baking powder, ensuring the cookies rise evenly. A small amount of milk is all you need; too much can make the batter too wet.
For those who prefer a dairy‑free version, substitute the milk with almond or oat milk and use dairy‑free butter. The texture and flavor will remain remarkably similar, making this recipe adaptable to various dietary needs.
Everything’s prepped? Good. Let’s get into the real action…
The Method — Step by Step
- Preheat your oven to 350°F (175°C) and line a baking sheet with a silicone mat or parchment paper. The temperature is crucial—too hot, and the cookies will brown too quickly; too low, and they won’t set properly. Before the oven heats, gather all your ingredients to keep the process smooth. This prep step saves you from scrambling for items mid‑bake. Once the oven is preheated, set it to a timer for 30 minutes, but remember you’ll need to check the cookies before the timer goes off. This ensures the cookies don’t overbake and stay moist inside.
- In a large bowl, sift together the flour, cocoa powder, instant pudding mix, baking soda, baking powder, and salt. Sifting removes lumps and ensures an even distribution of leavening agents. Mix the dry ingredients until they’re well combined, creating a smooth base. This step is essential for the cookie’s texture, preventing uneven baking. The dry mix should feel like fine sand when you touch it. Set the bowl aside while you move on to the wet ingredients.
- In a separate medium bowl, whisk together the melted butter, pumpkin puree, sugar, brown sugar, eggs, vanilla extract, and a splash of milk. Whisk until the mixture is smooth and glossy, indicating the sugars have dissolved. The wet mixture should have a slightly thick consistency, which helps the cookies maintain their shape. Be careful not to over‑whisk, as that can introduce excess air and alter the texture. This wet blend should feel silky to the touch.
- Pour the wet mixture into the dry mixture and stir gently with a spatula until just combined. Over‑mixing can cause the cookies to become tough, so mix until the flour is just incorporated. The batter will look a little lumpy, but that’s normal. Let the batter rest for a minute; this allows the leavening to activate slightly. The batter should feel thick enough to hold its shape when scooped. This rest period is key to achieving the right crumb.
- Fold in the chocolate chips, ensuring they’re evenly distributed throughout the batter. The chips add a burst of chocolate flavor and a pleasant crunch. Use a spatula to gently fold, keeping the batter from becoming too thin. The chips should be spread evenly across the batter. This step is critical for the final bite experience. The chocolate chips should feel like small, glossy jewels in the dough.
- Drop rounded tablespoon‑sized balls of dough onto the prepared baking sheet, spacing them about 2 inches apart. The spacing allows the cookies to spread without touching, ensuring crisp edges. Keep the dough balls firm; they should hold together when pressed lightly. If the dough feels too sticky, chill it for 15 minutes before scooping. The dough should be manageable and not cling to your hands. This step sets the stage for the cookies’ final shape.
- Bake for 12–14 minutes, or until the edges are set but the centers still look slightly soft. The cookies should have a glossy, dark chocolate surface. Keep an eye on the timer, as oven temperatures can vary. After 12 minutes, use a toothpick to check for a few crumbs; if it comes out clean, the cookies are done. The cookies will continue to bake slightly on the hot sheet, so be careful not to overbake. This step ensures the cookies remain moist and chewy inside.
- Remove the baking sheet from the oven and let the cookies cool for 5 minutes. This short cooling period allows the cookies to set, preventing them from breaking apart when moved. The cookies will still be soft after 5 minutes, so be careful not to over‑handle them. Once the cookies are cool enough to touch, transfer them to a wire rack to finish cooling. The cooling process is essential for achieving the perfect crumb. The cookies should feel firm yet still slightly pliable.
- Store the cooled cookies in an airtight container at room temperature for up to a week. The airtight container keeps the cookies from drying out and maintains their moist interior. If you’re storing them for longer, consider adding a slice of bread to the container; the bread will absorb excess moisture. The cookies will stay fresh and flavorful for several days. This storage method is ideal for holiday parties and last‑minute treats. The cookies will remain delicious and ready to serve at any time.
That's it — you did it. But hold on, I've got a few more tricks that'll take this to another level…
Insider Tricks for Flawless Results
The Temperature Rule Nobody Follows
Many bakers think any oven temperature will do, but the truth is that a precise 350°F (175°C) is essential for even baking. If your oven runs hot, the cookies will brown too quickly, leading to a dry center. Using an oven thermometer can help you maintain that exact temperature. This trick ensures a consistent, golden finish on every batch. The cookies will bake evenly, with a glossy surface and a chewy interior.
Why Your Nose Knows Best
The aroma that fills the kitchen as the cookies bake is a reliable indicator of doneness. A sweet, chocolatey scent that’s slightly caramelized signals that the cookies are ready. If the smell is faint or raw, give them a few more minutes. Your nose can guide you better than a timer. This sensory checkpoint saves you from overbaking or underbaking.
The 5-Minute Rest That Changes Everything
After baking, let the cookies rest on the pan for exactly five minutes before transferring them. This short rest allows the structure to set, making the cookies easier to handle. If you rush them off the sheet, they can break apart or lose their shape. A five‑minute rest also lets the residual heat finish the baking process, ensuring a perfect crumb. This simple step is often overlooked but makes a world of difference.
Keep It Cool, Keep It Fresh
Storing cookies in a room temperature environment can lead to moisture loss. To combat this, wrap the cookies in parchment paper before placing them in an airtight container. The parchment paper absorbs excess moisture, keeping the cookies soft. If you’re storing them for a long time, add a slice of bread to the container; it will absorb any excess moisture and keep the cookies fresh. This trick extends the shelf life without compromising flavor.
Don’t Skimp on the Chocolate Chips
Many recipes call for a modest amount of chocolate chips, but for these pudding cookies, a generous handful is key. The chips add texture and a burst of flavor that complements the chocolate base. If you’re a chocolate lover, feel free to double the amount of chips for an extra indulgent treat. The extra chips also add a satisfying crunch that balances the chewy interior. This tweak turns a great cookie into an unforgettable dessert.
Use a Silicone Mat, Not Just Paper
While parchment paper is fine, a silicone baking mat offers superior heat distribution and prevents sticking. The mat’s non‑stick surface means you can easily lift the cookies without them breaking. It also makes cleanup a breeze, as the mat can be reused indefinitely. This small investment pays off in both texture and convenience. The cookies will come out with a perfect, uniform shape.
Creative Twists and Variations
This recipe is a playground. Here are some of my favorite ways to switch things up:
Caramel Swirl Edition
Swirl caramel sauce into the batter before baking. The caramel adds a buttery sweetness that complements the pumpkin and chocolate. Use a spoon to create a marbled effect, giving each cookie a unique look. This variation is perfect for guests who love a sweet, buttery twist. The caramel will set into a glossy swirl after baking.
Nutty Crunch Variation
Replace half of the chocolate chips with chopped pecans or walnuts. The nuts add a delightful crunch and a nutty aroma that pairs well with the spices. Toast the nuts lightly before adding them for an extra depth of flavor. This version is great for those who enjoy a mix of textures. The nuts also provide a subtle earthy note.
Dark Chocolate Delight
Swap semi‑sweet chips for dark chocolate chips or chunks. Dark chocolate offers a richer, slightly bitter flavor that balances the sweetness. Use a 70% cacao content for the best taste. This variation is ideal for chocolate connoisseurs who prefer a more intense flavor. The dark chocolate will melt beautifully in the cookie.
Spice‑Up Your Life
Increase the cinnamon and nutmeg by 50% for a spicier cookie. The extra warmth will make the cookies feel like a cozy autumn treat. Add a pinch of cayenne pepper for a subtle kick that surprises the palate. This variation is perfect for adventurous bakers who love a bit of heat. The spices will mingle with the pumpkin for a complex flavor.
Gluten‑Free Option
Replace all-purpose flour with a gluten‑free blend that contains xanthan gum. This substitution keeps the cookies chewy and moist while being safe for gluten‑sensitive diners. Ensure the blend has a neutral flavor to avoid any off‑notes. This version is great for accommodating dietary restrictions. The cookies will still hold their shape and texture.
Vegan Version
Use a plant‑based milk and vegan butter, and replace the eggs with flaxseed meal mixed with water. The flaxseed acts as a binder, holding the cookies together. This version maintains the same flavor profile while being completely dairy‑free and egg‑free. Vegan bakers will love the flexibility of this recipe. The texture will remain tender and chewy.
Storing and Bringing It Back to Life
Fridge Storage
Store the cooled cookies in an airtight container in the refrigerator for up to 10 days. The fridge keeps the cookies from drying out while preserving their flavor. Wrap the container in parchment paper to absorb any excess moisture. When you’re ready to eat, let the cookies sit at room temperature for 10 minutes to soften. This method is ideal for those who want a quick, fresh treat.
Freezer Friendly
For longer storage, place the cookies in a freezer‑safe bag, removing as much air as possible. Freeze for up to 3 months. When you’re ready to enjoy, thaw at room temperature for 30 minutes. The cookies will retain their moisture and flavor. This option is perfect for bulk baking before a holiday.
Best Reheating Method
To revive the cookies, preheat the oven to 300°F (150°C). Place the cookies on a parchment‑lined sheet and bake for 5 minutes. The low temperature gently warms the cookies without overbaking them. If you prefer a crispier edge, add a minute or two. After reheating, let them cool slightly before serving. The result is a cookie that tastes like it was freshly baked.
And a quick quality‑saving trick: add a tiny splash of water before reheating, it steams back to perfection. This small addition keeps the cookies from drying out and preserves their soft, chewy interior. The water evaporates, leaving a moist crumb that’s almost indistinguishable from a freshly baked batch. This trick is a game‑changer for anyone who wants to enjoy these cookies days after they were first baked.