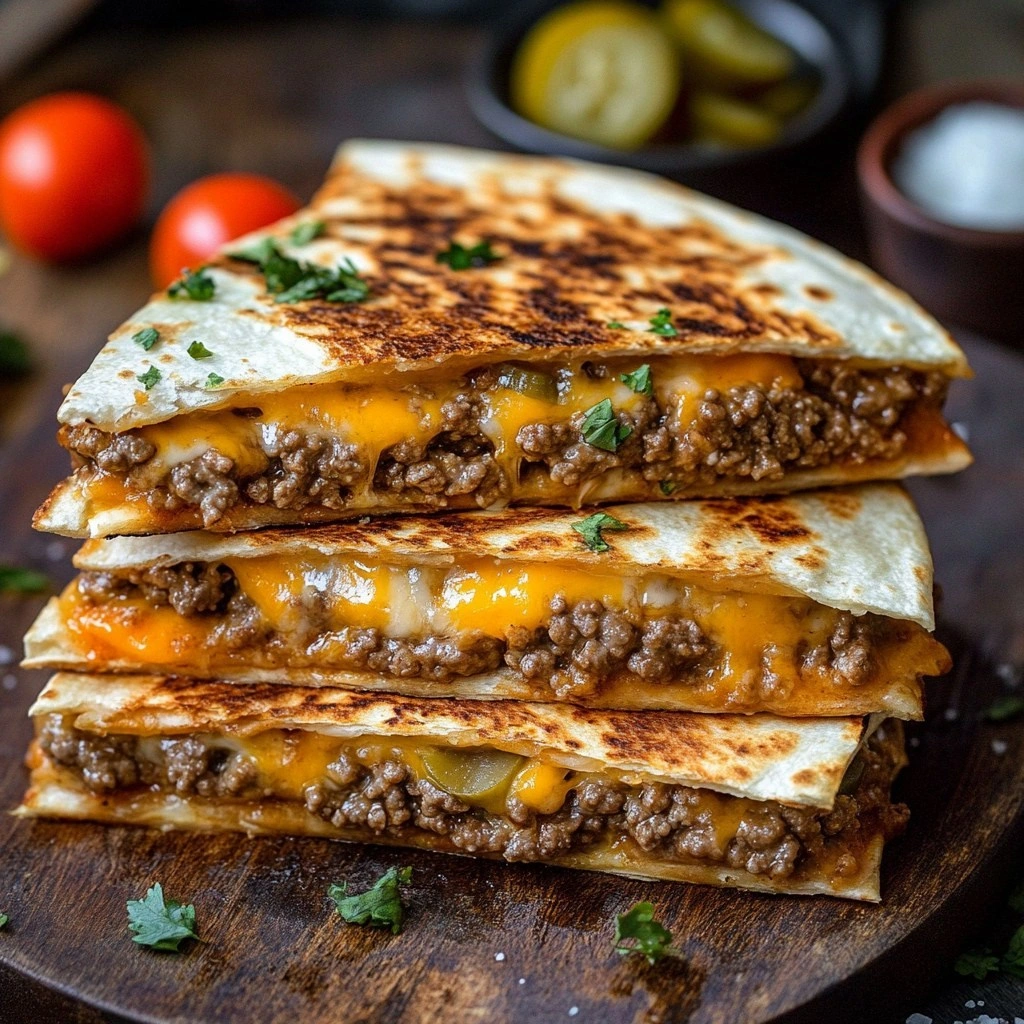
I remember the night my roommate tried to make a “quick” burger and the kitchen turned into a battlefield of sizzling beef and burnt onions. The smell of charred meat clung to the ceiling fan, and I could barely breathe. I walked over, spatula in hand, and declared, “You’re going to taste the best quesadilla you’ve ever had, and I’ll prove it.” That promise turned into a culinary revelation that would become my go‑to crowd‑pleaser: Smashburger Quesadillas.
Picture the scene: a skillet on high heat, the beef searing with a crackle that sounds like applause. The aroma is a mix of garlic, onion, and a whisper of cumin, mingling with the buttery scent of melted cheese. When the first golden tortilla lands, the sizzle is audible, the heat radiates like a warm hug. The texture is a play of crisp edges and a molten center that stretches like silk when you bite. The taste is a burst of savory meat, tangy salsa, and creamy cheddar, all wrapped in a tortilla that’s both sturdy and tender. The sound of the first bite is that satisfying crunch that tells you you’re in the right place.
What makes this version stand out isn’t just the combination of flavors—it’s the execution. I use a high‑heat skillet to smash the beef into a thin, evenly cooked layer, ensuring every bite is packed with flavor. The cheese blend of cheddar and Monterey Jack melts into a silky, gooey layer that holds the tortilla together without making it soggy. The salsa is fresh, not jarred, giving a bright, citrusy kick that cuts through the richness. I also incorporate a subtle hint of lime and cilantro for freshness. And the final touch? A quick butter‑toasted tortilla that adds a buttery crunch you won’t forget.
I dare you to taste this and not go back for seconds. This is hands down the best version you’ll ever make at home. I’ll be honest—when I first tried it, I ate half the batch before anyone else got to try it. Most recipes get this completely wrong. Here’s what actually works: a quick smash, the right cheese blend, and the right balance of heat and acidity. Picture yourself pulling this out of the oven, the whole kitchen smelling incredible, and the guests’ eyes widening at the first bite.
The next step? Let me walk you through every single step—by the end, you’ll wonder how you ever made it any other way. The recipe is simple, but the techniques are precise. Each element plays a role in creating that signature texture and flavor. And trust me, you’ll want to keep this in your kitchen drawer for those busy nights when you need something that feels like a feast but is ready in minutes.
What Makes This Version Stand Out
- Flavor: The combination of seasoned beef, fresh salsa, and a cheese blend creates a layered taste that evolves with every bite.
- Texture: The high‑heat smash creates a thin, evenly cooked meat layer that melts into the tortilla, while the butter‑toasted edges provide a satisfying crunch.
- Ease: All the steps fit into a 45‑minute window, making it a perfect weeknight dinner or a quick appetizer.
- Visual Appeal: The golden, slightly charred edges of the tortilla and the molten cheese inside make every plate Instagram‑ready.
- Crowd Reaction: Friends who have tried other quesadillas rave that this one is the most memorable and share it with their own families.
- Ingredient Quality: Using fresh, high‑quality beef and fresh salsa makes the difference between good and unforgettable.
- Make‑Ahead Potential: The quesadillas hold up well when reheated, so you can prepare them in advance for parties.
- Versatility: Swap in different cheeses, add veggies, or adjust the heat level to suit your taste.
Alright, let's break down exactly what goes into this masterpiece…
Inside the Ingredient List
The Flavor Base
Ground beef is the star of the show. Use 1 pound of 80/20 beef for the best balance of fat and flavor. The fat renders into the skillet, creating a rich, savory base. If you skip the beef, the quesadilla will feel flat and lack depth. For a leaner option, swap the beef for ground turkey but keep the same seasoning.
The Texture Crew
Tortillas are the vehicle that holds everything together. I use 6 medium flour tortillas for even distribution. A thicker tortilla gives a sturdier bite, while a thinner one offers a lighter feel. If you prefer gluten‑free, use corn tortillas but be careful—they’re more fragile. Butter adds a golden crust and a buttery crunch that elevates the overall texture.
The Unexpected Star
Salsa is more than a topping; it’s a flavor enhancer that cuts through the richness. I choose a fresh, chunky salsa with a hint of lime. The acidity brightens the dish and adds a refreshing bite. If you can’t find fresh salsa, a high‑quality store‑bought variety works, but look for low sodium and no added sugars.
The Final Flourish
Cheese is the glue that holds the quesadilla together. I blend cheddar for sharpness and Monterey Jack for meltiness. Together, they create a gooey, stretchy interior that pulls apart when you bite. If you’re vegan, substitute with a plant‑based cheese that melts well. A pinch of salt and pepper brings everything together, but be sure to taste as you go.
Everything's prepped? Good. Let's get into the real action…
The Method — Step by Step
- Prep the beef. Heat a large cast‑iron skillet over medium‑high heat until shimmering. Add the ground beef in a single layer, breaking it up with a spatula. Let it sear for 2 minutes before smashing it into a thin, even layer. This technique ensures maximum flavor and a tender texture. Watch the sizzling; it’s the sound of flavor building.
- Season the meat. Sprinkle 1 teaspoon of taco seasoning, a pinch of salt, and pepper over the beef. Stir quickly to coat evenly. The seasoning infuses the meat with a subtle kick that complements the cheese. Keep the heat high so the seasoning caramelizes slightly, adding depth.
- Cook the meat. Let the beef cook for 3–4 minutes, until it’s browned and the juices have rendered. Flip once, then cook another 2 minutes. The goal is a crisp edge that gives the quesadilla a satisfying bite. If the skillet is too hot, reduce the flame to avoid burning.
- Prepare the tortillas. While the meat cooks, melt 2 tablespoons of butter in a separate pan on medium heat. Place each tortilla in the pan and toast until golden on both sides, about 30 seconds per side. The butter creates a crisp, buttery crust that holds the cheese and salsa.
- Assemble the quesadilla. Lay a toasted tortilla on a plate. Spread a thin layer of salsa, then add a generous amount of shredded cheddar and Monterey Jack. Sprinkle a handful of cooked beef on top. Cover with the second tortilla, pressing gently to seal.
- Cook the assembled quesadilla. Transfer the stack back to the skillet over medium heat. Cook for 3 minutes, pressing down with a spatula, until the bottom tortilla is golden and the cheese begins to melt. Flip carefully and cook the other side for 2–3 minutes. The cheese should be bubbling and the tortilla crisp.
- Rest before cutting. Remove the quesadilla from the skillet and let it rest for 1 minute. This allows the cheese to set slightly, preventing it from spilling out when sliced. A quick rest also lets the flavors meld together.
- Slice and serve. Use a sharp knife to cut the quesadilla into wedges. Serve immediately with extra salsa, a squeeze of lime, and a sprinkle of cilantro if desired. The heat of the freshly cooked quesadilla pairs perfectly with the cool, bright salsa.
- Enjoy. Take a bite, feel the crunch, the molten cheese, and the savory beef all at once. Let the flavors dance on your palate. This is the moment you realize why this recipe is a game‑changer.
That's it — you did it. But hold on, I've got a few more tricks that'll take this to another level…
Insider Tricks for Flawless Results
The Temperature Rule Nobody Follows
Many people cook at a low heat, but the secret to a perfect quesadilla is high heat. The skillet should be hot enough that the beef sizzles when it hits the pan. If the heat is too low, the tortilla will steam and become soggy. If you’re using a non‑stick pan, preheat it for at least 5 minutes before adding butter.
Why Your Nose Knows Best
Before you flip the quesadilla, take a quick sniff. A warm, buttery aroma indicates the cheese is melting and the tortilla is crisping. If the smell feels off, give it another minute. Your nose is a reliable guide to when the quesadilla is ready.
The 5‑Minute Rest That Changes Everything
Letting the quesadilla rest for 1–2 minutes after cooking allows the cheese to set slightly. This prevents it from oozing out when you cut. It also lets the flavors meld, creating a more cohesive bite. Think of it as letting the dish settle before the final reveal.
Use a Cast‑Iron Skillet
A cast‑iron skillet retains heat better than a stainless steel pan. It ensures an even sear on the beef and a consistent crust on the tortillas. If you don’t have cast iron, a heavy‑bottomed pan works as a close substitute.
Keep the Tortillas Warm
Wrap the tortillas in foil after toasting them. This keeps them pliable and prevents them from drying out while you assemble the quesadilla. Warm tortillas are easier to fold without cracking.
Creative Twists and Variations
This recipe is a playground. Here are some of my favorite ways to switch things up:
Mexican Street Taco Quesadilla
Swap the salsa for a smoky chipotle sauce and add diced avocado. Top with fresh cilantro and a squeeze of lime. This version brings the street taco flavor into a handheld form.
BBQ Pulled Pork Quesadilla
Use slow‑cooked pulled pork instead of beef and mix in a spoonful of barbecue sauce. Add shredded coleslaw for crunch and a tangy finish. It’s a smoky, sweet twist that’s perfect for summer gatherings.
Veggie‑Loaded Quesadilla
Replace the beef with sautéed bell peppers, onions, and zucchini. Add a handful of black beans for protein. Finish with a sprinkle of feta cheese for a Mediterranean flair.
Spicy Jalapeño Popper Quesadilla
Incorporate diced jalapeños and cream cheese into the filling. The cream cheese adds richness while the jalapeños give a fiery kick. This version is a crowd‑pleaser for heat lovers.
Breakfast Quesadilla
Replace the beef with scrambled eggs and add cheddar, spinach, and a dash of hot sauce. This makes a hearty breakfast that’s both filling and flavorful.
Cheese‑Only Melt
If you’re a cheese fanatic, double the cheddar and Monterey Jack, and skip the meat entirely. Add a drizzle of honey for a sweet‑savory contrast. It’s a simple yet decadent treat.
Storing and Bringing It Back to Life
Fridge Storage
Store cooked quesadillas in an airtight container in the refrigerator for up to 3 days. Wrap each quesadilla individually in parchment paper to keep them from sticking together. When you’re ready to eat, reheat in a skillet with a splash of water.
Freezer Friendly
Place the quesadillas on a baking sheet and freeze until solid, then transfer to a freezer bag. They can be kept for up to 2 months. To reheat, bake at 350°F for 10 minutes or until warmed through.
Best Reheating Method
The best way to reheat is in a skillet over medium heat, adding a small splash of water to create steam. Cover with a lid for 2 minutes. This technique restores the crispy exterior while keeping the interior moist and gooey.