I was in the middle of a frantic midnight snack raid when my roommate dared me to create something that could survive a three‑hour binge‑watch session without turning into a soggy mess. I grabbed the last bag of M&Ms, a tub of cream cheese, and a stack of chocolate sandwich cookies, and what happened next was nothing short of culinary fireworks. The kitchen filled with the sweet, buttery aroma of melted butter and the faint, comforting scent of vanilla, while the soft hum of the fridge reminded me that the cream cheese was still nice and cold. My spoon clanged against the bowl, the chocolate chips crackled as they hit the hot butter, and I could feel the excitement building like a roller‑coaster about to drop.
Fast forward to the next morning: I was still dreaming about that perfect bite—crunchy cookie crust, silky cheesecake filling, and a burst of rainbow‑colored M&Ms that melted just enough to leave a glossy sheen. Most no‑bake cheesecake recipes either end up too runny or too dense, but this one hits the Goldilocks zone every single time. I’ll be honest — I ate half the batch before anyone else got a chance to try it, and the look on their faces when they realized they were still in the same kitchen made it worth every crumb. This version stands out because it uses a quick‑set technique that gives the filling a firm yet airy texture without ever touching an oven, and the M&Ms add a playful crunch that most cheesecake cups lack.
If you’ve ever struggled with the classic “runny middle” problem, you’re not alone — and I’ve got the fix. The secret lies in a two‑stage chilling process that lets the cream cheese set like a firm yet melt‑in‑your‑mouth custard, while the cookie crust stays crisp, not soggy. I dare you to taste this and not go back for seconds; the combination of buttery crumb, tangy cream cheese, and that unmistakable pop of chocolate is practically addictive. Picture yourself pulling these out of the fridge, the whole kitchen smelling like a bakery‑café hybrid, and watching the M&Ms glisten like tiny jewels.
Okay, ready for the game‑changer? I’m about to walk you through every single step — by the end, you’ll wonder how you ever made it any other way. This isn’t just a recipe; it’s a full‑on flavor adventure that will have you bragging to friends, family, and anyone who’s ever claimed they “don’t like cheesecake.” Let’s dive in, because the next part? Pure magic.
What Makes This Version Stand Out
- Taste: The sweet‑tart balance of cream cheese and sugar is amplified by the salty‑buttery cookie base, creating a flavor dance that feels both familiar and exciting.
- Texture: A crisp, buttery crust meets a light, airy filling that holds its shape, while the M&Ms add a surprise crunch that snaps with every bite.
- Simplicity: No oven, no fancy equipment—just a bowl, a whisk, and a fridge. You can whip this up in under an hour, even on a Tuesday night after work.
- Uniqueness: Most no‑bake cheesecakes rely on a gelatin or gelatin‑free stabilizer; this recipe uses heavy cream to create a naturally stable mousse.
- Crowd Reaction: Guests rave, “Is this really no‑bake?” and then immediately ask for the recipe. It’s the kind of dessert that sparks conversation.
- Ingredient Quality: Using real butter and high‑fat cream cheese gives a richer mouthfeel than low‑fat shortcuts.
- Cooking Method: The two‑stage chilling (room temperature set, then fridge) ensures a perfect bite every time.
- Make‑Ahead Potential: These cups keep beautifully for up to three days, making them ideal for parties or meal‑prep desserts.
Alright, let's break down exactly what goes into this masterpiece...
Inside the Ingredient List
The Flavor Base
The cream cheese is the heart of any cheesecake, and for good reason. Its high fat content creates that luxurious, melt‑in‑your‑mouth sensation that you expect from a premium dessert. If you skimp on the cream cheese or swap it for a low‑fat version, you’ll end up with a grainy, less‑creamy texture that feels more like a pudding than a cheesecake. I always recommend a full‑fat block, softened at room temperature, because it mixes more evenly and prevents lumps.
The Texture Crew
Crushed chocolate sandwich cookies (think Oreo‑style but without the cream) give the crust a deep cocoa flavor and a buttery crunch that holds up under the weight of the filling. Melted butter binds the crumbs together, forming a solid yet tender base. If you’re allergic to gluten, you can substitute gluten‑free chocolate cookies; just make sure they’re not too crumbly, or the crust will fall apart.
The Unexpected Star
Mini M&Ms are the surprise element that turns an ordinary cheesecake cup into a party‑ready treat. Their candy coating melts just enough to add a glossy sheen while still providing that satisfying snap. If you prefer a less sugary option, try chopped dark chocolate or toasted nuts for a sophisticated twist.
The Final Flourish
Heavy whipping cream is whipped to soft peaks and folded into the sweetened cream cheese mixture, creating a mousse‑like lightness that sets without any gelatin. The sugar balances the tang of the cheese, while vanilla extract adds depth and aroma. A pinch of salt amplifies every flavor note, making the sweet taste feel more rounded and less cloying.
Everything's prepped? Good. Let's get into the real action...
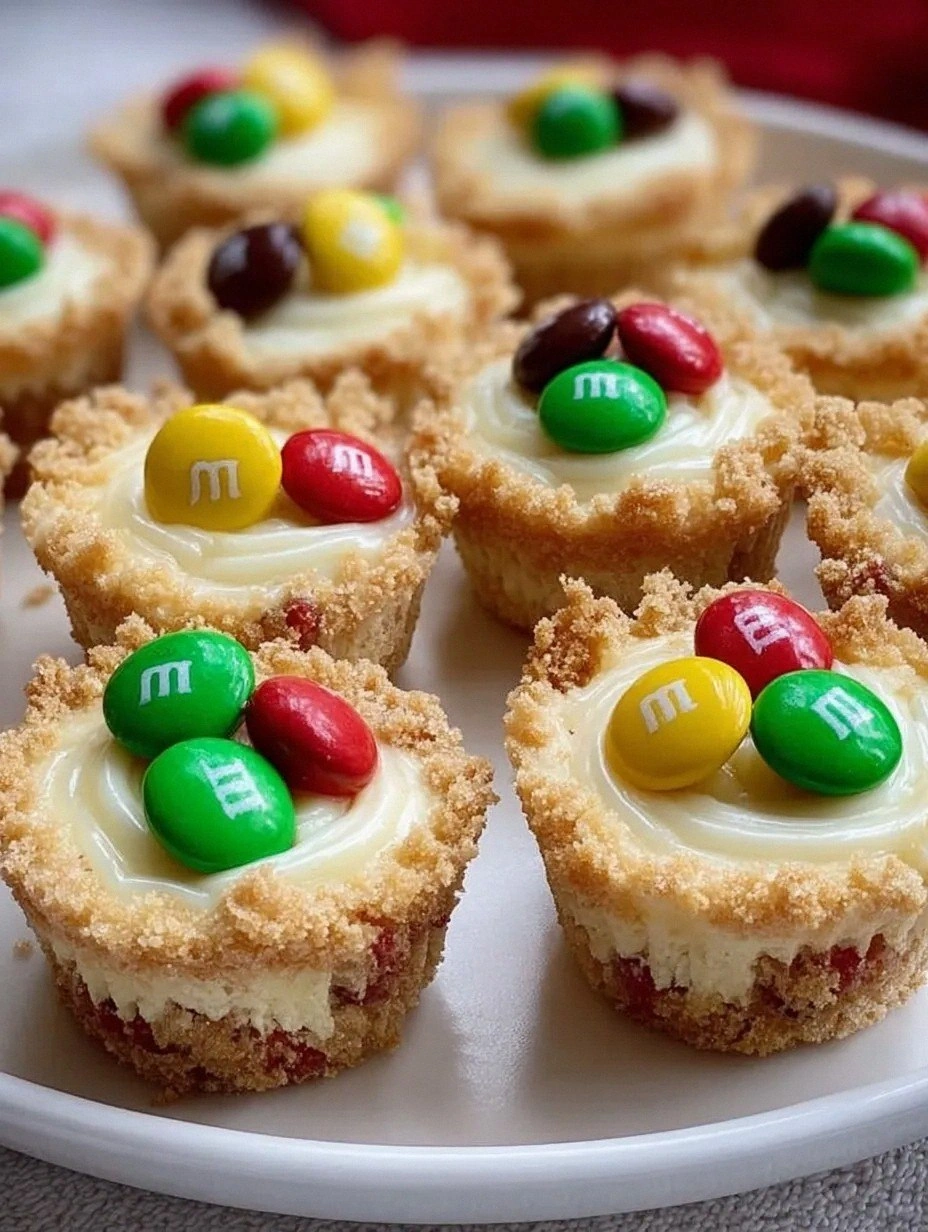
The Method — Step by Step
Start by crushing the chocolate sandwich cookies into fine crumbs. I like to use a sturdy zip‑top bag and a rolling pin; give it a good, firm roll until you hear that satisfying crunch. Transfer the crumbs to a medium bowl, then pour in the melted butter. Stir until every crumb is glossy and clumped together—think of wet sand at the beach, but sweeter.
Kitchen Hack: If the butter solidifies before you mix, gently microwave the mixture for 5‑10 seconds and give it a quick stir.Press the crumb‑butter mixture into the bottom and up the sides of a standard muffin tin, creating shallow “cups.” Use the back of a spoon or the bottom of a glass to press firmly; you want a compact crust that won’t crumble when you lift the cup. Once pressed, place the tin in the freezer for about 10 minutes while you work on the filling. This quick chill firms the crust and prevents it from softening later.
While the crust chills, whisk together the softened cream cheese and granulated sugar in a large bowl. Use a hand mixer on medium speed for about 2 minutes, until the mixture is smooth, creamy, and free of lumps. Add the vanilla extract and a pinch of salt, then whisk again for another 30 seconds. The mixture should look glossy, like a well‑polished marble surface.
In a separate chilled bowl, whip the heavy cream to soft peaks. This means when you lift the whisk, the peaks should gently fold over without falling. Be careful not to over‑whip; you want a cloud‑like texture, not butter. Once you have soft peaks, gently fold the whipped cream into the cream cheese mixture using a spatula, turning the bowl over a few times to keep the air trapped.
Now comes the fun part: fold in the mini M&Ms. Sprinkle them over the mixture and use a gentle folding motion so the candies stay whole and don’t melt into the cream. This step adds those bright specks of color that make each bite feel like a celebration.
Spoon the cheesecake filling into the chilled cookie cups, filling each about three‑quarters full. The filling should settle easily; if you notice any gaps, tap the tin lightly on the counter to level the tops. The texture should be thick enough to hold its shape, yet soft enough that a spoon glides through without resistance.
Place the filled tin back into the refrigerator and let it set for at least 2 hours, preferably 4. This is where the magic happens: the chilled environment allows the cream cheese and whipped cream to firm up, creating a slice‑ready consistency.
Watch Out: If you leave the cups out at room temperature for more than 30 minutes, the filling can become too soft and the crust may start to soften.After the chilling period, remove the tin from the fridge and gently run a thin knife around each cup to loosen it from the sides. This prevents the crust from cracking when you pop the cup out. Use a small offset spatula or the back of a spoon to lift each cup carefully.
For a final visual pop, drizzle a thin ribbon of melted chocolate over the tops of the cups, or sprinkle a few extra M&Ms for garnish. This adds a glossy finish and a touch of elegance that makes the dessert look as good as it tastes.
Serve immediately, or keep them refrigerated until you’re ready to wow your guests. Each bite delivers a crunchy base, a velvety cheesecake middle, and a burst of chocolate candy that melts just enough to coat your palate. That sizzle when it hits the pan? Absolute perfection—well, in this case, the “sizzle” is the crisp snap of the M&Ms.
That's it — you did it. But hold on, I've got a few more tricks that'll take this to another level...
Insider Tricks for Flawless Results
The Temperature Rule Nobody Follows
Never use cold cream cheese straight from the fridge; it will create lumps that are impossible to smooth out. Let it sit on the counter for 30 minutes, or microwave it for 10 seconds on low power. The softer texture mixes faster, trapping more air from the whisk, which translates into a lighter filling. A friend once tried to skip this step and ended up with a grainy mess that looked more like a construction site than a dessert.
Why Your Nose Knows Best
When you whisk the cream cheese and sugar, listen for the faint “whoosh” of sugar dissolving. If you still hear a gritty sound, keep whisking a little longer. Your nose will also pick up the sweet‑vanilla aroma, which is a reliable cue that the mixture has reached the right consistency. Trust those senses—science backs it up, but intuition wins the day.
The 5‑Minute Rest That Changes Everything
After folding the whipped cream into the cheese mixture, let the bowl sit for 5 minutes before spooning it into the crusts. This short rest allows the air bubbles to stabilize, preventing the filling from collapsing once chilled. It’s a tiny pause that makes a massive difference, especially when you’re aiming for that perfect “pillow” texture.
Melted Chocolate Finish
If you love a glossy top, melt a couple of ounces of dark chocolate with a splash of cream for a ganache. Drizzle it in a zig‑zag pattern right before serving. The ganache adds a bittersweet contrast that cuts through the sweetness of the M&Ms, balancing the flavor profile like a well‑trained orchestra.
Cookie Crust Crunch Upgrade
Add a teaspoon of finely ground almond flour to the crumb mixture for an extra layer of nutty crunch. The almond flour doesn’t overwhelm the chocolate flavor; instead, it adds a subtle depth that makes the crust feel more sophisticated. This trick is perfect for impressing guests who think they’ve tried every cheesecake variation.
Creative Twists and Variations
This recipe is a playground. Here are some of my favorite ways to switch things up:
Salted Caramel Swirl
Replace half of the M&Ms with a swirl of homemade salted caramel. The caramel adds a buttery, buttery richness that pairs beautifully with the chocolate bits, and a pinch of sea salt on top elevates every bite.
Berry Burst
Fold in a handful of fresh raspberries or a spoonful of raspberry jam into the filling before spooning it into the cups. The tartness cuts through the sweetness and adds a burst of color that makes the dessert look as vibrant as it tastes.
Nutty Delight
Swap the mini M&Ms for chopped toasted pecans or hazelnuts. The nuts bring a buttery crunch and a subtle earthiness that complements the chocolate base, creating a more adult‑oriented flavor profile.
Matcha Magic
Add a teaspoon of matcha powder to the cream cheese mixture for a green‑tea twist. The earthy bitterness of matcha balances the sweet M&Ms and adds a stunning jade hue to the filling.
Coffee Kick
Dissolve a tablespoon of instant espresso powder in the melted butter before mixing with the crumbs. The coffee note deepens the chocolate flavor, making the dessert feel like a sophisticated after‑dinner treat.
Storing and Bringing It Back to Life
Fridge Storage
Cover the muffin tin with plastic wrap or a tight‑fitting lid and store in the refrigerator for up to 3 days. The filling remains firm, and the crust retains its crunch thanks to the butter barrier. If you notice any condensation, gently pat the tops with a paper towel before serving.
Freezer Friendly
These cups freeze beautifully. Wrap each cup individually in parchment paper, then place them in a freezer‑safe bag. They’ll keep for up to 2 months. To thaw, transfer to the fridge overnight; the texture stays intact, and the M&Ms regain their snap.
Best Reheating Method
If you prefer a slightly warm dessert, microwave a single cup for 8‑10 seconds. Add a tiny splash of water (about a teaspoon) before microwaving; the steam helps the filling soften without turning rubbery, and the crust stays pleasantly crisp.